If a Cast Shadow is always hard (albeit with blurry edges sometimes) a Form Shadow is soft.
The Ultimate Guide To IP Rating
The International Electrotechnical Commission (IEC) 60529 is an international standard that defines IP (Ingress Protection) which is the level of protection provided against the ingress of solid objects, dust, and moisture. The IP rating system uses two digits to indicate the level of protection offered.
The first digit indicates the level of protection against solid objects, such as tools, fingers, or dust. The scale ranges from 0 (no protection) to 6 (complete protection against dust).
The second digit indicates the level of protection against moisture, including water splashes, drips, and submersion. The scale ranges from 0 (no protection) to 8 (continuous submersion under defined conditions).
For example, an IP65 rating indicates that the device is completely protected against dust and is protected against low-pressure water jets from any direction. An IP68 rating indicates that the device is completely protected against dust and is designed for long periods of immersion under water.
IP ratings are an important factor to consider when choosing lights that will be used in harsh or outdoor environments. The higher the IP rating, the better the device is protected against the ingress of solid objects, dust, and moisture.
Why have an IP rating system?
The IP (Ingress Protection) rating system provides a standardized method for evaluating the level of protection provided by electrical enclosures against the ingress of solid objects and liquids. This system is important for several reasons:
- Safety: The IP rating system helps to ensure the safety of electrical equipment by evaluating the level of protection against potential hazards, such as electric shock, fire, and corrosion.
- Durability: By evaluating the level of protection against moisture and dust, the IP rating system helps to ensure the long-term durability of electrical equipment and its ability to perform effectively in different environments.
- Comparison and Selection: The IP rating system provides a standardized and objective method for evaluating the protection provided by different electrical enclosures, making it easier to compare and select products for different applications.
- Compliance: The IP rating system is an internationally recognized standard, and many countries have adopted the IP rating system as a requirement for the certification and approval of electrical equipment.
How does IP rating work?
The IP (Ingress Protection) rating system works by assigning a numerical value to indicate the level of protection provided against the ingress of solid objects, dust, and moisture. The IP rating is a two-digit code, with the first digit representing the protection against solid objects, and the second digit representing the protection against moisture.
To determine the IP rating, the device undergoes a series of tests in a controlled environment. These tests assess the device’s ability to prevent the ingress of solid objects, dust, and moisture under specified conditions. The test results are then used to determine the device’s IP rating.
For example, to test the device’s protection against solid objects, it is subjected to various levels of mechanical impact, such as a pointed object or a blunt object. To test the device’s protection against dust, it is subjected to a dust chamber, where it is sealed and filled with fine dust particles. To test the device’s protection against moisture, it is subjected to a spray or immersion test, where it is exposed to water from various angles and at different levels of pressure.
Based on the results of these tests, the device is assigned an IP rating, with the first digit indicating the level of protection against solid objects and the second digit indicating the level of protection against moisture. The higher the IP rating, the better the device is protected against the ingress of solid objects, dust, and moisture.
It’s important to note that the IP rating is a standard and not a guarantee. The actual level of protection may vary depending on the specific conditions and environment in which the device is used. However, the IP rating provides a useful way to compare the relative protection levels of different devices.
IP Rating Table
| IP | First digit: Ingress of solid objects |
Second digit: Ingress of liquids |
|---|---|---|
| 0 | No protection | No protection |
| 1 | Protected against solid objects over 50mm e.g. hands, large tools. | Protected against vertically falling drops of water or condensation. |
| 2 | Protected against solid objects over 12.5mm e.g. hands, large tools. | Protected against falling drops of water, if the case is disposed up to 15 degrees from vertical. |
| 3 | Protected against solid objects over 2.5mm e.g. wire, small tools. | Protected against sprays of water from any direction, even if the case is disposed up to 60 degrees from vertical. |
| 4 | Protected against solid objects over 1.0mm e.g. wires. | Protected against splash water from any direction. |
| 5 | Limited protection against dust ingress. (no harmful deposit) |
Protected against low pressure water jets from any direction. |
| 6 | Totally protected against dust ingress. | Protected against high pressure water jets from any direction. |
| 7 | N/A | Protected against short periods of immersion in water(up to 1m of submersion). |
| 8 | N/A | Protected against long, durable periods of immersion in water. |
| 9K* | N/A | Protected against close-range high pressure, high temperature spray downs. |
*IP rating 9K is not a recognized classification in the International Electrotechnical Commission (IEC) 60529 standard for ingress protection (IP) ratings. The scale ranges from 0 (no protection) to 6 or 8 (maximum protection), depending on the type of protection being evaluated. It is possible that some manufacturers may use the IP 9K rating as a marketing term to indicate a high level of protection, but it is not an officially recognized standard. If you are evaluating the protection and durability of electrical equipment, it is important to refer to the official IP rating code defined in the IEC 60529 standard to ensure accurate and consistent comparisons.
Why is IP rating important for lights?
IP rating, or Ingress Protection rating, is a measure of a light’s protection against solid objects (such as dust) and moisture. This is important for lights as it determines the suitability of the light for use in different environments, including indoor, outdoor, and damp or wet locations. A higher IP rating indicates better protection and a longer lifespan for the light.
What is the best IP rating for outdoor lights?
For outdoor lights, it’s recommended to use lights with an IP rating of at least IP65. This rating means that the light is protected against dust and low-pressure water jets from any direction, making it suitable for outdoor use in most climates and conditions. Higher IP ratings, such as IP66, IP67 or IP68, provide even better protection against water and dust, and can be used in more demanding outdoor environments.
Is IP rating related to resistance from corrosion?
IP rating does not directly measure resistance to corrosion, but it can be an indirect indicator of the light’s overall durability and protection against the elements. For example, a light with a high IP rating, such as IP67 or IP68, provides good protection against moisture and dust, which can reduce the risk of corrosion. However, the actual resistance to corrosion will also depend on the materials and construction of the light, as well as the specific environment in which it’s used.
How does IP rating relate to a light’s material and its durability?
The IP rating of a light is primarily determined by the design of its enclosure and the materials used in its construction. A light with a higher IP rating typically has a more robust and sealed enclosure, made from materials that are resistant to moisture and dust. For example, a light with an IP65 rating might have a sealed plastic or metal housing, while a light with an IP67 or IP68 rating might have a waterproof seal and a metal housing that’s resistant to corrosion. The choice of materials and the level of sealing can also impact the durability and lifespan of the light. In general, lights with higher IP ratings are more durable and better suited for use in harsh or demanding environments, where they are exposed to moisture, dust, and other elements.
What is the best IP rating for lights in bathrooms?
For lights in bathrooms, it’s recommended to use lights with an IP rating of at least IP44. This rating means that the light is protected against splashing water from any direction, making it suitable for use in damp or wet environments, such as bathrooms. For areas directly exposed to water, such as showers, it’s recommended to use lights with a higher IP rating, such as IP65 or higher, to provide better protection against moisture. The exact IP rating required will depend on the specific bathroom environment and the level of protection needed.
What IP rating is needed for different bathroom lighting zones in Australia?
In Australia, the lighting zones in a bathroom determine the required IP rating for lights used in that area. The Australian Standards specify the following zones:
- Zone 0: Inside a bath or shower cubicle. Lights in this zone must have an IP rating of at least IP67.
- Zone 1: The area above the bath or shower to a height of 2.25 meters from the floor. Lights in this zone must have an IP rating of at least IP44.
- Zone 2: The area extending 0.6 meters outside the perimeter of the bath or shower and up to a height of 2.25 meters from the floor. Lights in this zone must have an IP rating of at least IP44.
- Zone 3: The rest of the bathroom. Lights in this zone must have an IP rating of at least IP20.
It’s important to choose lights with the appropriate IP rating for the specific lighting zone to ensure safety and compliance with local regulations.
What IP rating is needed for kitchen lights in Australia?
In Australia, there is no specific IP rating requirement for kitchen lights. However, it’s recommended to use lights with an IP rating of at least IP20 in kitchens. This rating provides basic protection against solid objects larger than 50mm, such as fingers, but does not provide any protection against moisture.
For areas in the kitchen that may be exposed to moisture, such as near the sink or stove, it’s recommended to use lights with a higher IP rating, such as IP44 or higher. This will provide increased protection against splashing water and ensure that the lights have a longer lifespan in damp or wet environments.
It’s important to choose lights with the appropriate IP rating for the specific kitchen environment to ensure safety and durability.
What is the actual wording of the international IP rating?
The International Electrotechnical Commission (IEC) 60529 standard defines the following levels of protection:
First digit of the IP rating code –
0: No protection
1: Protection against solid objects larger than 50mm, such as a hand
2: Protection against solid objects larger than 12mm, such as fingers
3: Protection against solid objects larger than 2.5mm, such as tools and wires
4: Protection against solid objects larger than 1mm, such as small wires
5: Dust protected, limited ingress of dust is allowed, but it must not interfere with the normal operation of the equipment
6: Dust tight, no ingress of dust is allowed
Second digit of the IP rating code –
0: No protection
1: Protection against vertically dripping water
2: Protection against dripping water when tilted up to 15°
3: Protection against spraying water
4: Protection against splashing water
5: Protection against water jets
6: Protection against heavy seas or powerful water jets
7: Protection against the effects of immersion between 15cm and 1m
8: Protection against long periods of immersion under pressure
Does IP rating measure weatherproofing?
The IP (Ingress Protection) rating system does measure the level of protection against weather elements to some extent, but it is not specifically designed to evaluate the weatherproofing of electrical equipment. The IP rating system evaluates the level of protection against the ingress of solid objects and liquids, and some of these elements may include weather elements such as rain, snow, or dust.
For example, an IP65 rating indicates a high level of protection against low-pressure water jets from any direction, making it suitable for outdoor use in rainy conditions. An IP68 rating indicates complete protection against dust and continuous immersion in water, making it suitable for use in environments where the equipment will be continuously exposed to water.
However, other factors such as temperature, wind, and UV radiation can also affect the performance and durability of electrical equipment in outdoor environments. Some manufacturers may provide additional information and certifications related to the weatherproofing of their products, but these may not always be captured by the IP rating system.
Light hearted video about IP rating
How does light behave when it hits a form?
If we’re using one single light source.
The problem is most of the time at home, you don’t have one single light source, you have a comfy chair, a cup of tea and 10 minutes to sketch your dog. There’s multiple lights coming from above, window lights and maybe lights from a t.v or reading light.
Just by the nature of the lighting setup we have in our homes, it makes it really difficult to achieve a dramatic drawing successfully.
To make something look three dimensional, you need the light to do the work for you – rather than your pencil.
Now I’m the first one to be drawn to my sketchpad whilst enjoying a brew in my lounge, but note the word ‘sketch’.
Sketching really helps you to keep your eye practiced and your creativity flowing and I do it every day.
But when I want to work up one of my sketches into a more developed drawing, I would have a more conscious approach to the lighting setup, composition and design of the piece.
Creating the illusion of form using multiple light sources is difficult because the effect of the light falling on an object is more confused, softer and introduces new shapes that don’t behave consistently with the object we’re looking at.
So I’ve found the easiest way to learn about light and shadow is by using one hard, single light. It could be the sun, a light through a window or an artificial light.
A hard light clearly demonstrates each distinct area to be aware of, exaggerating the widest tonal range and when you’re a beginner it’s the simplest way to see the difference between the tones.
So for this 3 Part Series, we’ll be looking at single lighting set ups demonstrating the theory of form on a sphere.
Learning simple form principles will enable you to see the fundamental shapes of which all of nature is comprised. The cone, the cube, the cylinder and the sphere.
The principles we’ll look at on the sphere, can be applied to the curve of a cheek, the fullness of a teapot or vase and I’ll be putting them into practice on a drawing of an apple next week.
Light Logic Using a Single Light Source
Light always travels in a straight line.
The shadows that are made by the light are always in a direct response to whatever the light hits, whatever angle the light is coming from and the intensity of the light source.
So if bright, high sunshine hits a tree directly from above, it makes a short shadow shape, that doesn’t necessarily help you as an artist to describe the subject.
Later in the day when the sun is very low, it will make a longer more interesting shadow shape, usually more representative of the essence of the tree and the presence of light.
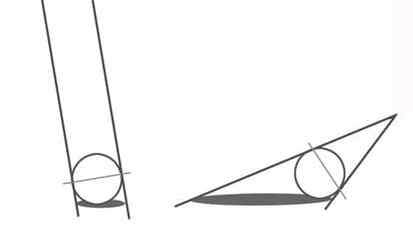
If a single light hits a cube, it will make a square shape – if a single light hits a sphere, an ellipse shape.
This is called ‘light logic’ and the shadow produced is called a Cast Shadow.

Cast Shadow
The characteristics of the cast shadow are dependent on the intensity of the light source. A hard light will produce a cast shadow with a sharp edge, a soft light will produce a cast shadow with a more blurry edge.
The longer the cast shadow is from the object, the softer the edge of the shadow becomes. Notice how the cast shadow is darkest right underneath the sphere and then it gets lighter and lighter as it goes out further away from the light source.
Also a cast shadow behaves predictability when on a flat surface, but when there are other levels or surfaces in the shadows path, the shape can be altered depending on the surface over which it falls.

This is one of the first things to check on your drawings and paintings. Do the shadow shapes logically sit with the subject and the lighting?
It’s all about being aware of where the light is coming from and is it consistent with your picture.
Once you understand the basics of how light behaves, it is quite encouraging to think that a small amount of information can give you the knowledge needed to convincingly portray the illusion of form with any subject.
Tutorial for depicting a post light

Installing an outdoor post lamp is actually simpler than you might think. Although you will need to hire a licensed electrician for hooking up the wiring to the main box and adding a switch, installing the post and running the wire can be done by you. Here are the steps:
Step #1: Dig the posthole and trench
With a posthole digger or round shovel, dig a hole at the location of the post about 12 inches in diameter and 22 inches deep. Fill in the bottom of the posthole with 6 inches of gravel. Next, create a narrow, 18-inch-deep trench using a trenching spade. Add in the soil on top of a plastic tarp.
Step #2: Install the PVC conduit
Dry fit PVC conduit to extend from the house up to the posthole. If needed, cut the pieces with a hacksaw. Connect elbows to lead the conduit away from the house and down into the trench then up at the post. Add a conduit to the elbow in the posthole, making sure it is long enough to project 6 inches above the ground. Connect the conduit pieces together using PVC cement. All the elbows should be oriented correctly. Thread a 12-gauge UF-rated wire through the pipe. There should be extra wiring about 9 feet long at the post location plus a few more at the house to extend through the walls and to the breaker box. Lay the pipe containing the wiring inside the trench then backfill with soil.
Step #3: Fill the posthole with concrete
Mix a batch of concrete in a trough or wheelbarrow. Maintain a firm mix and avoid adding too much water to shorten the set time. Shovel the concrete into the posthole over the gravel. Be careful not to get any into the conduit or on the wires. Fill the posthole to grade or just below it. Leave approximately 6 inches of conduit exposed. Smooth the top of the footing with a concrete float or a piece of scrap wood.
Step #4: Set the post into the concrete footing
Lay the post quickly but carefully next to the hole. Pull the wires through the post from the bottom all the way to the top. While the concrete is still wet, slide the shaft of the post over the conduit and 12 inches into the concrete. Make sure that the wires still protrude from the top of the post. Twist the post while putting downward pressure on it to work it into the concrete.

Step #5: Install the lamppost
Brace the post by wrapping two or three straps or ropes around the post and staking them into the ground a few feet away. Hold a level against the post vertically in different spots around its circumference to check it for plumb.
Step #6: Brace the lamppost perfectly plumb
Adjust the straps that are attached to the lamppost to firmly hold the post in position. Allow the concrete to dry and harden completely about 4 hours before you remove the straps.
Step #7: Make the wire connections
Carefully peel away 3 inches of the gray insulation from the UF cable projecting from the post with a utility knife to expose the three wires inside it – white, black, and a bare copper (or green) ground. These match to like-colored wires on the lantern. With a wire stripper, expose half an inch of bare copper on all the colored wires from the post and the lantern. Match the wires from the lantern to those from the post – white to white, black to black, and bare copper to bare copper (or green). Twist on wire nuts to secure the pairs together. Slide the lantern onto the post and fasten its set screws to secure it. Get the help of a licensed electrician to connect the wires to the breaker box and install a switch in a convenient location. Test the post lamp by switching it on.