Sketch trace is intended to help with tracing handwriting or hand-drawn images, for instance tracing a recipe to engrave onto a cutting board. Without this setting, the threshold used to determine whether a pixel is filled or empty is consistent across the entire image. With this setting activated, LightBurn will consider its pixels neighbors more heavily to compensate for inconsistencies in both lighting and the darkness of the image you’re tracing. You can see more at this timestamp of our tracing video.
Tutorial | Tracing bitmaps
One of the features in Inkscape is a tool for tracing a bitmap image into one or more elements for your SVG drawing. These short notes should help you become acquainted with how it works.
Keep in mind that the Tracer’s purpose is not to reproduce an exact duplicate of the original image; nor is it intended to produce a final product. No autotracer can do that. What it does is give you a set of curves which you can use as a resource for your drawing.
Our tracer, derived from the original Potrace library by Peter Selinger, interprets a black and white bitmap, and produces a set of curves. For Potrace, we currently have three types of input filters to convert from the raw image to something that Potrace can use.
Generally the more dark pixels in the intermediate bitmap, the more tracing that Potrace will perform. As the amount of tracing increases, more CPU time will be required, and the element will become much larger. It is suggested that the user experiment with lighter intermediate images first, getting gradually darker to get the desired proportion and complexity of the output path.
To use the tracer, load or import an image, select it, and select the Path ⇒ Trace Bitmap item, or Shift + Alt + B .
The user will see the five filter options available:
- Brightness Cutoff
This merely uses the sum of the red, green and blue (or shades of gray) of a pixel as an indicator of whether it should be considered black or white. The threshold can be set from 0.0 (black) to 1.0 (white). The higher the threshold setting, the fewer the number pixels that will be considered to be “white”, and the intermediate image with become darker.
This uses the edge detection algorithm devised by J. Canny as a way of quickly finding isoclines of similar contrast. This will produce an intermediate bitmap that will look less like the original image than does the result of Brightness Threshold, but will likely provide curve information that would otherwise be ignored. The threshold setting here (0.0 – 1.0) adjusts the brightness threshold of whether a pixel adjacent to a contrast edge will be included in the output. This setting can adjust the darkness or thickness of the edge in the output.
- Color Quantization
The result of this filter will produce an intermediate image that is very different from the other two, but is very useful indeed. Instead of showing isoclines of brightness or contrast, this will find edges where colors change, even at equal brightness and contrast. The setting here, Number of Colors, decides how many output colors there would be if the intermediate bitmap were in color. It then decides black/white on whether the color has an even or odd index.
The user should try all three filters, and observe the different types of output for different types of input images. There will always be an image where one works better than the others.
After tracing, it is also suggested that the user try Path ⇒ Simplify ( Ctrl + L ) on the output path to reduce the number of nodes. This can make the output of Potrace much easier to edit. For example, here is a typical tracing of the Old Man Playing Guitar:
Note the enormous number of nodes in the path. After hitting Ctrl + L , this is a typical result:
The representation is a bit more approximate and rough, but the drawing is much simpler and easier to edit. Keep in mind that what you want is not an exact rendering of the image, but a set of curves that you can use in your drawing.
The Autotrace option uses a different algorithm for tracing and also offers some other parameters to tweak. It may take a little longer to work, but gives you some variety to choose from.
- Centerline tracing (autotrace)
If you would like to vectorize a line drawing, and get strokes that are easy to modify instead of filled areas as a result, use this option. It will attempt to find contiguous lines that make up your drawing.
Authors: Bulia Byak; Jonathan Leighton; Colin Marquardt; Nicolas Dufour; Gellért Gyuris; Maren Hachmann
Header / footer design: Esteban Capella — 2019
Tracing Images
LightBurn has a feature that will trace the outline of a bitmap image and convert it to a vector graphic. This works best for content that has very clear edges, like a silhouette or a cartoon. It does not work very well for photographs, though with some cleanup those may be usable as well.
We have an excellent tutorial video for this feature on our YouTube channel here: Image Tracing Tutorial
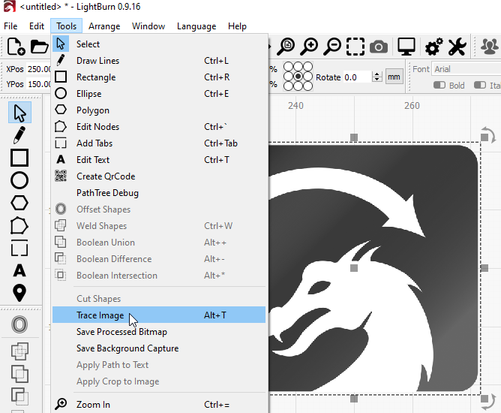
To start, import an image object into LightBurn, select it, then choose Tools -> Trace Image from the menu (or press Alt-T). You can also select an image, then right-click and choose Trace Image from the pop-up menu.
You’ll be presented with the Trace Image dialog, with your image showing in the window, like this:
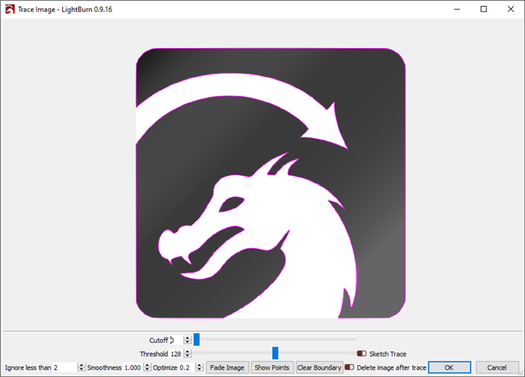
In the image above, the purple lines are the vectors that LightBurn has produced from the image being traced. If you want to be able to see them more clearly, click the “Fade Image” button, and the image will dim. You can also zoom and pan using the same controls as the preview window (mouse wheel to zoom, and click-drag the view with either left or middle mouse).
Controls
The preview window can be panned and zoomed just like the edit window, using the middle mouse button to pan and the mouse wheel to zoom. Double-clicking the middle mouse button resets the view.
The Cutoff slider controls the lower end of the range of values that LightBurn will outline with vectors, and the Threshold slider sets the upper end. The default is 0 to 128, which traces around all values in the range of 0 to 128 brightness, excluding lighter values in the range of 129 to 255 brightness.
By adjusting these two controls, it is possible to trace around a narrow range of the image.
Selection range
By clicking and dragging within the trace window you can specify a portion of the image you would like to trace. Once the area is defined, you can grab and drag a corner of it to adjust, or just single-click to reset it.

Ignore less than
This setting tells the vectorizer to ignore anything smaller than this many pixels in area. If you are trying to vectorize a noisy image, increasing this may help.
Smoothness
Bitmap images are made of pixels, and pixels are rectangles. Image tracing tries to infer shapes from these arrangements of rectangles, and has to smooth out the results or everything would just look like stairs. Part of the process is trying to recover smooth shapes from jagged lines, and this number controls how aggressive the smoothing is. A value of 1.333 is the maximum, and will make almost everything into curves. A value of 0.0 will produce all straight lines. The difference is shown below:
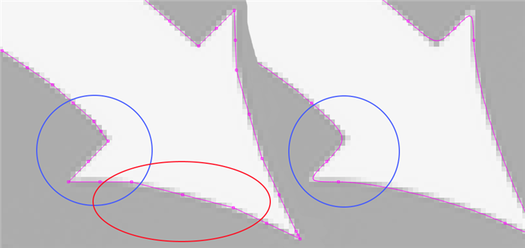
Notice in the left image, with a Smoothness of zero, the area highlighted in red is made of several line segments, whereas the same area in the right image is a continuous curve. The area shown in blue is also sharp in the left image, but with the Smoothness value set to maximum, the image at right shows how even sharp corners become smoothed, and this is rarely desired. The default value of 1.0 is a good mix between producing smooth curves while still maintaining sharp corners.
Optimize
After generating lines and curves, the image trace feature will attempt to merge similar lines and curves together to reduce the node count of the result. The Optimize parameter controls how aggressive this is. 0 means no merging. The default of 0.2 is a nice balance between accuracy of the result and node count.
Fade Image
Dims the image to make it easier to see the resulting vector shapes
Show Points
Enables the display of the points (nodes) of the resulting vector trace. Enabling this is useful when you are tuning the Optimize parameter to see the resulting points.
Vector Image Tracing Services At Tech2Globe
Converting Raster To Vector
Experts at Tech2Globe can help you with the best Vector conversion service. We re-image the bitmap graphics into vector images, which you can stretch to any size without losing quality.
Editing Vector Graphics
Our graphics editors interactively edit and create vector graphics images, including clipping paths, photo manipulation, and more, before sharing them in PDF, EPS, WMF, VML, and SVG formats.
Path Of Clipping
A closed vector path known as the clipping path which is used to cut 2D pictures, is also implemented by our expert team. After applying the clipping path, we include the component inside the path while omitting the items outside the path.
Services For Image Masking
Tech2Globe’s expert image editors include non-destructive picture masking, which allows us to conceal some sections of an image while highlighting others. Edges, motion, and noise are detected, and you can adjust the masks at any time.
Services For Color Correction
Our picture editing specialists help our clients achieve success by modifying color tones, enhancing needed areas, removing red-eye effects, and more based on business needs.
What Is The Need For Image Tracing?
You anticipate professional-touch cropping around the edges which highlights all around when uploading items and product photographs to your website. Regardless of the picture or items in the shot, the cropping must be precise, and the image must appeal to the viewers.
Hand cropping may be challenging at times, and there’s a risk that essential details will be lost. As a result, picture tracing is always the ideal option for such tasks. To provide high-quality Vector tracing services, Tech2Globe employs some of the most cutting-edge tools and technology. After that, the traced photos are put on the appropriate background of your choice. We do the needed picture tracing using the most up-to-date licensed software, resulting in flawless photos that you may use on your marketing or advertising strategies.
Why Choose Us?
Nobody can deny the importance of a correctly cropped image when it comes to product promotion. Photographs that are appealing are proven to attract both new and existing clients more effectively than images of ordinary quality. As a result, you’ll need a competent picture tracing service provider who can meet your needs and create a stunning set of photographs that you can use in marketing campaigns and online product presentations.
Below are the most compelling reasons to choose Tech2Globe to provide Photo tracing services:
- To provide high-quality services, our picture editors employ the most up-to-date tools and modern photo editing procedures.
- We use ISO-compliant procedures and conduct frequent audits to ensure that our services are consistent.
- We provide the most competitive rates in the market.
- We are capable of offering cutting-edge services since we have a team of skilled and experienced individuals.
- We use the most current database technology to assure data integrity and total protection of your personal information.
- When Jewelry Image Tracing services are outsourced to us, we give considerable cost savings and time-saving benefits.
At Tech2Globe, we provide our clients with the best Vector tracing services available, all of which are designed to produce the best results at the most affordable pricing. Our experts meticulously produce any photograph that requires image tracing to the minute details using the most up-to-date equipment.Our image tracing experts ensure that no critical elements in the image are lost during the tracing process.