You should also make sure the little chain link icon is selected like in the example – this constrains the proportions of the image, so you don’t end up stretching it too much in one direction; i.e. when you change the width, the height will change accordingly and vice versa.
Easy Ways to Enlarge an Image to Print Online
There will always be occurrences when you need to make your photo larger than its original size. In that way, you can clearly experience every part of your photo. However, your photo will be blurry and pixelated. Luckily, there are many online websites available that can give you a helping hand on how to enlarge a picture for printing. PicWish will easily upscale your photos alongside the other web service tools listed below.

December 29, 2022 by Nora Jones
Top 5 Online Tools to Enlarge an Image to Print
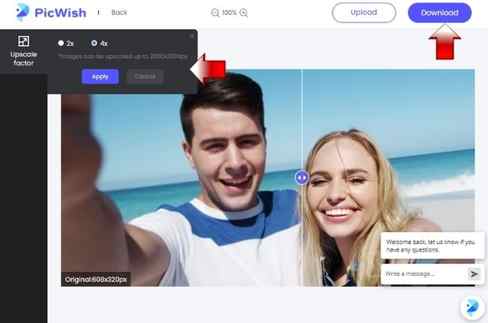
PicWish is a totally 100% free image upscale that you may experience online. This tool can enlarge your photos up to 4 times, without affecting their original quality. With its AI image upscaler it will automatically calculate and adjust the lines, colors, and tones for the enlargement process saving the overall looks of your work. What is more amazing in this online tool is that there is no image size limit, no need to download anything or sign up for an account. Indeed, PicWish will let you experience a hassle-free experience.
How to enlarge a picture for printing without losing quality
- Visit the official page of the PicWish image enlarger on your browser.
- Click the “Upload Image” button to get the image from your computer gallery.

- Then, set the “Upscale factor” option and hit the “Apply” button.
- Finally, click “Download” to save your file.
Note:
If you want to restore old photos or enhance image quality and color, PicWish is also available for you.
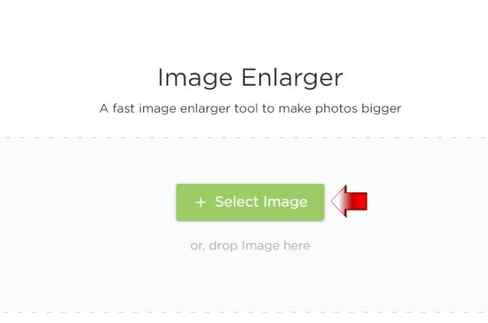
Image Enlarger
A fast photo enlarger tool that you may also experience online to make your photos bigger is Image Enlarger. From its name implies, this online tool is specifically made to make your photos twice bigger than their original size. You will easily learn how to enlarge a picture for printing windows to exact pixel size.
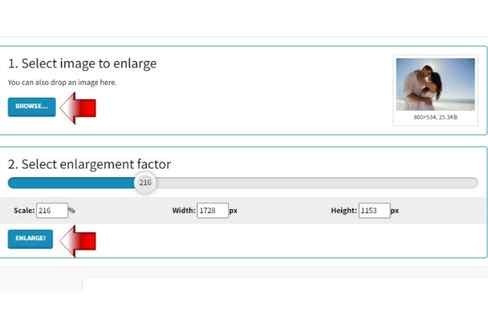
Upscale your image with the help of Image Enlarger
- Open your browser, click the “Select Image” button to upload the photo that you need to enlarge.
- Set the dimension and percentage and hit the “Enlarge Image” button.
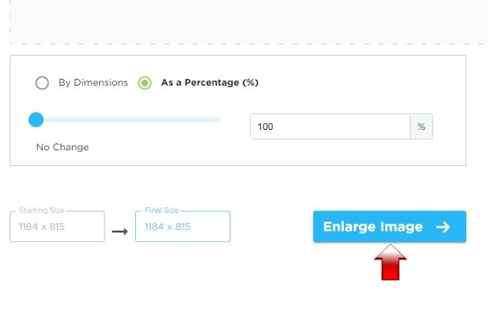
- The tool will process your file giving you the result afterwards.
- Just hit the “Download” button.
Method #1. Enlarging a Picture for Printing in Photoshop
Photoshop is a go-to program for many photographers and designers. In addition to its editing features, it also contains tools for enlarging pictures. Thus, you can start working in Ps, resize your images, and then switch to photo printing software.
STEP 1. Decide on the Print Size
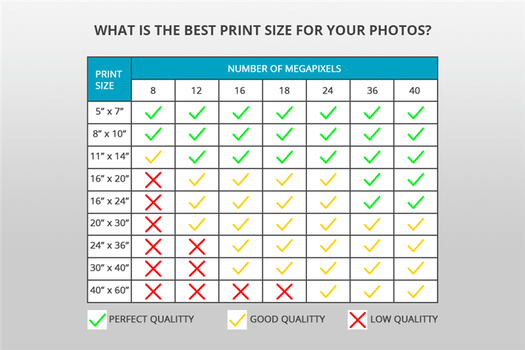
Before getting down to resizing, you need to choose a proper image format for printing and standard photo sizes for printing. An important thing to keep in mind at this point is the number of dots per inch (DPI). Simply put, the more dots, the clearer the photo. If there are very few dots printed in every inch of an image, you will receive a grainy, low-quality result.
For the clearest photo prints, I recommend sticking to 300 DPI. A good rule of thumb is to learn the max photo size at full quality and double the value when blowing up a picture. If you choose 150 DPI and lower, the quality of your image will be terrible. To avoid mistakes, use the tablet above for reference.
STEP 2. Open the Photo
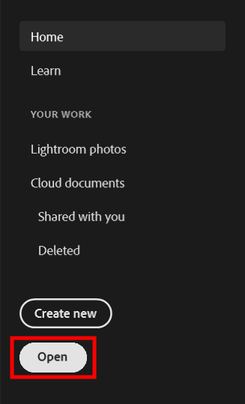
Launch Photoshop, go to the Home Screen and click the Open button to open your file. You will see the File Explorer if you use a Windows computer or the Finder if you own Mac (this is my case). Navigate to the folder with images and double-click on the needed file.
STEP 3. Bring Up the Image Size Window
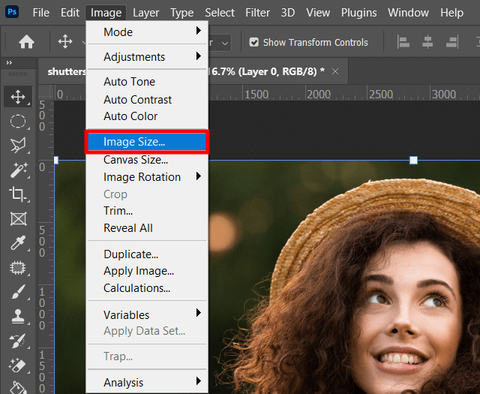
To change PPI in Photoshop, start the Image Size dialog by clicking Image – Image Size in the top menu bar.
STEP 4. Set the Resolution to 300 Pixels/Inch
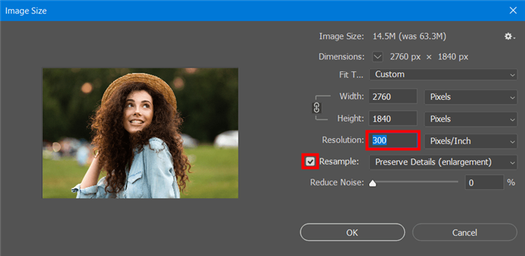
Now, you can increase resolution in Photoshop. Check resample, and select “Preserve Details” in the corresponding dropdown menu. Resolution should be set to 300Pixels/Inch.
STEP 5. Enlarge Your Photo
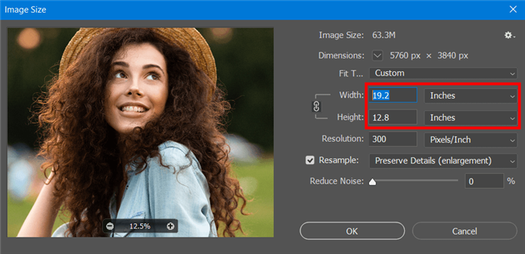
Set Width and Height to inches and enter proper values to make your picture bigger. At this stage, inexperienced users who learn how to blow up a picture for print can make a common mistake. They forget about the recommendation to double the size of the source photo and choose too high values, which negatively affects the resulting image.
STEP 6. Convert the Image to Smart Object
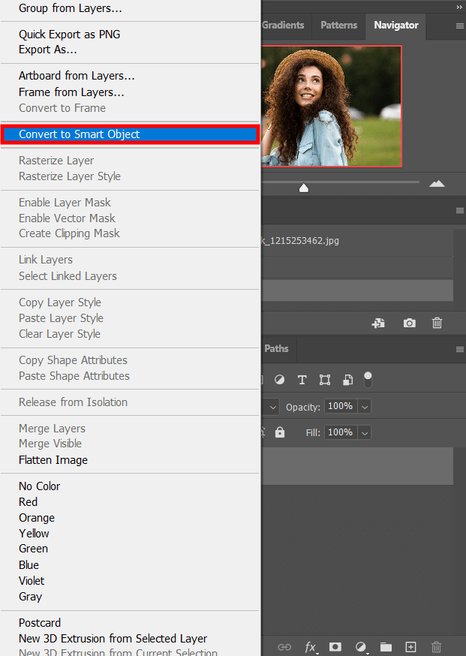
After you enlarge the photo, save it as a smart object. You need to right-click/Ctrl-click directly on the layer in the Layers panel. Then choose Convert to Smart Object from the menu. There will appear a smart object icon in the layer’s preview thumbnail, so you can be sure the layer has been converted into a smart object.
STEP 7. Set the Blend Mode to Soft Light
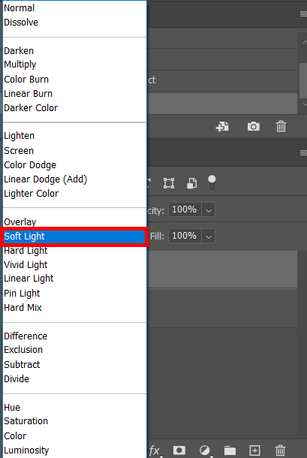
Use the Ctrl+J/Cmd+J Photoshop keyboard shortcuts to duplicate the layer. Head to the Layers panel, and click on the Blending Modes menu there. In the window that opens, choose the “Soft Light” for the new layer’s blend mode.
STEP 8. Apply the High Pass Filter

Go to the menu bar and choose Filter>Other>High Pass. The photo will be transformed into a grey overlay and you will see the High Pass window.
STEP 9. Select the Radius and Save the Image
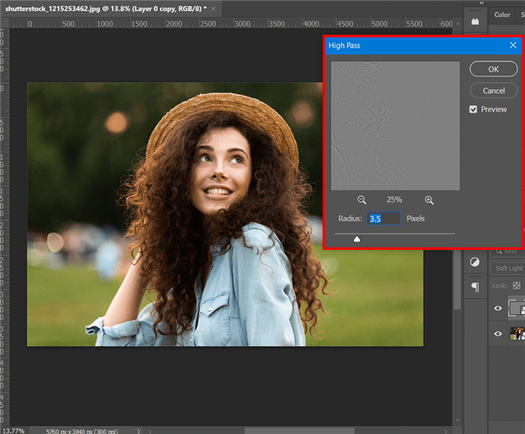
This is the final step to take. Use the slider to choose the proper radius. Create an enhanced edge by adjusting the preview. It may take some time to select the proper value. If you are pressed for time to learn all the intricacies of the process, you can address photo printing services, and experts will take care of image resizing and adjusting resolution.
If you plan to sell your photos, you need to make sure they look flawless. This usually involves performing retouching and improving colors. Doing all the adjustments yourself can be time-consuming, so many people delegate the task to professionals. They will improve skin tone, remove defects, improve colors, etc. Besides, such companies work very quickly, so you will get your pictures in the shortest time possible.
Method #2. Enlarging a Picture for Printing in Lightroom
To try this method of how to make an image bigger without losing quality for printing, you need to use Adobe Lightroom. In 2021, Lightroom received the “Super Resolution” feature. Now, if you need to resize an image in Lightroom and double the initial size, you can use this feature for instant results. Keep in mind that the width and height will be 2 times the size of the source photo and 4 times the total pixel count without quality loss.
STEP 1. Import the Photo
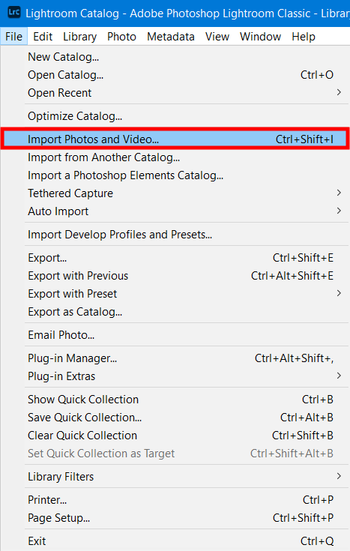
You should start by importing RAW files into Lightroom. Open the main menu, choose File > Import Photos And Video… Or, you can go to the Library module, find there the “Import…” button, and click on it.
STEP 2. Bring Up the Enhance Window
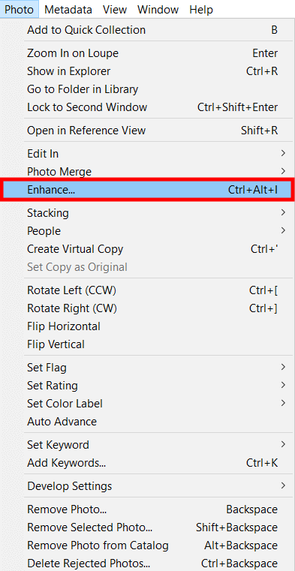
Once in the Develop section, select your photo and go to Photo > Enhance. There you will find the Super Resolution feature.
STEP 3. Enlarge the Photo

The program employs machine learning algorithms to enhance photo quality. You can preview the enhancements in the special window, so don’t neglect this possibility. If you like the result, click the Enhance button. You will receive a DNG file beside the original image.
Method #3. Enlarging a Picture for Printing in Preview
You may have free photo resizing software installed by default on your computer, and it’s capable of adjusting DPI and preparing pictures for print. In fact, this program is very user-friendly, so tutors frequently use it when explaining to students how to print photography.
STEP 1. Open the Image
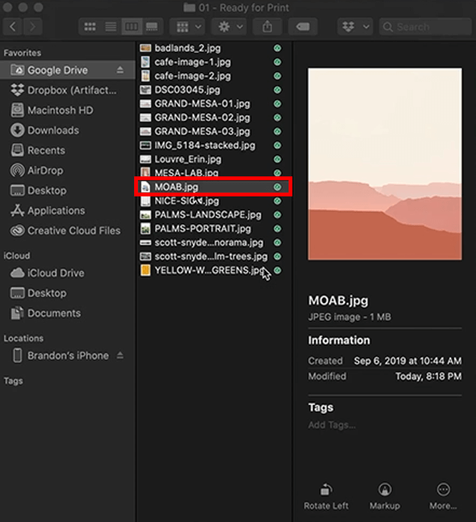
Double-click your image to open it in Preview. If the program isn’t used for this purpose by default, you need to right-click a picture and hover over “Open with” > “Preview”.
Select the needed image(s) by highlighting them on the Preview sidebar. If you need to enlarge several pictures in one go, you need to select them all by holding down the Command button and clicking each thumbnail you want to edit.
STEP 2. Bring Up the Adjust Size Window
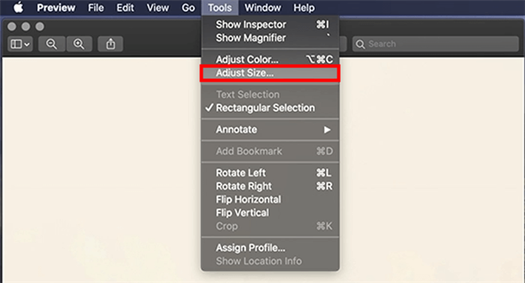
Go to the menu bar and click on “Tools” there. There will appear the “Tools” drop-down menu and you need to choose “Adjust Size” there.
STEP 3. Choose Inches and Pixels
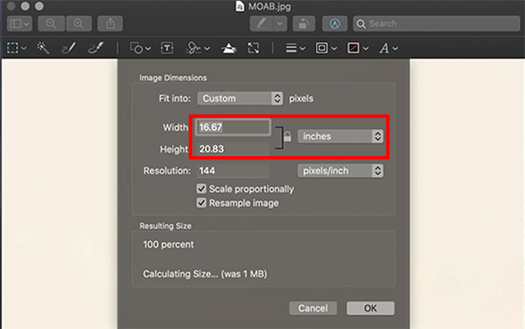
There will appear a window where you can adjust Height, Width, and Resolution. Choose “Inches” for Width and Height and “Pixels/Inch” for Resolution. By choosing “Scale proportionally”, you can alter Height or Width and have the other value adapting automatically.
To resize several photos simultaneously, you need to display all the files in the same window, select them in the window’s sidebar, and choose Tools > Adjust Size.
STEP 4. Resize the Photo to Your Taste

Uncheck “Resample Image” and set the Resolution to 300px/inch. The Width and Height max values will be generated automatically. If you like the outcome, you can save the file.
After the program displayed the max Height and Width at 300 DPI, you can figure out how much you can blow up a picture without compromising its quality. Of course, it is up to you to decide whether quality or size plays a more important role.
Cropping & extending
Sometimes, your image will be a different aspect ratio than what you intend to print.
In this case, you’ll need to crop or extend your image to be the correct size.
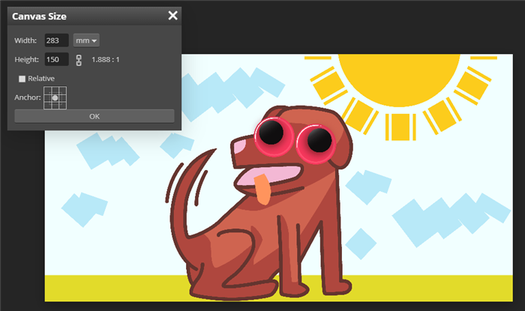
Canvas Size
Once your image is open, you’ll need to have a look at the image size dialogue and see what the size of your image is.
Resize your images using the steps above, but make sure the smallest of the two measurements is the one you want to end up with – i.e. that your image is slightly oversized.
In the menus find Image > Canvas Size. You’ll see a similar dialogue to Image Size, except missing the DPI box.
You can now enter your final dimensions here, and the respective part of your image will be cropped off to suit.
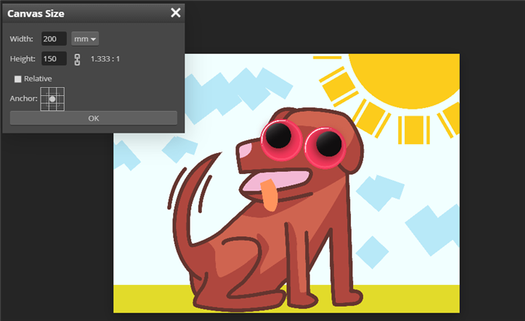
You can change the anchor placement to alter which edges get chopped off by the cropping.
You can also use the relative check-box to easily crop or extend the edges of your image by a set amount. This is great for adding borders to an image.
In Depth
The size of a printed image is typically defined by 3 numbers:
The combination of those factors will uniquely determine the print size of your image.
Pixels per inch or PPI is sometimes referred to as dots per inch or DPI , but means the same thing in this context.
Using the pixel width or height and the resolution, we can work out the physical dimensions of the image.
Most image editing software will allow you to alter these and change the other values accordingly, including the physical dimensions.
Resampling
When resizing your image for print, typically you do not want to change the pixels of the image, as this can lead to artefacts in the image from the resampling operation.
Here is an example of an image that has been resampled by a very small amount.
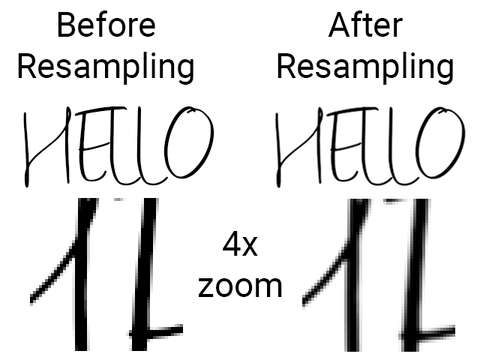
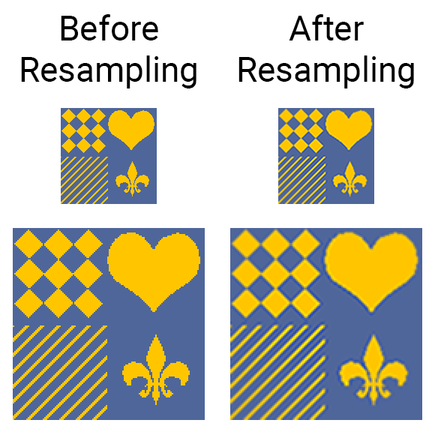
This is equivalent to changing your image from 150mm to 151mm by resampling.
You can see that the resampled image on the right is a lot less sharp and has had a lot of artefacts introduced, even though the physical size is not much different to the original size on the left.
This can have a large impact on artwork, and as such you will want to avoid resampling your image as much as possible, especially for digitally created artwork.
When resizing your image for print, you should thus disable resampling and only change the resolution as opposed to the pixel dimensions of the image unless you’re absolutely sure of what you’re doing.
Increasing the Resolution of your Image
There is unfortunately no way of increasing the resolution of your printed image without recreating it.
Resizing the image in Photoshop or other image editing software will not create a higher resolution print. Resampling the image will only make it worse quality by introducing artefacts.
The only way of increasing resolution is to print your image at a smaller physical size.
If you have a scan, photograph or digital drawing, then the only way to get a higher resolution print is to wish and hope that what you currently have is a version that has already been resized smaller, and that a larger version exists somewhere.
There are two exceptions to this rule:
- If the artwork is a physical artwork, you can re-scan at a higher resolution
- If the artwork is vector artwork, you can export at a higher resolution
Conclusion
To change the physical size of your image, the most important thing to remember is to not resample your image.
Other than that, resizing your artwork to an exact size is easy and something anyone can do.