Gather four sheets of paper together. Green is the traditional Christmas tree color but you can also use other colors like white, silver, gold, or pastel shades. Align the papers at the edges.
Popsicle Stick Christmas Tree Ornaments Kids Craft
DIY projects are a colorful way to add some seasonal cheer to your home! These popsicle stick Christmas tree ornaments are not only cute, they are super easy to make using colored popsicle sticks. Kids can help design and make these personalized ornaments too!
Supplies
- colored popsicle sticks
- large wire cutters
- hot glue gun
- rhinestones and embellishments
- ribbon

DIY Miniature Christmas Trees
These colored popsicle stick Christmas tree ornaments are fun and easy to make. If kids are making these, be sure to ask an adult to help with the hot glue. First, cut the ends off a variety of craft sticks to create several small tree shapes. You can make both tiered Christmas tree designs and miniature triangle Christmas trees.
To make the tiered mini trees, cut up colored craft sticks / popsicle sticks into a variety of sizes. Arrange the craft sticks horizontally so they increase in size from the top to the bottom. Glue the horizontal craft sticks onto a single colored craft stick to make each miniature Christmas tree.

Make miniature triangle trees by gluing three popsicle sticks together. Attach two long popsicle sticks to a shorter bottom piece to create triangle trees.
Decorate with Pom Poms, Jewels and Beads
Once you’ve created your miniature popsicle stick Christmas tree ornaments, it’s time to decorate! Embellish the mini trees with tiny pom poms, rhinestones, adhesive foam stars, beads, buttons and thin ribbon or trim. Attach the embellishments with hot glue. Finally, glue a loop of ribbon onto the back of each popsicle stick Christmas tree to hang it up.
Tip: If you use natural colored popsicle sticks to make these trees, you can paint them with craft paint before decorating. Full strength paint will create brightly-colored trees. Watered-down paint will create lightly colored trees in muted color tones.

We love how these miniature popsicle stick Christmas trees turned out. They add a pop of color alongside the other ornaments and multi-colored lights on our Christmas tree. You can use any combination of tiny decorations to make these popsicle stick ornaments sparkle!
Pin this to Pinterest

Craft Sticks, Jewels and Ribbon
You can easily make your own festive Christmas tree ornaments using colored craft sticks or popsicle sticks. Add adhesive glitter stars, rhinestones, trim and jewels to decorate each tree. This is also a great Christmas craft project for kids. Kids will love designing their own trees using their favorite colors and crafty embellishments. Don’t forget to add a loop of ribbon at the top of each popsicle stick tree to hang it on your Christmas tree.

We used brightly colored craft sticks and sparkly jewels to make these popsicle stick Christmas tree ornaments stand out! You can also use natural wood popsicle sticks and paint them with craft paint. Furthermore, if you use watered-down paint, you can create muted color tones to coordinate with a more traditional style. These colorful DIY wooden ornaments are eye catching on any Christmas tree!
Pin this to Pinterest

Christmas Tree Arts + Crafts for Kids
I can’t believe that Christmas is only a couple of weeks away. It seems like this year flew by in a flash, but I guess it always seems that way in December. Are you ready for Christmas? Christmas cards sent off in the mail…presents purchased and wrapped…tree decorated? While I can happily say that I can check a few things off of my Christmas to-do list…I still have a lot to accomplish before the big day. Luckily, my little nugget has been helping me in the decorating department, as we’ve been creating some super fun and simple Christmas Tree Arts + Crafts for Kids!
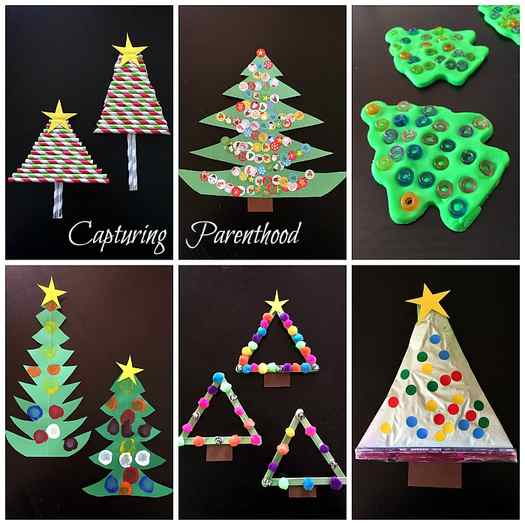
The topic of Christmas trees and (especially) ornaments has filled our home ever since we finished eating our delicious Thanksgiving feast, so I figured we would stick with the obsession and create a handful of different Christmas tree arts + crafts to help adorn our home this holiday season.
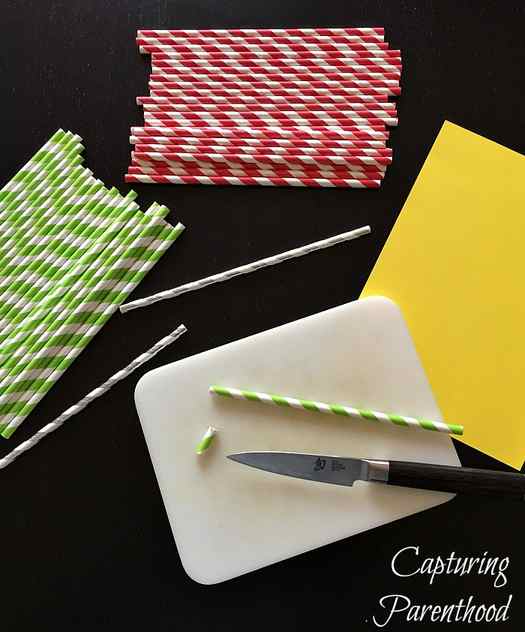
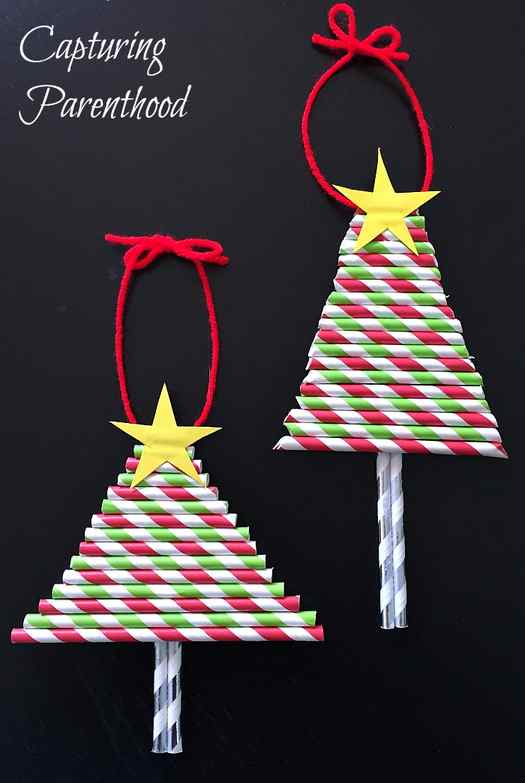
Paper Straw Christmas Trees
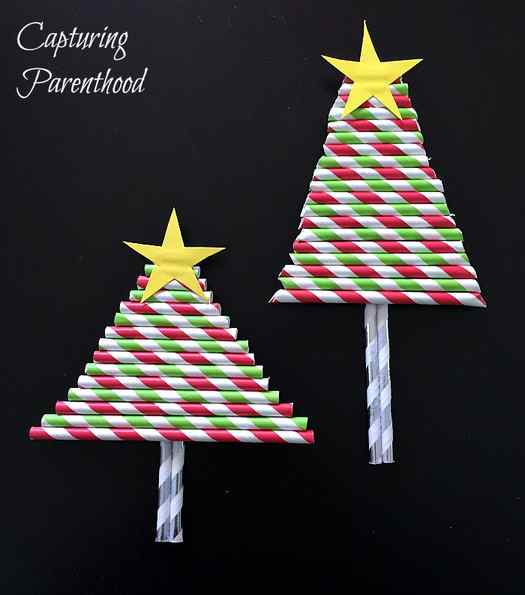
I came across the brilliant idea to craft Christmas trees using colorful paper straws over on How Wee Learn, where they shared a post containing 45 Christmas Crafts for 3 Year Olds.
All you need to create these simple Christmas trees are some colorful paper straws, a piece of yellow construction paper (to craft stars for the top of the trees), and lots of glue! A word to the wise…it is probably a good idea if you pre-cut the straws and then have your kiddos help you glue them all together. I used a small kitchen knife to cut my straw pieces, but a pair of sharp scissors should also do the trick.
You will want to start by gluing two full-length straws together to create your tree truck (this will also be what you adhere the remaining straws to). Set the straws aside for the glue to dry completely. Next cut your straws, cutting a small piece for the top of the tree, and then a slightly longer piece each time, as you descend down the tree. You can cut the straws straight or at an angle (slanted). I made one of each, but the slanted straw pieces were definitely more difficult. Once you have all of your pieces cut, and the glue on your tree trunk straws is set, apply a descent amount of glue to one side of your tree trunk straws (starting at the top) and then carefully lay your straw pieces down (in descending order), pressing gently in the middle to adhere the straws together. Once you have all of your straw pieces glued on, carefully set the tree aside, so that the glue can dry completely. Add a dab of glue to the top of your tree and gently press your yellow star in place. If you would like to hang your paper straw Christmas trees, you can easily slide a piece of yarn (or string) through the top straw on your tree and tie it off with a bow!
Sticker Garland Christmas Tree
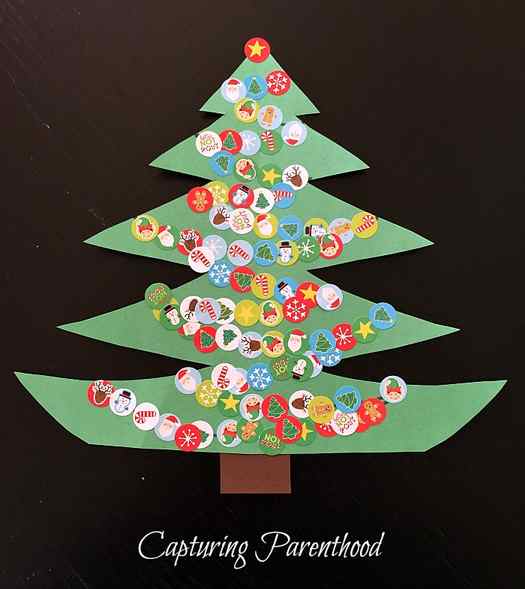
I’ve never thought to decorate a Christmas tree with a sticker garland before…that is, until I came across this Sticker Christmas Tree Craft for Kids over on Hands On As We Grow!
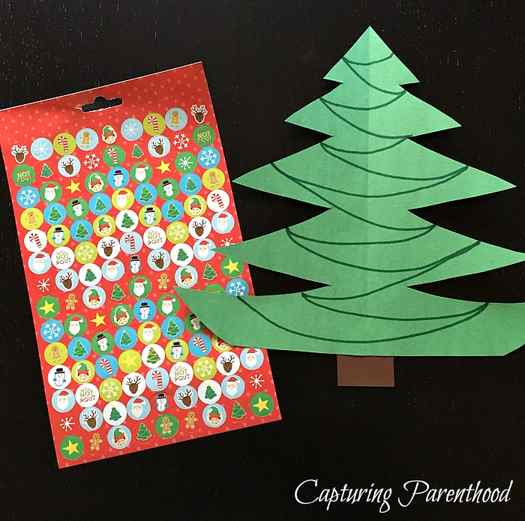
This festive craft is so quick and easy to setup! All you need is some green (tree) and brown (trunk) construction paper, a marker, and some small Christmas-themed stickers (I found an entire booklet at the Dollar Tree). Cut a Christmas tree out of the green construction paper. Cut a small rectangle out of the brown construction paper, and tape it on the bottom of the tree to create the tree trunk. Using a marker, simple draw a garland outline on the tree.
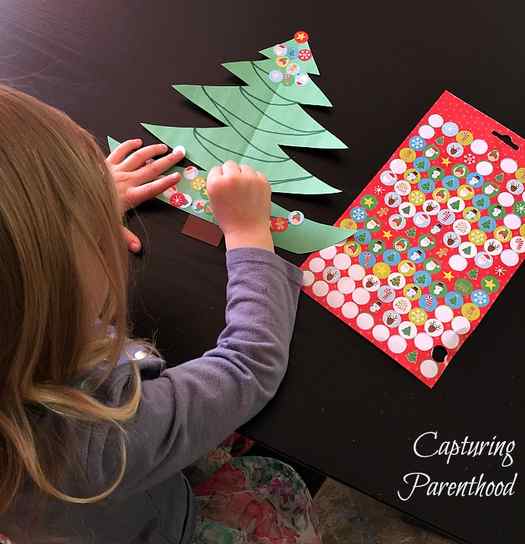
Hand the tree and stickers to your little one and let the decorating begin! Our little nugget loved this Christmas tree craft. She was so busy placing stickers on (to cover the marker outline) that I was able to prep another fun Christmas tree craft!
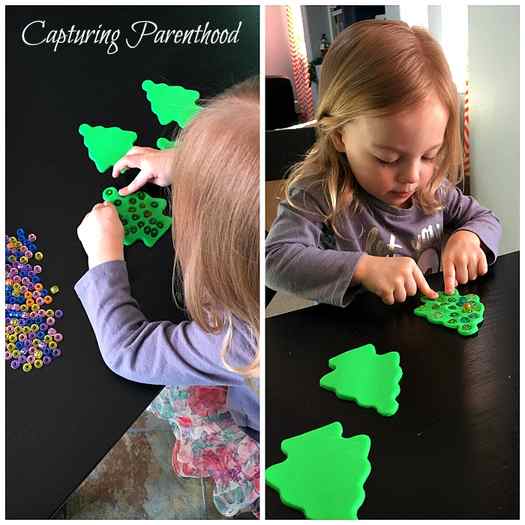
Playdough + Pony Bead Christmas Trees
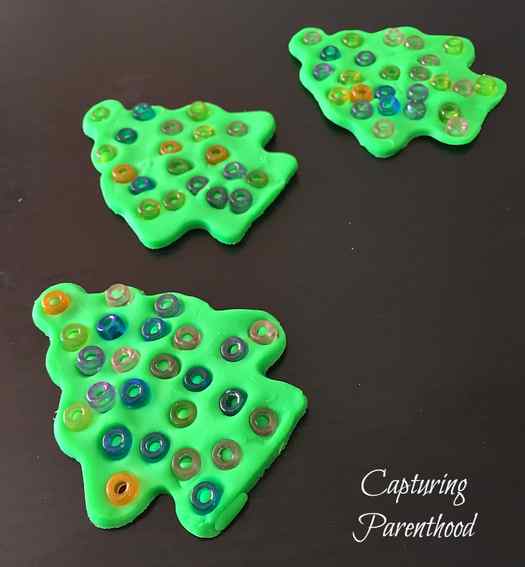
Playdough is a big deal in our house these days, so I figured I better incorporate it into our Christmas tree crafts, one way or another. Since I had some pony beads sitting around (leftover from our Melted Craft Bead Suncatchers project), I figured we could use a few as Christmas tree ornaments!
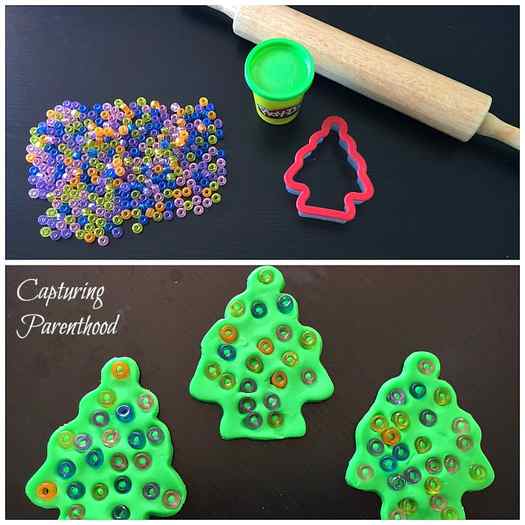
We rolled out some green playdough (the Holiday Peppermint Playdough that we made last year would be absolutely perfect), grabbed our Christmas tree cookie cutter, and a handful of pony beads, and set to work! I’m pretty sure that we would have ended up with hundreds of playdough Christmas trees, if I let my little nugget keep crafting…she had the best time squishing her “ornaments” onto each tree.
Pom Painted Christmas Trees
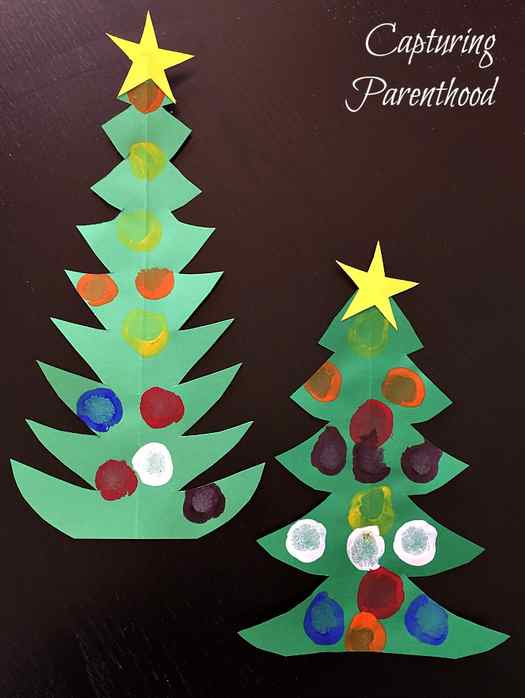
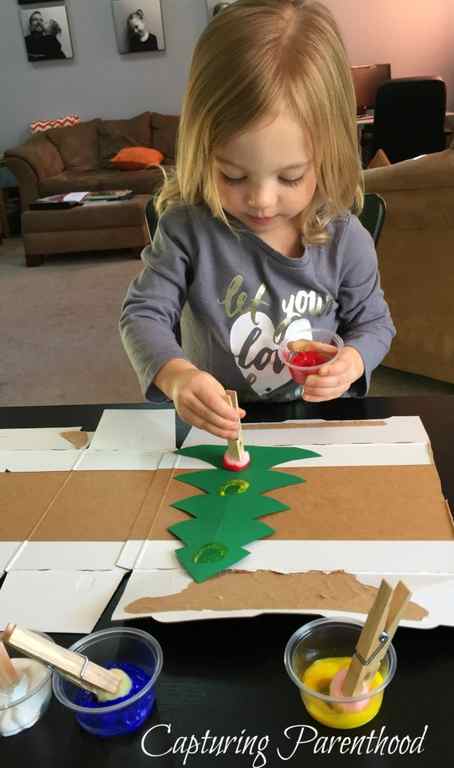
It would just be silly if we completed our Christmas tree craft session without ever opening a bottle of paint. This Pom Pom Painting Christmas Tree Craft for Toddlers idea, that we stumbled upon over at Fantastic Fun and Learning, provided the perfect excuse to break out the paint!
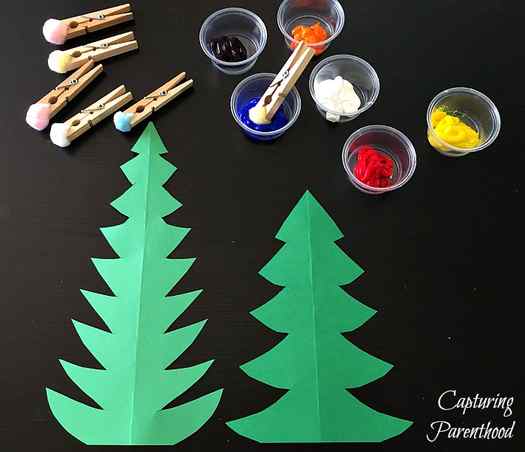
For this simple craft, you will need green construction paper, paint (in the colors of your choosing), small poms, and some clothes pins. Cut a couple of Christmas trees out of the green construction paper, and squirt a few different colors of paint into some small cups/tubs/bowls. Count the number of different paint colors you have selected, and then grab the same number of small poms, and clothes pins. Place a pom in each clothes pin (you can have your kiddos do this for some fine motor skills practice), and then place each clothes pin into a separate cup of paint. Hand everything over to your kiddos and let their creativity run wild!
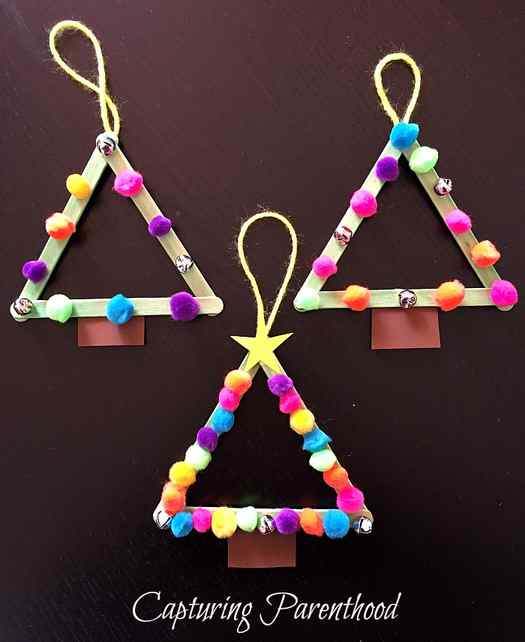
Popsicle Stick Christmas Trees
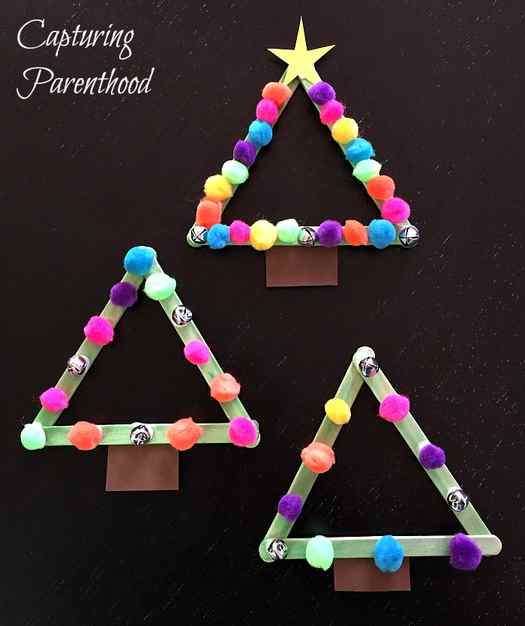
We kept a little bit of green paint out to create these colorful and creative Christmas trees! When I came across Debbie’s post for Popsicle Stick Christmas Trees, over on One Little Project At A Time, I just knew we had to make a few for ourselves!
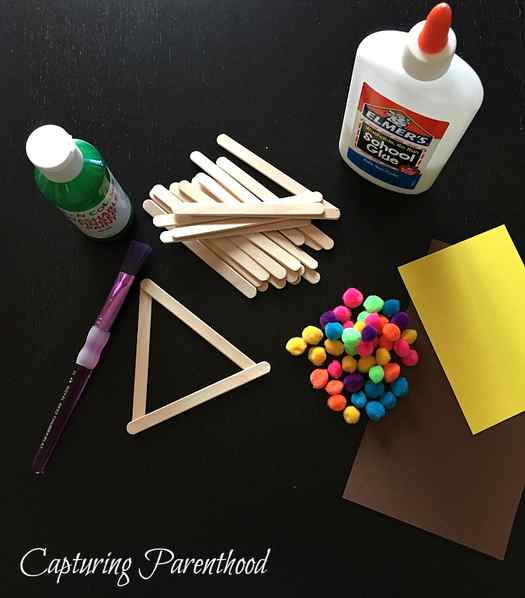
The necessary supplies for this Christmas tree craft include: popsicle sticks, green paint, glue, brown and yellow construction paper, and some mini poms (we also ended up using a few small silver jingle bells)!
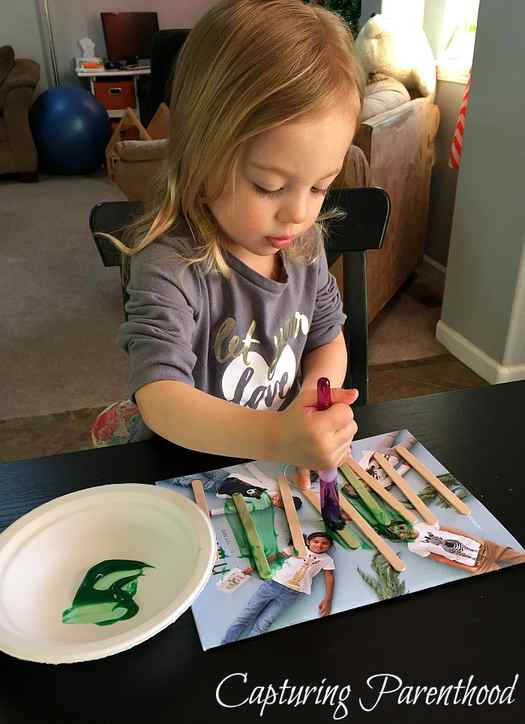
We started by painting all of our popsicle sticks green, and then we set them aside to dry. Once the paint had dried, we glued three popsicle sticks together in the shape of a triangle, and set them aside until the glue became firm. Then it was time to decorate! We adorned our trees with our miniature poms and some small silver jingle bells, by adhering each of them with a drop of glue. We decided to add a yellow star to the top of one of our trees, and cut small rectangles out of our brown construction paper, to glue to the bottom of each tree, to create the tree trunks. Lastly, we glued a piece of yarn to the back of each of our trees, so that we could hang them up around out house. You could even use them as ornaments for your actual Christmas tree!
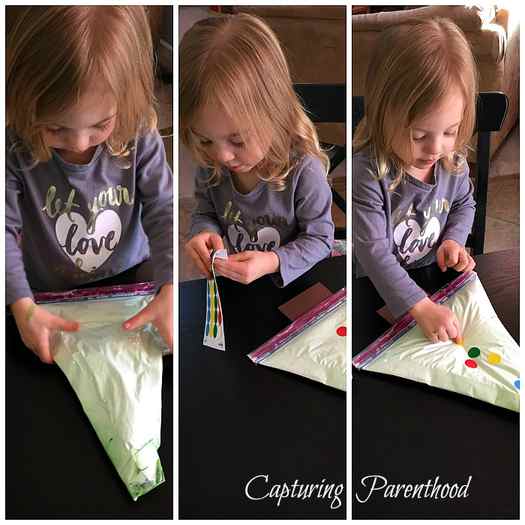
Color-Mixing Shaving Cream Christmas Tree
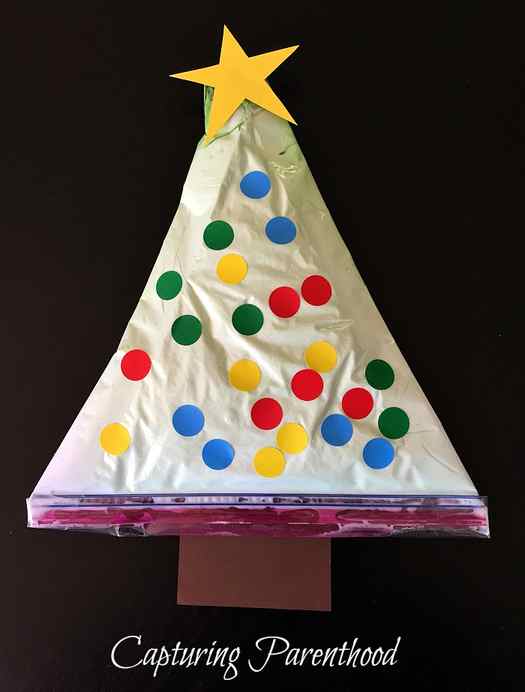
I came across a photo of this Big Christmas Tree No-Mess Sensory Play Activity for Kids, over on A Little Pinch of Perfect, and I must admit, I ran full steam ahead without ever reading Katie’s tutorial. In hindsight, I wish I had read the instructions, because we ended up having a small leaking issue with our creation, but all in all, this Christmas tree sensory activity was a blast!
As it turns out, Katie used a cellophane bag that is normally used for bouquets of flowers. I clearly did not know this since I skipped the instructions, but regardless, I don’t have any cellophane bags on hand, so I likely would have attempted my method anyways. If you would like to follow the original set of instructions, please follow the link above to A Little Pinch of Perfect. Otherwise, you are welcome to try our Ziploc bag method, but be sure to apply lots of tape!

The supplies that we used for this Christmas tree sensory activity include: one Ziploc bag (storage size), scissors, packing tape, shaving cream, food coloring (yellow and blue), dot stickers, and yellow and brown construction paper.
To create the tree, I simply cut the sides of the Ziploc bag at an angle. Once cut, I taped up the two sides with packing tape. We added a few drops of our yellow and blue food coloring to the bag, before squirting in an ample amount of shaving cream. I carefully released any extra air from the bag and then sealed the bottom, applying another piece of packing tape over the seal. Then I handed the bag over to my daughter to complete the color-mixing process (this was very similar to our Shaving Cream Color Mixing activity). It was at this point that we discovered a small leak in the top of of our tree, but it was minimal, so we pressed forward. Once my little nugget was satisfied with the color of her green Christmas tree, it was time to add the ornaments (i.e. dot stickers). We added a yellow star to the top of our tree, and a brown tree trunk to the bottom, for the finishing touch!
And there you have it, six simple and creative Christmas Tree Arts + Crafts for Kids!
If you’re looking for more fun Christmas crafts for the kiddos, check out our Creative Toddler Christmas Crafts post from last year!
HAPPY HOLIDAYS!
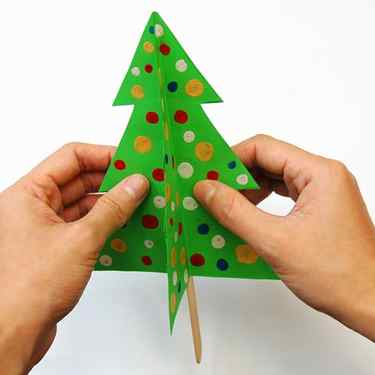
6 Decorate the trees.
Decorate the inner surface of each tree by doing any or all of these ideas:
a.) Drawing or Painting
An easy way to decorate the trees is to use your fingers or a cotton swab to apply colorful paint dots.
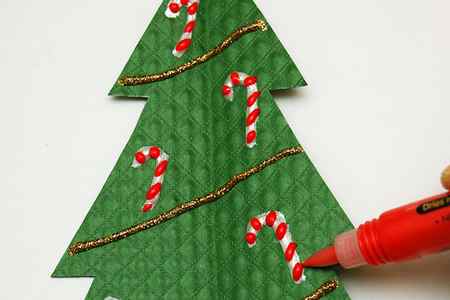
Draw sparkly lines, dots and shapes with glitter glue.
You can also add raised lines and shapes using puffy paint. The paint’s small nozzle will allow you to make finer details. Avoid making any puffy paint shapes along the tree’s middle crease.
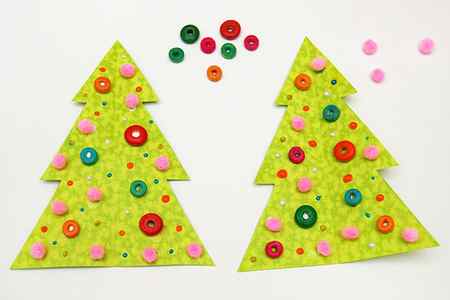
b.) Gluing stuff
Glue small materials like sequins, paper or foam shapes, rhinestones, tiny pom-poms, and small bows. Remember not to glue anyting along the tree’s middle crease.
If you want to glue heavier materials like buttons or beads, use cardstock or thick paper to make the Christmas trees in the previous steps.
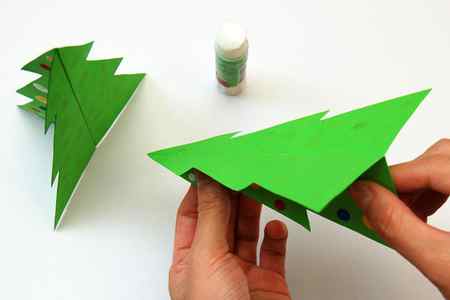
7 Glue the trees by pairs.
Once the glue and/or paint dries on the trees, fold each tree in the middle again to emphasize the crease.
Join the trees by pairs by gluing together half of their undecorated sides.
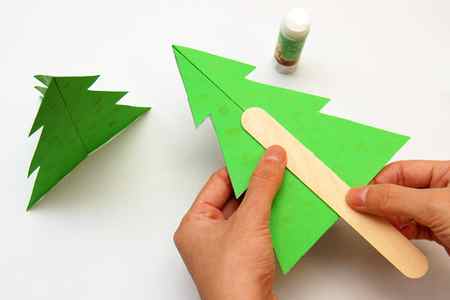
8 Glue a craft stick.
Create a tree trunk by gluing a craft stick along the middle of one of the paper tree pairs. If you want a colored tree trunk, paint the craft stick beforehand.