A nice result which you can repeat at home on your own DIY canvas!
SUPER EASY DIY Acrylic Paint Pouring Wall Art With Steps And Video
Make your own stunning canvas art for less than $20 with this pretty DIY Acrylic Paint Pouring Wall Art Idea. I love this DIY, guys!
Hi again! I’ve recently had some fun making new wall art for my Dining Room and the Master Bathroom I just remodeled.
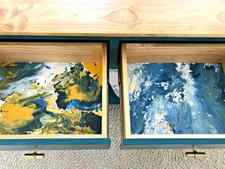
Today I’m sharing the DIY Acrylic Paint Pouring Wall Art Idea & Tutorial behind the pair of canvases I made for my Dining Room. I absolutely love how these turned out!
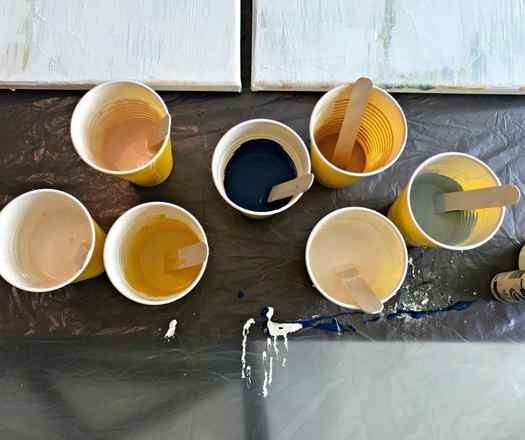
For this pour, I used peach, pale peaches, pale pinks, greyish blue, blue, and golds. I custom mixed these colors to go together.
Some links on this post are affiliate links. As an Amazon Associate I earn from qualifying purchases at no additional cost to you.
I recommend always mixing all your paints and holding the craft sticks you mix together, in the light.
That’ll help you pick the right shades to make sure the colors work. They can look a bit different inside those colored plastic cups I use for the pour.
You can find the tutorial for the 1×2 wood frames in my last post.
Watch the DIY Dutch Pouring Wall Art Video
Abstract Acrylic Fluid Art – Pouring Acrylic Paint on Canvas Using Pastel Pink, Blue, Yellow
Materials Needed
- Acrylic Paints – I love this Big Variety Pack
- Art Canvas or 1/4″ Plywood
- Some Cups and Craft Sticks for Mixing
- Drop Cloth
- Water and/or Floetrol
- Blow Dryer – This might get paint on it. So, use a cheap one.
- Matte Mod Podge & Foam Brush
Acrylic Paint Pour Setup & Steps
Step One
Prep for this DIY Acrylic Paint Pouring Wall Art by applying a base coat of paint. White acrylic will work fine on a canvas. Wood needs a coat of a good latex primer to protect it from water. Let that base coat dry.
Step Two
Pick 4 to 8 paints to use in your pour. Use more of the colors that you want to see most and less of the accent colors.
Mix each color in a cup with enough water to make it flow off the craft stick when you pick it up out of the cup.
I eyeballed it, but I’m guessing I used 3 parts paint, 1 part water, and 1 part floetrol for this pour.
For my last pour, I only used water and I don’t really see a difference in result. So, either would work.
It’s hard to tell exactly how much paint you need. But too much mixed up is always better than not enough. You want to have enough paint that it can be moved across the canvas with a blow dryer.


Step Three
Prop your canvas up off the table top, and make sure it’s flat.
Now, on to the fun part of this DIY Acrylic Paint Pouring Wall Art Idea. Pour the main colors, that you mixed the most of, in random circles, lines, drips, etc. across the canvas.
Follow that up with the accent colors, that you mixed less of, adding some wherever you feel like it should go.
Use craft sticks when necessary, to spread the paint into any spots still missing paint. Work fast so that the paint doesn’t start to dry.

Step Four
Once the surface is full of wet paint, you’re ready for the blow dryer. Turn it on high and blow across the surface from any direction to find a look you love.
You can see how I did it in the video.

Step Five
Let your new masterpiece dry for 36 to 48 hours. When it’s completely dry, set the paint with a matte mod podge. And, you’re done!
I have to say that canvas is flexible and paint pours leave a thick layer of paint on the canvas.
That flexible canvas and thick paint can sometimes make hairline cracks in the paint.


Even with a few cracks the art still looks beautiful, but I think using 1/4″ plywood works best for avoiding any cracks.
The mod podge helps hold everything in place on canvases, long term.


Check out my DIY Simple Wood Frame to see how I framed these canvases.
That’s it for this DIY Acrylic Paint Pouring Wall Art Idea & Tutorial. Good Luck on your pour.
DIY Acrylic Paint Pouring Wall Art
Make your own stunning art for less than $20 with this pretty DIY Acrylic Paint Pouring Wall Art Idea & Tutorial. I love this DIY, guys!
Materials
- Acrylic Paints – I love this big pack
- Art Canvas
- OR 1/4″ Plywood to Pour Paint On
- Cups and Craft Sticks for Mixing
- Dropcloth
- Water and/or Floetrol
- Blow Dryer
- Foam Brush
- Matte Mod Podge
Instructions
Step One
- Prep for this DIY Paint Pouring Wall Art Idea by applying a base coat of paint. White acrylic will work fine on a canvas. Wood needs a coat of a good latex primer to protect it from water. Let that base coat dry.
Step Two
- Pick 4 to 8 paints to use in your pour. Use more of the colors that you want to see most and less of the accent colors. Mix each color in a cup with enough water to make it flow off the craft stick when you pick it up out of the cup.
- I eyeballed it, but I’m guessing I used 3 parts paint, 1 part water, and 1 part floetrol for this pour. For my last pour, I only used water and I don’t really see a difference in result. So, either would work.
- It’s hard to tell exactly how much paint you need. But too much mixed up is always better than not enough. You want to have enough paint that it can be moved across the canvas with a blow dryer.
Step Three
- Prop your canvas up off the table top, and make sure it’s flat. Now, on to the fun part of this DIY Paint Pouring Wall Art Idea. Pour the main colors, that you mixed the most of, in random circles, lines, drips, etc. across the canvas. Follow that up with the accent colors, that you mixed less of, adding some wherever you feel like it should go.
- Use craft sticks when necessary, to spread the paint into any spots still missing paint. Work fast so that the paint doesn’t start to dry.
Step Four
- Once the surface is full of wet paint, you’re ready for the blow dryer. Turn it on high and blow across the surface from any direction to find a look you love. You can see how I did it in the video.
Step Five
- Let your new masterpiece dry for 36 to 48 hours. When it’s completely dry, set the paint with a matte mod podge. And, you’re done! I have to say that canvas is flexible and paint pours leave a thick layer of paint on the canvas. That flexible canvas and thick paint can sometimes make hairline cracks in the paint.
- Even with a few cracks the art still looks beautiful, but I think using 1/4″ plywood works best for avoiding any cracks. The mod podge helps hold everything in place on canvases, long term.
Notes
I used peach, pale peaches, pale pinks, greyish blue, blue, and golds in this pour. I custom mixed these colors to go together.
I recommend always mixing all your paints and holding the craft sticks you mix them with together, in the light, to make sure the colors work.
They can look a bit different inside those colored plastic cups I use for the pour.
© Abbotts At Home
Category: DIY Home Decor
Looking for another pour tutorial – that was a near huge fail?? Check out my Canvas Upcycle video, then go here to see the full DIY Old Canvas Pour tutorial and all of the pictures from that pour. See more Quick 2 Hour DIY Projects here.
More DIY Projects You Should See
Looking for more easy DIY home decor? Check out this Easy DIY Resin Tray Tutorial and Video.

Or, this Paint Pour Tutorial & Video I used for pretty drawer bottoms.
Check out this post to see my easy steps for How to Make a No Sew Bench Seat tutorial
I love this easy DIY for how to clean a couch at home.
And, here’s my favorite picks for the best area rugs on a BUDGET. They’re beautiful, big, and budget-friendly.
Thanks for checking out my DIY Acrylic Paint Pouring Wall Art Idea & Tutorial. Please let me know if you have questions.
Don’t forget to sign up for the Abbotts At Home email newsletter to get DIY, Remodeling, and Crafty ideas in your inbox.
By Author Stephanie
Home » DIY Home Decor » SUPER EASY DIY Acrylic Paint Pouring Wall Art With Steps And Video
Tags Dining RoomDIY Home DecorHome Decorpaint pourpaint tipswall art
Wednesday 28th of August 2019
Love it! I was doing a pour method, but I think I like the control of this more, so I will try it once I get my next batch of paint!
Wednesday 28th of August 2019
Yay! I hope it turns out for you. I think it’s more fun. 🙂
Kim @Serving Up Southern
Tuesday 27th of August 2019
Hi Stephanie! I’m dropping back by to let you know that your one of my features this week at Homestyle Gathering. Thanks so much for sharing! I hope to see you at the party! >>> Kim
Wednesday 28th of August 2019
Thanks so much, Kim.
Tuesday 27th of August 2019
Beautiful art in great color pallette, with easy to follow tutorial! Pinning for later. Thinking of trying a huge canvas for my son’s loft.
Tuesday 27th of August 2019
Thanks so much. A huge canvas would be a fun pour!
Tuesday 27th of August 2019
Wow! These turned out perfect. I love how you made them. Happy fall, Kippi Ps. Please share this post over on my site at the YTS blog hop (kippiathome.com)
Tuesday 27th of August 2019
Thanks so much, Kippi!
Saturday 24th of August 2019
This is so pretty and looks like fun. The tutorial was great. Thanks for sharing on Sunday’s Best.
Saturday 24th of August 2019
Thanks so much, Rhonda!
Comments are closed.
Search This Site
Follow Abbotts At Home
Hello friends!
Stephanie Abbott shares DIY Projects, Cleaning Tips, Woodworking, Home Remodeling, and more Home Tips, every week. Her tutorials focus on designing a home in a stylish and affordable way.
Learn more about her here. Be sure to subscribe to our email newsletter to get the latest DIY projects and tutorials.
Disclaimer
Just a reminder, this blog is for entertainment purposes only. I am not an expert, I am a DIYer with 20+ years in home remodeling and DIY. Abbotts At Home is not liable in any way for injury or loss resulting from any ideas or information I provide. No single YouTube video or DIY tutorial can teach you everything you need to know or warn you about everything that might happen. DIY AT YOUR OWN RISK. Read the Full Disclaimer here.
Just A Quick Note
Abbotts at Home is fully supported by ads, digital download sales, and affiliate income. All posts on this site are an honest representation of my opinion and are not paid opinions or posts. As an Amazon Associate I earn from qualifying purchases at no additional cost to you.
Privacy Policy
Read our Privacy Policy for more information.
Acrylic Pouring Recipes Book: “Fluid Art Recipes and Art Journal: Over 100 Paint Pouring Mixtures” (2018)
This is a really good book for fluid art beginners. The recipes are formulated for an 8″ x 11″ or 9″ x 9″ size canvas and provide the exact amounts of paints and other components needed for each pour.
BEST OCEAN WAVE Acrylic Pour EVER.
CraftyJen has seen others doing the wave paintings using acrylic pouring techniques on canvas and attempted to create one of her own.
Pour painting recipe and directions:
- mix up a deep blue-black;
- take metallic cobalt blue and a mixed combination of silver/metallic white-grey;
- add Floetrol to the last mix;
- add water and silicone;
- mix up the white with just Floetrol and water;
It turned out to be really artsy! There can be no precise acrylic pouring recipe for each painting – this is the beauty of the pouring technique. Every time the paint mix touches canvas you will get a different result and will create something unique.
How to Make Museum Quality Acrylic Pouring Paintings
This is an interesting pour painting experiment to watch which will create a complex symphony of colors on canvas using flip-and-drag technique plus a swiping acrylic pour medium technique. Fascinating!
Pouring recipe advice – add 2-3 drops of silicone oil to each color:
- Perylene Maroon;
- Pink;
- Cadmium red light;
- Phthalo Turquoise;
- Cadmium Lemon;
- Quinacridone Magenta;
- Winsor and Newton Professional Iridescent gold;
- Iridescent medium from Golden;
- Pearl Yellow from DeSerres;
Well, for creating a museum-quality painting using acrylic pouring techniques on canvas, you definitely need to think about your color scheme and all the steps in the video. You would also need to do your research and use fine art professionals’ expertise to learn if including silicone oil into any of your acrylic pouring recipes is compatible in any way with this museum-quality label.
Below are a few art oils that artists can purchase at any art supplies store. The most common is linseed oil, stand oil (a less liquid version not suitable for acrylic pouring), and walnut oil (not shown).
Acrylic pouring authority figures do not recommend using organic oils stating that they will go rancid upon drying, will smell bad, and rot. If this was true that all art museums with oil paintings would be smelling like dumpsters.
What’s the solution then? Just add a few drops of Spike Lavender essential oil (sold in art stores) to linseed or walnut oil like thousands of fine artists have been doing over 100s of years.
And, please, don’t use your cooking oils.
Yes, acrylic pouring for beginners often starts with recipes featuring Silicone oil. But…
…Silicone oil is a non-drying lubricant that works wonders on squeaky wheels but may produce unpredictable results inside the acrylic polymer and absorb dust particles over long periods of time.


