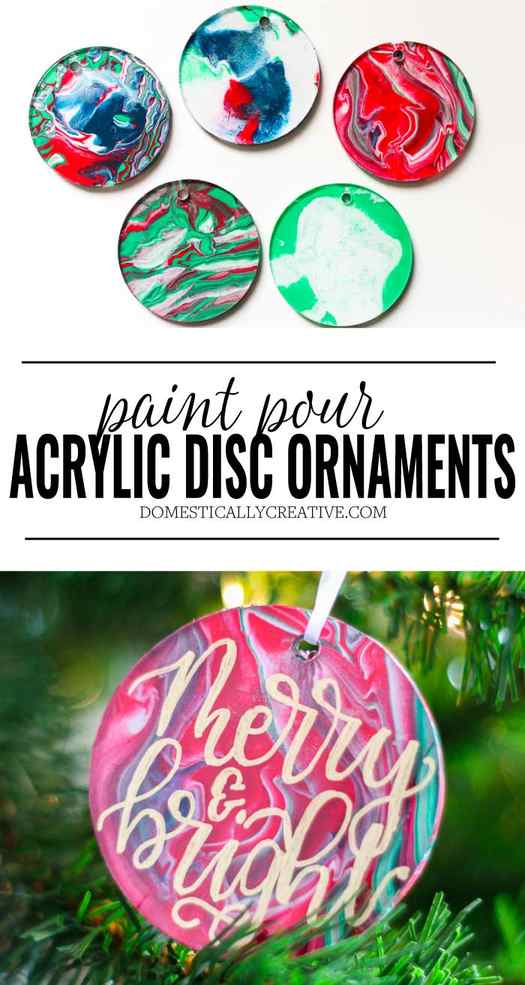
Paint Pour Christmas Ornaments

Thank you to DecoArt for sponsoring this post by providing me with the paint supplies needed to make these adorable Paint Pour Christmas Ornaments!
I love making my own Christmas ornaments and each year brings something a little bit different. This year paint pour is the popular trend, so I wanted to give it a try myself on some DIY Christmas ornaments. I must say that I love how they turned out.

How to Make DIY Paint Pour Christmas Ornaments
Step by Step Instructions
Follow the instructions on the pouring medium bottle for mixing ratios. You’ll want to mix up each color you plan to use in a separate disposable cup.

For each ornament, start by setting an acrylic disc on top of a disposable cup, set inside a bucket or other place for the paint to drip off into. I found a shallow bucket worked great for this because I didn’t have to worry about any of the paint spilling out!
In another disposable cup, layer the previously mixed paint with pouring medium in alternating patterns. Layer the colors slowly so they do not mix or get bubbles.
Once you have the layered paint, slowly pour onto the clear acrylic ornament discs, starting in the center. As the paint pours it will run to the sides and start dripping over into the bucket. Continue pouring until the paint has reached all sides. If desired you can pick up the cup and gently tilt it to different sides to manipulate the pattern. Be careful not to drop the ornament off of the top of the cup though or you’ll have a big mess.

There’s not really a science to this (that I know of) so play around with several iterations and color combinations! If you don’t feel like layering the colors and pouring it all out, you can play around with just dribbling some paint in random places and manipulating the ornament to let the colors marble together.
Once the paint has settled, stick a bamboo skewer or large toothpick into the hole on the acrylic disc to push the paint out. This way the paint does not dry inside preventing you from putting a ribbon inside to hang your ornament.
Let the paint dry completely before moving. This will take anywhere from 24-48 hours, so be prepared and be patient. You can see in the photo below I was not patient and dipped my finger right into the still wet paint on the green ornament. Do as I say not as I do!
Once dried, give the painted side a coat of sealing spray to keep the paint from peeling or scratching.

If any paint drips over onto the back side of the ornament, you can gently scrape it away with a finger nail. Clean the back side of each ornament with some glass cleaner to get all of the dirt and dust off of them. Remember the backs will look different from the front, giving you two different marbled effects on each paint pour ornament! It’s amazing how different some of them are on the back from the front!

Cut a piece of thin 1/8″ wide white ribbon about 10″ long. Loop it through the hole on each acrylic ornament, and tie a knot to secure the ends.

You can hang the paint pour acrylic Christmas ornaments as is if you’d like, or take it one step further and add a saying to each one with a paint marker. I hand lettered these, but you could also use vinyl for them as well. If you would like some similar hand lettered SVG files to use, check out this listing in my Etsy shop! If you’d like to learn how to hand letter on acrylic, check out this post about lettering on acrylic ornaments for all of the details.

I absolutely love how these paint pour Christmas ornaments turned out! They look great on our tree this year and really add a nice pop of color. Tell me in the comments what color combinations you would use to make your own paint pour ornaments.

More Handmade Christmas Ornaments:

Simple DIY Leather Christmas Ornaments

Easy DIY Rustic Christmas Ornament

Scrapbook Paper Christmas Ornament
Don’t forget to pin it!
Post Tags: # 12 days of christmas # Christmas # hand lettered # ornament # paint # paint pour
Amanda
Wife to a computer nerd, mom to a neurotic dog and lover of all things baking, creating and making. She’s not afraid to get messy or fire up a power tool and she has yet to meet a dessert she hasn’t liked.
10 Comments
allkitchenproducts says:
Wow, it’s really amazing. What a beautiful colores on the ornaments. I love the marble effect. Thanks for your nice review.
Jessa says:
Ahh your paint pouring is perfect! I love your lettering too!
Lauren |Mom Home Guide says:
i love all the beautiful colors! Nice job!
Alli Smith says:
Your hand lettering is gorgeous and your ornaments are simply beautiful. I’ve got to try this pain pour technique. It’s so cool!
Sarah Vanderkooy says:
These turned out so good! I really want to try paint pouring and ornaments seems like a good place start. Thanks for the tips.
Super Mom – No Cape! says:
WOW… I’ve seen paint pour art before, but I’ve never seen it done on something this small. I love it!
Rachel says:
These turned out so great! I like the colors you used together. Paint pouring is something I’d like to try.
Cherryl Ehlenburg says:
Those turned out really cute! I love the marble effect!
Marie says:
Now that looks like fun! I love this unique Christmas ornament idea. My favorites are the ones in the traditional Christmas colors without the sayings but both are equally beautiful! Pinned
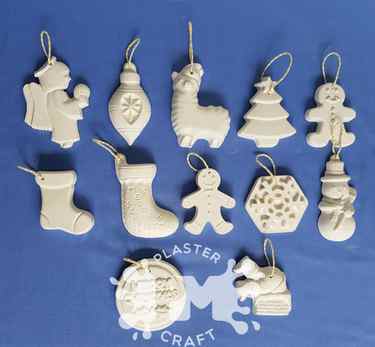
Christmas Ornaments (Plaster Only)

MSRP:
Now: $1.50
(You save )
(No reviews yet) Write a Review
Write a Review
Close ×
PM Plaster Craft. Handmade plaster painting kits
Christmas Ornaments (Plaster Only)
SKU: UPC: Gift wrapping: Options available Shipping: Calculated at Checkout
Bulk Pricing: Buy in bulk and save
Bulk discount rates
Close ×
Below are the available bulk discount rates for each individual item when you purchase a certain amount
- Buy 20 – 99 and pay only $1.20 each
- Buy 100 or above and pay only $1.00 each
- Description
- Warranty Information
Looking for a Christmas craft to do for some busy fingers?
We have our cute handmade plaster ornaments.
This item is for plaster only, great for schools and pre-schools who already have paint.
All of our plasters are hand poured by us in the Hunter Valley.
Ornaments range from 7-10cm tall and come already with string attached.
There are now over 20 different ornament designs, not all are pictured here.
Price is $1.50 each or there’s a discount for 20 or more (^see ‘Buy in Bulk and save’)
All Broken Plasters Will Be Replaced If Broken During Transit, You Must Send Us A Photo Within 24 Hours Of Receiving Your Package. Please Keep Any Packaging/Paint That Came With Your Order.


