Everything you read about how to plan a watercolor just sounds soooooo tedious! Thumbnail drawings, value studies, color studies, careful underdrawings.
Exploring Fiber Art: 4 Free Contemporary Fabric Art Projects
Many artists have explored the use of fabric and stitch in mixed-media art, but often don’t have the time or desire to create big quilts or complicated sewn pieces. Easy sewing projects plus favorite mixed-media techniques such as raw-edge appliqué designs, surface design, heat transfer images, fabric, paper, found objects—and most importantly, not a lot of rules—are often just what the doctor ordered.
As lovers of fabric, color, and pattern, creating fabric art is a natural extension of the mixed-media we have come to love. Here at Cloth Paper Scissors, we too love the use of fabric and stitch, so we gathered four articles to share the endless possibilities of creating textile art and fabric art, mixed-media style.
Click Here To Download!

What’s inside?
In our new free eBook, we focus on this brilliant approach to creativity and feature four unique projects to show you just a few of the possibilities that fabric and stitch have to offer.
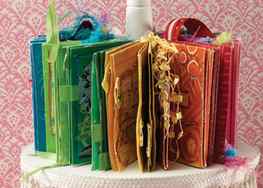
A Piece of Cake: Easy, Colorful Fabric Books by Debbi Crane
These fanciful handmade books are full of bright hues that are sure to delight. “I wanted to teach a project that would be easy and interesting for all levels, one that would incorporate fabric and had a color theme,” says Debbi, of her fabric book project. In this article she shares how a poem is a painless way to create text in a book if you think you can’t write. Learn how to overcome word shortcomings to create your own poem fabric journal books with this great free article.
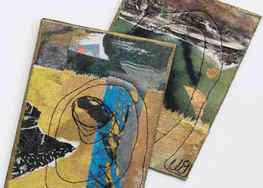
Fabric Collage Mail Art by Wen Redmond
This fabric collage process is a quick approach to composing a complete series of fun fabric based postcards. It’s also an ingenious way to use up all of your scraps and leftovers from other projects. Try it, and enjoy spontaneous artistic flow while creating stacks of unique postcards. So take out all of your goodies, and let’s get creative.
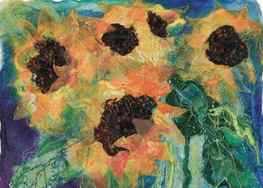
Fusing Fabric and Fibers for Fantastic Effects by Dianne Richards
Silk and other fibers can be used to make your own unique fabrics for a variety of textile-based projects. This fabric can be used as inspiration for stunning textured collages, usable artwork such as bags, boxes, or book covers, or incorporated into bigger works of art like quilts or wall hangings. This great article covers fabric embellishments in many ways—using other fabrics, silk rods and cocoons, machine and hand embroidery, and beadwork. The possibilities are endless and as wide as your imagination.
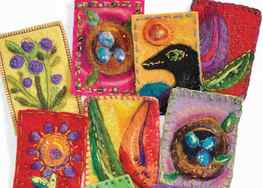
Fiber Effects: Colorful needle-felted artist trading cards by Kelli Perkins
Big, fluffy bundles of carded wool, lamb-soft tails of curling top, and silky strands of intense hue beckon spinners and knitters. Who can resist dye-batch names like “lollipop,” “hot peppers,” and “moon goddess”? If owning sheep is not your cup of tea, there is undoubtedly someone in your community who thrives on it. My semi-rural town is rich with family-owned operations producing a delicious artist’s paint box of hand-dyed, unspun fibers. But what if you’re not gifted with the tools to turn roving into yarn? You can still join in the fun by learning the inexpensive art of needle felting. Learn to create your own artist trading cards with this fun process.
What’s a “thumbnail drawing”?
Let’s say I’m looking at this scene, trying to decide on a composition for a painting.

One common way to begin planning is to do a series (10, 20, 30 . . . ) of “thumbnail drawings”.

These are small pencil, pen or marker sketches—2×3”, say—that you use to figure out the overall structure of your painting. What elements of the scene will you include? What are the big shapes? How will you arrange them? Will you include or edit out that telephone pole? What will the main value pattern look like? And so on.
The idea is to keep them very simple, just showing the big shapes and main values.
What’s wrong with thumbnail sketches?
And now, a confession: No matter how hard I try to simplify, whenever I do thumbnail sketches, some part of my brain keeps saying “no one will be able to tell what that is!” I find myself adding more and more detail (and hunching lower and lower over my paper).
I get lost in “fixing” things and adding tiny details and it takes forever! About the time I feel like I need a magnifying glass, I finally wake up and realize I got sucked in again! It’s a huge waste of time. Worse, I’ve totally lost sight of the big picture questions I was supposed to be figuring out.
Drawbacks (for me, at least!) of starting with thumbnail drawings:
- encourages deciding format in advance
- worries about accuracy and “making a good drawing” short-circuit creative brainstorming
- easy to get caught up in details and spend waaaay too much time and effort
My alternative to thumbnails: exploratory drawing
How to do exploratory drawing:
Feel free to change this to suit yourself, but I recommend you try it a few times as described. It might take a little practice to shift gears from “making a drawing” to “drawing as an aid to brainstorming”. You have to let go of old habits. Tell your inner critic to go have a nice cup of tea and leave you alone for a while.
Work on “expendable” paper.
I use ordinary copy paper, folded in quarters, so I can easily hold it in my hand to draw without needing any additional support.

Don’t start by drawing a box.
At the brainstorming stage, why make yourself feel cramped or “box yourself in” to a particular format or size?
Without a box, you can draw at whatever scale feels natural and comfortable.
You can always add a box (or boxes) later. Even if you know the format of the painting (a postcard, say), it’s easier to experiment with drawing various boxes around the sketch than to redraw the sketch repeatedly inside different boxes.

Let the pen (or pencil) follow what captures your interest and how your eyes move around. Use a relaxed “scribble” drawing style. Add written notes freely.
Try to allow your pen or pencil to simply “follow the eye”. Don’t worry about what is going on the page. Just use the act of drawing to help you start to notice what captures your interest. Where do your eyes go? Where do they linger and return? What are you noticing and learning about the subject as you start to draw?
As in the example above, feel free to add written notes to record anything that’s hard to capture quickly in a sketch—color ideas, aspects of the scene you find interesting but don’t know how to sketch quickly, questions or reminders for yourself, etc.
Don’t worry about accuracy—draw to supply a framework for your imagination and to make “visual notes”.
This is not drawing practice!
I’m all for practicing your drawing skills, but that’s a separate activity. If you try to practice drawing skills while you’re doing exploratory drawing, you’ll just do a bad job of both. Practice them separately!
In exploratory drawing, most of the work takes place in your mind’s eye. You are starting to imagine how paintings based on this scene might look. Not just composition, but size, colors, style, brush marks, washes, wet-in wet effects. Feel free to imagine anything with no worries at this point about whether you think you have the skills to pull it off—that’s for later!
Move on as soon as you get the least bit bored, frustrated or feel like you’ve got enough down to remind you of the idea you’ve been exploring.
There’s no need to “finish” a drawing!
Exploratory drawing is not about recording information you’ll need for the painting—that comes later. (And after you do some exploratory drawing, you’ll have a LOT better idea of what photos or sketches you might actually need as reference for your painting.)
You only need enough on the page to remind you of the ideas you’ve considered. No one else needs to be able to recognize what you are drawing—it’s shorthand visual note-taking for YOU.
Plenty of time later to flesh out your ideas. At this stage, focus on pushing yourself to generate lots of ideas and imagine freely. The goal is to identify a few ideas that really excite you. It’s a lot easier to get yourself to dive deeper into planning when you are working on an idea you’re really excited about.
Generate lots of ideas, quickly.
I try to keep each little drawing to less than a minute (many take only a few seconds) and generate 10 to 30 quick sketches. There will be time later to delve deeper into a few ideas you like best.
Keep asking yourself: what’s another way I might like to create a painting based on this scene?

The more ideas you can generate, the more likely it is you’ll arrive at one that really interests you. And the more exciting the idea is, the more you’ll want to invest the work to make it a really special painting.
Zoom in, zoom out. Turn around, move and change your perspective. Be bold; be subtle. Notice color and texture. Notice the big picture. Notice interesting details. Notice how you feel.


Notice non-visual things that influence your response to the scene and might affect how you interpret it in a painting: it is hot and dry? do you hear children playing or birds calling or people working or a train rumbling by? does the scene call up emotions, memories or associations that are meaningful for you? Write them down!


Remind yourself: exploratory drawing is something you DO, not something you make.
You are not drawing to “make a drawing”; you are drawing because having pen (or pencil) on paper helps you think like an artist, instead of just admiring the view.
I hope you find this an enjoyable and painless way to start brainstorming ideas for paintings! In later articles, I’ll talk about how I use the results of my exploratory drawing in the rest of my “painless” planning process. Until then, happy painting!


