How to Make Homemade Face Paint and Take Your DIY Costume to the Next Level
As POPSUGAR editors, we independently select and write about stuff we love and think you’ll like too. If you buy a product we have recommended, we may receive affiliate commission, which in turn supports our work.
September 20, 2023 by Sarah Lipoff

Making your own Halloween costume can be fun, but it can also be a little stressful. You have to start from scratch and get extra creative with every little detail, including your makeup, which can really drive home a DIY get-up. And using face paint instead of eyeliners, eyeshadows, or lipstick can be a great option for a more dramatic or pigmented makeup look.
Still, a lot of store-bought face paints are either way too expensive or not safe for the sensitive skin on your face (not to mention, they can leave marks that last for days). So why not try DIY face paint instead? If that sounds like way too much work, don’t worry. It’s actually really simple to put together your own face paint so you know exactly what’s in it. With just a few key products and a couple of art brushes, you can take your Halloween costume up 10 notches. And the best part? It only costs a few dollars to pull off. Here’s how to do it.
How to Make Homemade Face Paint
- Cornstarch
- Face lotion
- 1/4 teaspoon vegetable oil
- Washable paints, natural food coloring, or homemade dyes
- Small containers
- Small bowl
- First, decide which type of pigment you’ll use. You can find packs of colorful washable paints at your local craft store or on Amazon for only a few dollars, such as this Crayola Washable Kids Project Paint ($5, originally $6) or this Washable Finger Paint For Kids ($8-$12), which you can buy with six, eight, or 12 colors, depending on what you need. Using washable paint instead of natural food coloring creates solid colors that won’t stain clothes — or your face. Most are nontoxic and, when diluted, safe to use on skin (but remember to avoid using around the eye and mouth areas). You can also swap washable paint for a few drops of natural food coloring or homemade dyes, which you can make using foods or plants — just be warned that using food coloring may stain skin and clothing.
- Start by making a base for the face paints by mixing together equal parts cornstarch and your favorite face lotion until it forms a thick mixture. Add the vegetable oil, which helps keep the paint from caking. You want things to be smooth without being too watery.
- Now add a spoonful of the mixture to a small container and add a pea-sized amount of washable paint or dye.
- Continue adding colors until you’ve got an entire set of face paints. For a bit of shimmer, sprinkle glitter eye shadow into containers or swipe over finished face paint for allover glitter.
- As with any new makeup, rub a bit of the face paint on your hand or arm to check for a reaction first before applying to your face.
- Apply using face sponges or lip brushes. Paint will dry creating a smudge-free look. For a smoother application, add a few drops of water to the paints.
DIY Halloween face paint tutorial

If you’ve been reading Southern In-Law for a while, you may know that my sister, Katrina, is ridiculously talented when it comes to face painting and makeup.
Since Halloween is fast approaching, in only seven days time, we decided to team up to create an awesome or perhaps gruesome Halloween Zombie Face Painting Tutorial (well it’s kind of a Halloween Zombie Makeup Tutorial, too!) to share with you so that you’re Halloween ready.

Paired with an awesome Halloween Costume from Smiffys, we were ready to share a pretty cool tutorial with you, so let’s jump straight to it!
Here’s how you can create your own Halloween Zombie Look >>
What you’ll need for this look:
Throughout the tutorial, you’ll see the items you need for each step listed in bold.
- Moisturiser
- Liquid foundation
- White face paint
- Paint brushes and sponges
- Red face paint
- Black face paint
- Black eyeliner
- Optional but recommended: Eyeshadow Palette (you’ll need reds, browns, purples and black tones)
- Optional but recommended: fake blood
- Optional:brown face paint(if you don’t have brown shadows)
- Optional: false eyelashes
- Optional but recommended: A fun zombie Halloween Costume. We used this Zombie Dorothy Costume from Smiffys.
Before you start: Be sure to apply moisturiser before applying any face paint. This will stop the darker colours from staining your skin later on.

Step one: Mix your white face paint with liquid foundation. You’ll want to mix about 1 part foundation to 2 parts white face paint. This will not only make it easier to apply your base layer, but it will give you more of a realistic pale look instead of a my Mum decided I was going to be a ghost for halloween kinda look.
Apply this mixture with a brush or sponge, ensuring the paint is blended into both your hair line and down your neck. We find it’s easiest to first apply the face paint with a foundation brush and then sponge over it at the end (this way your sponge isn’t sucking up all of your face paint).
Our tip: Apply a layer of translucent powder to set your base layer. This will stop it from being sticky and allow it to dry so it’s easy to apply additional layers.
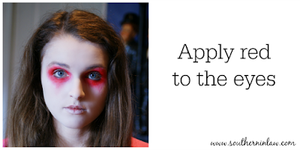
Step two: Apply red face paint or red eyeshadows to your eyes as shown using a brush and/or sponge. We started with the face paints and then added a mix of different red eye shadows for a more blood-red colour.
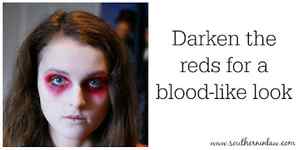
Step three: Darken the red of your eyes with red, rust and brown eyeshadows (or a mix of red and brown face paint) for a deeper blood-like look.
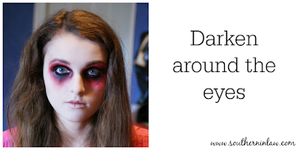
Step four: Using black face paint, darken around the eyes – focusing on the eyelid and under eye areas.
Step five: Blend your black layer with purple and red eyeshadow tones to avoid looking like a raccoon. Doing this will soften the lines and allow them to flow into one another.
Our tip: Set this layer with your translucent powder to avoid smudges later on.
Step six: Apply eyeliner to your waterline and fill in your eyebrows with a brow liner/powder.
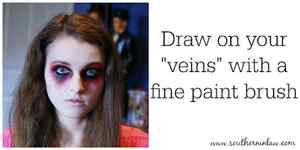
Step seven: Draw on your “veins” with a fine paintbrush and black face paint.
Our tip: Draw the lines on your hand first to create a softer line.
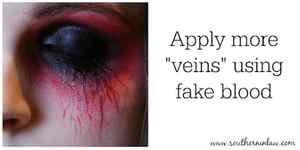
Step eight : Draw on some additional “veins” with fake blood and a fine paintbrush – just like you did with your black paint.
Step nine : Add some false lashes if desired for a more dramatic look.
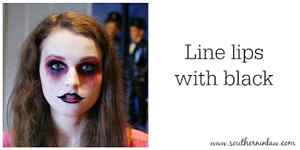
Step ten: Line lips with black eyeliner or black face paint and a fine brush.
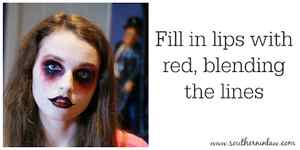
Step eleven: Fill in your lips with red facepaint or red lipstick, blending with the black eyeliner/face paint for a creepier look.

Step twelve: Using fake blood or red face paint, add your blood smears below your lips. Mix it up between smudging the “blood” with your finger tips and adding drips and lines (as shown).
You may also want to use brown/rust eyeshadow or brown facepaint to deepen the colour for a more realistic look.
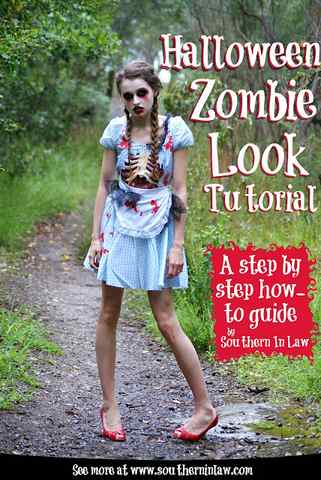
Step thirteen: Add a costume (or some ripped/”blood” stained clothes) and do your hair and you’re good to go!
And there you have it! Now you’re ready to audition for the next Hollywood zombie movie. or The Walking Dead ;P
PS: A HUGE thank you to my very talented sister for working with me on this post!
But tell me, if you were going to a costume party tomorrow, what costume would you choose? (and you can choose anything!)


