Before that though, here are the materials you will need (pictured also):
hair of some sort for the bristles
heat shrink tubing (a.k.a. “heat shrink”; or just “shrink”) used in electrics and electronics
(possibly) glue
wooden dowel or food skewers
scissors
point heat source such as a cigarette lighter
sewing thread.
Create and modify brushes
When working with the Brush tool on a smart object, a text layer, a shape layer, or an adjustment layer, users get a new transparent layer instead of a prompt to rasterize layers.
Discontinuation of 3D features in Photoshop
Photoshop’s 3D features will be removed in future updates. Users working with 3D are encouraged to explore Adobe’s new Substance 3D collection, which represents the next generation of 3D tools from Adobe. Additional details on the discontinuation of Photoshop’s 3D features can be found here: Photoshop 3D | Common questions on discontinued 3D features.
You can create brushes that apply paint to images in a variety of ways. You select an existing preset brush, a brush tip shape, or create a unique brush tip from part of an image. You choose options from the Brush Settings panel to specify how the paint is applied.
Note: Symmetry painting and Pattern Preview do not support Live Tip Brushes. Choose a normal brush for symmetry and pattern painting.

Brush Settings panel overview
The Brush Settings panel lets you modify existing brushes and design new custom brushes. The Brush Settings panel contains the brush tip options that determine how paint is applied to an image. The brush stroke preview at the bottom of the panel shows how paint strokes look with the current brush options.
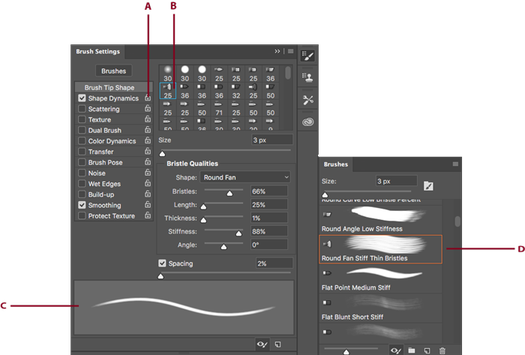
A. Locked/Unlocked B. Selected brush tip C. Brush stroke preview D. Brushes panel
Display the Brush panel and brush options
Choose Window > Brush Settings . Or, select a painting, erasing, toning, or focus tool, and click the panel button on the left side of the options bar.
Select an option set on the left side of the panel. The available options for the set appear on the right side of the panel.
Note:
Click the checkbox to the left of the option set to enable or disable the options without viewing them.

Purdy has spent many years with both professional painters and serious DIY painters, observing them and answering many questions. We have compiled the following painting tips and techniques to help meet your needs. However, please feel free to contact us directly with your individual question.
Which paint brush do I use for various types of paints?
A natural bristle paint brush is made from animal hair, and is very soft and porous. For oil-based paints, most professionals choose a natural China-bristle (hog hair) paint brush.
If you are painting a smooth surface with oil-based paint, a natural White Bristle paint brush is your best choice because it is soft and supple. When painting a textured surface, a natural Black Bristle paint brush will work better, because it is stiffer and has superior abrasion wear. When you require an ultra-fine finish, a brush blended with ox hair is the best choice.
Synthetic filament – When your choice in coatings is water-based (frequently referred to as latex), it is absolutely essential that you select a synthetic filament paint brush. The Purdy synthetic filament range includes:
- 100% black nylon
- 100% dyed nylon
- Nylon/polyester blend
- 100% Chinex® filament
- Chinex/nylon blend
- Chinex/polyester blend
- Chinex/nylon/polyester blend
Brushes that include a blend of polyester, such as our XL™ Elite™ series and PRO-EXTRA® series maintain their bend and recovery (or flex) better than brushes made of 100 percent nylon. This characteristic enables an XL Elite or PRO-EXTRA professional paint brush to perform consistently well in warm, humid weather conditions.
When painting exclusively indoors under controlled climatic conditions, a 100 percent nylon paint brush is a great choice, because stiffness retention is not as critical a factor. Furthermore, 100 percent nylon filament allows the paint to release from the brush easier and flow more smoothly onto the working surface.
It is worth mentioning that Purdy synthetic filament paint brushes also perform exceedingly well in oil-based paints. This is due to the various processing and finishing steps in our manufacturing operation that soften the synthetic material and eliminate drag when used with oil-based paints.
© 2023 Purdy. Sherwin-Williams UK Limited
Step 1: Prepare Your Bristles
Bristle Source
Do you have long hair you’re willing to sacrifice pieces of?
No? Then do you have access to someone (sister, wife, etc.) who sleeps soundly? 🙂
I joke. But i do foresee a lot of pets with missing tufts of hair.
Horse hair – if you know people with horses, this is a good source of longer hairs. Though the longer pieces from a horse’s clipping (yes, they get haircuts) is from the tail or mane, and is thicker hair.
I have long hair but only cut it once every 6 – 12 months. So I get a good long lock off. Try to keep it together when you cut it – splitting it up is easier than trying to put a bunch together.
The ideal in precision paintbrushes are hairs that each taper at their tips. You may be able to achieve this using some animal hair.
‘Fresher’ hair will be easier to manipulate. Though it’s the natural oils etc. which make this so, and you may wish to wash the finished brush before use to remove these ‘additives’.
Orientation
If you’re using natural (mammal) hair, remember that it has a ‘direction’. Although the brush i’m making here is most useful as a paintbrush, a brush isn’t a paintbrush until it has paint on it. So create your brushes with their purpose in mind. The reward for creating with intent is a tool that’s a pleasure to use. In this case, the scales on the hairs could point ‘up’ the handle of the brush to better ‘scrape’ if it’s a brush to sweep (say dust) away, or could point ‘down’ the brush for a smoother application of paint.
A similar approach can go for hair / bristle selection.
For this example I’m using human hairs, cut to approximately 60 mm (2 ½ inches) long from a longer lock.
Add Tip Ask Question Comment Download
Step 2: Fixing the Bristles in Place
Select a bunch of hair to fit into the heat shrink ferrule. If you’re sliding the hair straight in, get as much in as possible without too much effort. Or use my alternate method described below. Then heat only the section of shrink tube that is covering the hair. It will tighten down and clamp the hair in place, taking up the little space you couldn’t fill. The further into the heat shrink tube you can have the hair, the more area there will be clamping down on it holding it in place. A small flame such as that of a cigarette lighter is best for this local heating.
Because we’re using a ferrule that tightens down on the bunch of hair (bristles) when it shrinks, you may wish to use no glue to hold the bristles in place. This is especially unnecessary if you’re doubling the hair over in a bend (as I describe below). You could certainly change the process slightly and ass glue if you like, but i’m going to show my process without glue. If you do use glue it’s to hold the bristles together as a bunch (rather than hold the bunch to the handle), and you would apply glue and let it set or dry before continuing. Doing this lets you best control where on the bunch of bristles the glue goes. You want as little glue as possible, restricted as much toward one end of the bunch of bristles as possible (so that there’s space between bristles to ‘hold’ paint. Don’t let glue ‘seep’ along the bristles by capillary action. Wood glue (white glue) is best but watch for water solubility.
My method for getting the hair into the heat shrink easily and compactly is to tie sewing thread around the bunch of hair, and pull the hair into the ferrule using the thread. The thread is tied in the mid point of the hair bunch. And the bunch of hair should be half as much as will fill the heat shrink ferrule, since it doubles over when its middle is pulled into the ferrule.
This has a few favourable consequences. First, a single hair that’s doubled over is less likely to fall out of the brush (to mar the applied paint job). Second, when the heat shrink contracts around the (larger) bend in the hairs it shrinks on either side of the bulge and locks it in place better than otherwise. It also means handling longer hairs which is less fidgety. And i’m not that fussy about the hair’s direction when i’m making ‘quick and dirty’ brushes.
Add Tip Ask Question Comment Download
Step 3: Adding a Handle
Slide the heat shrink ferrule over a suitable handle and heat to affix them together. A cigarette lighter works well as a small heat source. Pass the section of heat shrink tubing through the flame tip gently until the tubing clamps down.
We’re producing quick, somewhat dirty brushes here. But that just means our intention is to do so. It doesn’t mean we can neglect reasons for everything we do. So you could turn beautiful handles on a lathe, but to match the ‘quick’ and ‘cheap’ themes i’m using rough materials that I can find ready-made for my handles. But i’m still considering every aspect.
A good handle is long enough to contact two places on the hand when held (at least pencil length). It won’t dissolve or degrade if it meets paint solvent. And it won’t fall apart easily. To match the shape of the heat shrink ferrule, i’m using round wooden ‘sticks’. For the size brush i’m making here, a kitchen skewer is perfect. However dowels from a hardware store etc. come in a range of sizes and you’ll probably find one to suite.
The heat shrink ferrule may not be sturdy enough for your application. In a good paintbrush only the hairs bend and move which allows predictability etc.. You could consider slipping a second layer of heat shrink over the first. Or adding hot-glue over the ferrule. It may be easier to do this before adding the handle, or afterward.
Add Tip Ask Question Comment Download


