Ready to begin your journey with watercolour paints? Spotlight has a fantastic range of watercolour paints, sets, brushes and canvas for you to choose from. See the full range online or visit your nearest Spotlight store, where our friendly staff can help you find the right materials to begin watercolour painting.
The complete guide to watercolour painting for beginners
Watercolour painting is very different from its acrylic and oil painting cousins. Whether you are a new artist looking to learn how to paint or an experienced acrylic painter wanting to switch mediums, this guide will help you learn watercolour painting, as well as what you need to get started.
There are a few basic essentials you’ll need to get started with water painting, besides the watercolour paints themselves!
Canvas or paper for watercolour art
Watercolour painting must be done on special paper or treated canvas – normal craft or printer paper is often too thin to support the amount of water needed on paper for this medium. Look for watercolour paper with at least 200GSM – this paper is thick and strong enough to support your colours. You can buy individual sheets, but it is more common to find watercolour paper in pads that can be removed by pulling the paper from the tape binding.
Watercolour canvas is specially made to withstand the strongest of watercolour techniques (which often involve scrubbing and scraping at the paper) and has been primed to absorb and showcase watercolour paints.
Paintbrushes for watercolour painting
The main thing you want when buying an artist’s paintbrush for water painting is whether it can hold a point and if it can hold a large capacity of paint. The most common types of paintbrushes used in watercolour are mop brushes (for laying down washes of colour), flat brushes (for painting flat, straight lines) and round brushes (for painting curved lines and details). You want to ensure your paintbrush keeps its shape after use, otherwise you may struggle to paint the details you want.
As for their capacity, how much paint a brush can hold and how it releases it onto the paper is important. Synthetic bristle brushes keep their shape very well, but because the fibres are smooth they can struggle to hold onto lots of paint and can ‘dump’ it onto your paper. Natural hair brushes are much better at gripping paint and releasing it, but they have a lot of other characteristics that can vary depending on the type of hair that is used.
Try to buy a few sizes of natural hair round brushes for your detail work, and synthetic brushes for tougher techniques that their bristles can stand.
Watercolour painting palette
A watercolour palette is indispensable for painting, as it has handy compartments that will let you keep your colours separate, as well as sections for mixing colours into new hues. Choose palettes made of non-porous material like plastic or ceramic, as these will keep your colours pliable and within easy reach.
A watercolour palette can be easily cleaned after each session with a little warm water and soap if needed.
Watercolour painting accessories
While all you really need for watercolour art is paint, paper and a brush, there are a few other accessories that will make your life a lot easier and open new opportunities for exciting techniques!
- Paper towels will be your best friend when it comes to cleaning brushes and fixing mistakes. Because there is so much water involved with this medium, they are great to have on hand for general tidying up as well.
- An aqua pen (also known as a water brush or aquarelle pen) is a fun alternative to a paintbrush. It has synthetic bristles like a brush, but instead of a wooden handle, it has a clear barrel that is filled with water. This water keeps the bristles wet and allows you to lift colour straight from the palette onto paper. They are also great for wetting the colours made with watercolour pencils.
- There are many kinds of artists’sponges you can use with watercolour art. Sea sponges, circular sponges on sticks and special artists’ sponges all create different effects on paper that can simulate foliage, clouds, grass and more.
- Grey lead pencils can be used to lightly sketch the composition of the piece you plan to paint. Look for pencils sized 7H and above, as you only want to create very faint, thin lines – the transparency of watercolour paint means thicker lines will be visible underneath the colour.

Mixing watercolours & creating gradients
One of the great things about water painting is how easy it is to mix colours together. Because watercolours are transparent, colours are easy to layer and shine through each other like tiny stained glass windows. Make sure to mix your colours on a palette before applying them to paper to ensure you have the colour you want.
To mix watercolours, add a small blob of each colour to the palette with about five centimetres between them. Gradually bring the edges of the two colours together and mix, adding more of each colour until you have achieved the hue you desire.
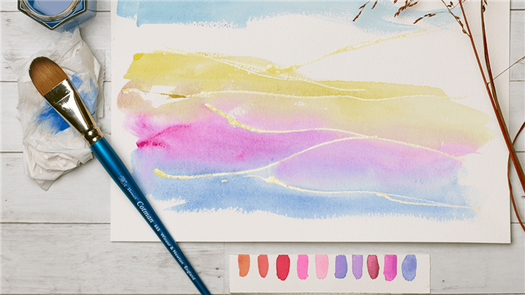
To make a colour gradient (great for painting sunsets or oceans) choose colours that are near each other on the colour wheel (like yellow and green or blue and purple) and have them ready to go on your palette. For example, start by painting a small strip of pure blue paint onto paper. Clean your brush, then pick up a little bit of purple paint on your brush and mix it into the blue paint on the palette. Continue painting next to your blue line with the new colour and blend it smoothly. Keep adding small amounts of purple to your blue paint and adding to the gradient, until the end of the gradient is pure purple.
Watercolour painting techniques for beginners
Watercolour techniques often revolve around how much water you are using and where you apply it. Here are four easy techniques for beginners to try:
- Wet on wet – this technique will give you beautiful, softly flowing colours that are perfect for dreamy landscapes. You’ll need to start by adding some water to the surface you are painting on. Simply dip your brush in water and paint invisible lines over the area you want to use until it has been covered in a thin layer of water. Pick up some wet watercolour paint from your palette and paint it onto the wet area. Depending on if you paint lines or just dab your brush, you will see colours bloom in different ways.
- Wet on dry – you will be able to create more defined lines and shapes using this technique than the wet on wet one above. Instead of wetting the paper, simply apply paint directly onto the dry paper. Moistened paint will create a smoother line, while drier paint will give you textured results. Because the paint isn’t blooming onto a watery surface, you can paint defined lines without worry!
- Plan for white – this isn’t exactly a painting technique, but it’s a very handy tip for anyone to know! While white watercolour paints are available, they are easy to misuse and can end up clouding your other colours. If you really want to have sections of white in your artwork, it is best to leave those areas blank and let the white of the paper shine through your other colours. Either plan your artwork beforehand so you know what to leave blank, or use masking fluid to cover the areas you want to keep white – this can be peeled off when you are done to reveal the clean paper underneath.
- Salt – adding salt to your watercolour artwork can produce interesting and unexpected results! Sprinkling a little salt over wet paint on paper will cause the salt to slowly absorb the pigments, creating enchanting speckles in the painted area. Once it dries, carefully remove the salt by blowing it or gently shaking the paper. Use this technique when you want to show small wildflowers, grassy texture, snow and other similar things in your art. You may like to test this with your paints on a piece of scrap paper to see how your choice of salt and paint react.
Materials List
Uni Pin Fineliner Drawing Pen – Complete Set of 9 Buy From Amazon
No. 2 Squirrel Hair Mop Brush Buy from Amazon
Synthetic Squirrel Flat Brush Buy From Amazon
Princeton Neptune Synthetic Squirrel Round Brush Buy From Amazon
Rigger Brush ( For thin tree branches etc)
Da Vinci No.4 Petit Gris Round Mop brush Buy From Amazon
Winsor & Newton Cotman 111 Round No.3 Buy From Amazon
Paper
Arches Watercolor Paper Block, Cold Press, 9″ x 12″, 140 pound Buy from Amazon
Easy release painters masking tape Buy from Amazon

Subscribe to my newsletter and get my free email course plus free art critiques, videos, tips and discount offers
Free Course! Learn Watercolor In 7 Days
n.b. I will never share your email address with any 3rd parties
Setup Your Painting Angle
All the following examples were painted with the paper at an angle of about 25 – 30 degrees. If you don’t happen to have an easel, then just rest your paper on an angled surface. A lever arch file works perfectly well for this. Painting with your paper at an angle means that the paint will mostly flow in one direction which brings a certain amount of predictability to this unpredictable medium.
This wintry looking abstract landscape was inspired by the work of Antonio Ortega Perez https://www.instagram.com/antoniortega67/ and only uses 2 colours. Ultramarine mixed with Paynes Grey.
To be honest, the Ultramarine was probably not even needed as Paynes Grey consists of and will naturally split into black and blue.
The idea here is to simply encourage the paint to flow and let it do what it wants. When you’re happy with the way it looks, you can embellish it with suggestions of trees and foliage and Hey presto, this is a landscape that practically paints itself!
Steps 1 -2
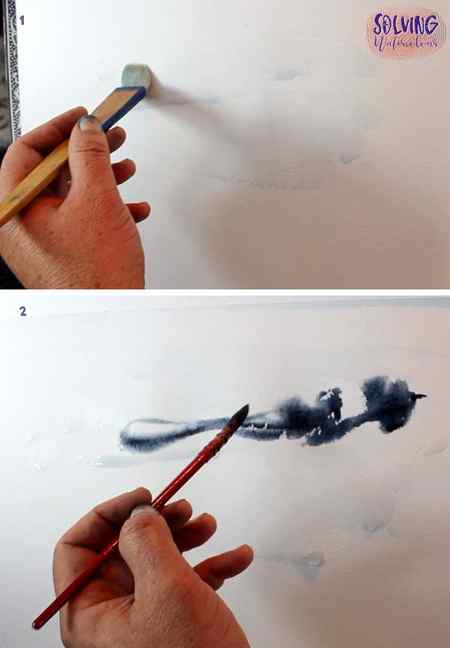

Take a brush that holds a good amount of water. A large flat brush will do, or in this case I used a medium sized Hake. The Hake is a good brush for this because we don’t the water to go on too uniformly. The Hake, with it’s floppy goat hair, holds a lot of water and creates marks with a natural looking roughness to them.
Wet In Wet Painting
Paint two or three stripes of pure water horizontally across the paper and connect them in a couple of places. Connecting them creates a channel that will allow the paint to flow down through the painting.
Take a mop or round brush and just start making random marks with a wet Ultramarine/Paynes Grey mix onto the wet paper.
Steps 3 – 5
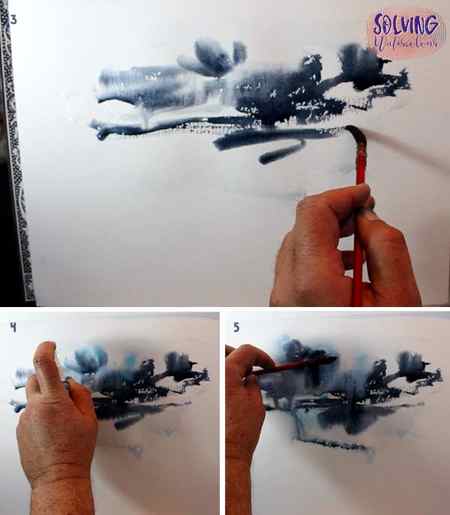
Carry on making marks with the brush until you’re happy with what you have.
Play around with the paint. Encourageit to flow and spread further by spraying some clean water from an atomizer onto the paper. Add some additional brush strokes if you feel like. This whole process should be an intuitive one. There’s no right or wrong, it’s simply what looks good to you.
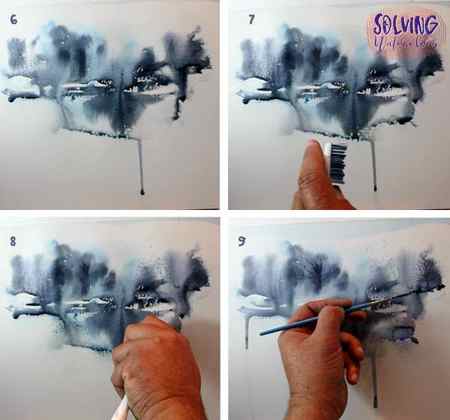
Steps 6 – 11
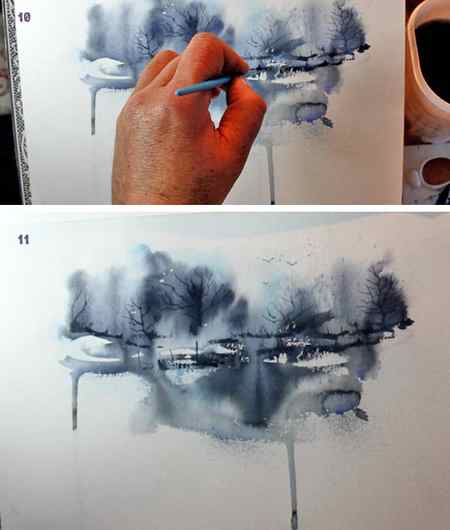
After I had allowed the whole painting to dry, I took an old toothbrush and flicked some more paint on to the paper for an additional texture effect. The final step is to take a rigger brush and add some trees, grass and foliage wherever it feels appropriate. For me, the overall effect was one of a vignetted semi-abstract winter landscape. although I didn’t particularly have that in mind when I started. The trick is really is to just go with it and see what happens.


