The leaf pattern is available below, sign in or sign up for free access.
How to Paint Fall Leaves for Autumn Decor
Paint Fall leaves on coasters, table runners, add them to fun signs, you name it! Switch up the colors and make them unique. Easy enough for beginners, and fun enough for everyone.
Learning to paint Fall leaves is easy to do and oh-so fun. The video makes it easier to see how the brush moves along.
No time now? PIN for later!

Supplies
- 3/4 inch Donna Dewberry one stroke brush
DecoArt Americana craft acrylics:(or use comparable Plaid FolkArt colors) - Spicy Mustard
- Cadmium Yellow
- Georgia Clay
- Tangelo Orange
- Cranberry Wine
- Brush Caddy
- Graphite Paper to transfer design
For a complete list of my most used painting supplies CLICK HERE. I have a check list you can download and print.
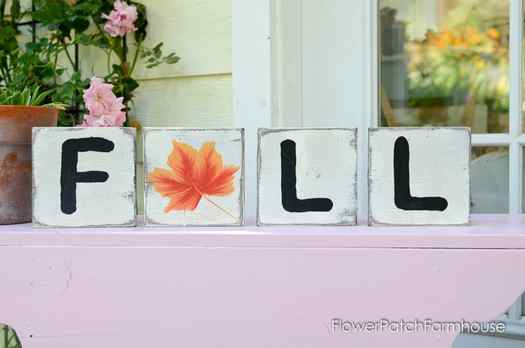
I painted my leaves on painted wood for a sign like these Scrabble tiles..
To see that post click here FUN DIY SCRABBLE TILE ART
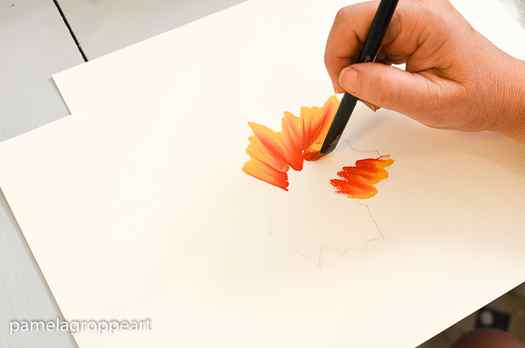
Get Started painting leaves
So let’s learn How to Paint Fall leaves!
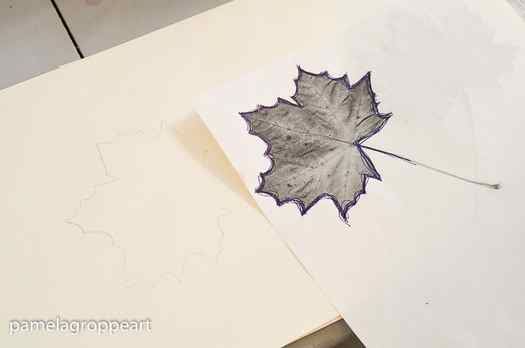
1. Start with the design. I actually copied a leaf from a Maple tree to make mine. A free printable pattern is available in the resources page. A form below is available to fill out if you don’t already have the password.
2. Place it on top the surface to paint. With graphite paper trace along the outline. This is a guideline but I don’t follow it exactly.
Beginner’s Tips for Painting Autumn Leaves
Does the thought of painting in watercolor intimidate you? Is it even harder for you to imagine how you might do it outdoors, in a park or meadow? Let me help get you started! Fall leaves are a great subject to start your painting journey with, since they come in so many different colors which softly blend together making painting a breeze.
With Autumn in full swing here in central Oregon where the sagebrush meets the pines, I was inspired to take a hike and do some watercolor painting. I brought along my camera so I could show you just how easy it is to incorporate watercolor painting into a nature sketching practice.
This is just a casual, unscripted tutorial I was inspired to make in the beauty of the moment, so please forgive the sound of the creek in the background, I couldn’t find a picnic table in a quieter part of the forest! And as wise folks like Confucius, Shakespeare, and Voltaire have said, in one form or another, “perfect is the enemy of the good”.
Before you watch the video, you may like to download my Cheat Sheet for Painting Autumn Leaves, which includes the tips and leaf photo practice page as seen below the video.
A quick note: In this video, I dip my palette in the stream water, which certainly isn’t the best practice. I would recommend that instead, you wet your palette with a spray mister since some paints, like Cadmiums, can be harmful to wildlife if ingested. You should then pour any excess onto a paper towel instead of the ground.
Let’s review the painting tips from the video
- Assemble your art supplies including watercolors, brush, pencil and paper.
- Collect a variety of colorful leaves. If you can’t pick any of your own leaves, you can download the Autumn Leaves Practice Page I created for you (as seen below).
- Sketch a leaf or save time by simply tracing a leaf onto your paper.
- Take some time to observe your leaf before you start painting. Notice and name the colors you see and how they blend together.
- Paint loosely in a wet-in-wet technique starting by wetting the leaf you’ve outlined on your paper with clear water.
- While your paper is still wet, paint the lightest color in your leaf , then quickly add darker ones, such as in this order: yellow, green, orange, sienna, blue.
- Be bolder with your colors than you think you should, since watercolors always dry paler than they look when wet.
- Don’t get too fussy or perfectionist by overworking the paints on your paper, just quickly drop colors in and move on, or else you risk over-mixing the colors and making mud!
- Let painting dry then feel free to add emphasis with additional layers of watercolor, pencil, pen, or opaque white gelly roller pens.
- Most importantly, have fun! I always encourage my students to enjoy the process over the product and progress over perfection!
Now It’s Your Turn
Now it’s your turn to try your hand at painting leaves in watercolor. Download my Cheat Sheet for Painting Autumn Leaves, which includes the tips above and the practice page below.

Want to learn more about watercolors?
If you enjoyed this tutorial I bet you’d love my introductory online course on watercolor painting. It includes videos and downloadable guides that you can study in the comfort of your own home. Learn more about the course HERE!

Tutorial: How to paint a fall leaf in watercolour

Leaves are one of my favourite things to paint in watercolour! And they look their best in autumn, or fall if you’re from the US. I love the way they change colour so gradually, revealing all the beautiful yellows, oranges and reds.
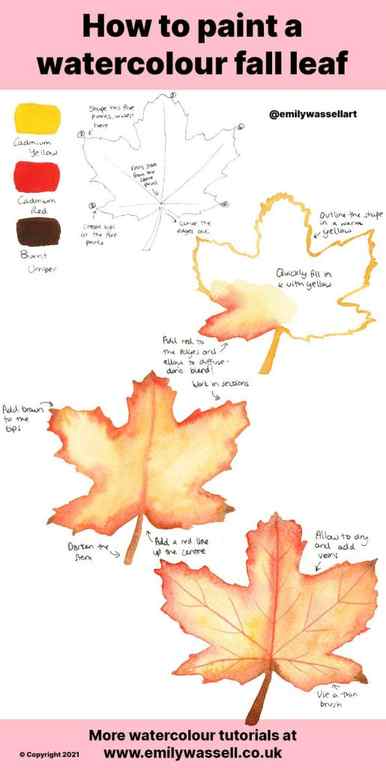
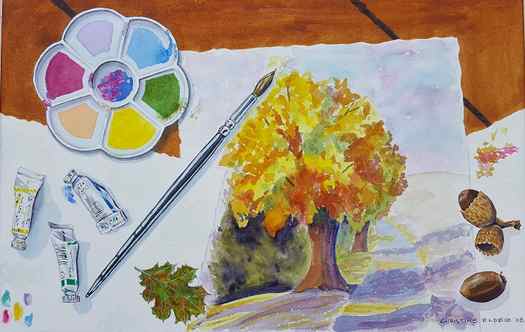
Supplies you will need
- Watercolour paper sheets
- Watercolour paints
- Brushes (medium and small for details)
- Water jars
- Paper towels or cloth to dry your brushes
I’m using Winsor & Newton Professional Watercolour paints in:
- Cadmium Red
- Cadmium Yellow
- Burnt Umber
Painting an autumn leaf – step by step
- Sketch out your shape with a pencil if you like – it can make it easier to get the scale right. Start with a small stem, then draw lines out to five points. The two top points are longer and wider than the bottom two. Create tips at the five points and then join up using curved lines. Add the vein lines in, starting from the same point near the stem.
- Outline your leaf in a warm yellow, including the stem. Working in one corner first, begin filling in the shape with a watery mix of paint.
- While the area is still wet, load up your watercolour brush with a red colour and touch it to the edges of the shape, allowing the paint to bleed and blend out.
- Using a darker brown colour, touch your brush again to the leaf tips and allow to bleed out.
- Continue working in sections around the leaf, adding your yellow, red and brown colours, until your leaf is filled in.
- Darken the stem, and run a red line through the centre of the leaf, allow it to diffuse out. Let this layer dry completely.
- Use a fine brush to add the veins on top in a red-brown mix. Begin with the long lines running from the stem to the tips. Add shorter veins coming off your main ones. Try to make them curve as much as possible for a natural look.
That’s how to create a beautiful sycamore leaf in watercolour! Hope you liked this watercolour tutorial. Happy painting!
More tutorials
- How to paint fall trees in watercolour
- How to paint a watercolour monstera leaf
- Tutorial: How to paint watercolour lilac
- Tutorial: How to paint a pansy in watercolour
- Tutorial: How to paint watercolour delphiniums
- Tutorial: How to paint watercolour fish


