Before we get into it, let’s answer some questions…
Design and Create a Dress


By Gages Cooking Corner Follow
More by the author:


About: I’m finishing up college and I have some free time to share my creations with you before I move on to graduate school. I hope that I can teach everyone something that they will use at some point. I have been u… More About Gages Cooking Corner »
Designing and creating a dress is remarkably simple, and can be done by anyone. As long as you have an idea, some paper, some fabric, something to mark it with, something to cut it with, and something with which to sew it together, you can too!
The dress featured in this instructable took about 6 hours total to complete (and I made plenty of mistakes that had to be corrected). Considering this is my first dress, I am happy with how long it took.
Since this instructable features the little black dress that I made, I will tell you exactly what I did and what I learned. If you are applying this information to make a dress of your own size and design, obviously you need to alter the techniques and supplies accordingly to suit your own dress design.
I will assume that for the duration of this instructable that you keep the above paragraph in mind, and I will not be reminding you to employ a technique differently depending on your design.
Okay, let’s get started!
Add Tip Ask Question Comment Download
Step 1: Supplies You Will Need
You will need the following:
– Paper (to draw on)
– Butcher’s Paper (to adapt a stencil, can be found inexpensively at hobby stores in rolls)
– Chalk Wheel Marker
– Sewing Machine (can be done by hand, if you’re daring)
– Fabric (and dress liner fabric)
– Needle (for hand sewn touchups)
– Seam Ripper (if you make as many mistakes as I do)
Add Tip Ask Question Comment Download
This may be the hardest part of your dressmaking journey, coming up with the dress you want to create. My first dress was crafted with the help of my girlfriend. She wanted a little black dress, so we sat down and I drew something that she liked.
Then I measured my model, following a helpful dressmaker’s measurement guide. I recorded the measurements with my drawing and imagined an unfolding of the dress into flat planes. Graph paper is helpful here to insure symmetry.
I drew each of these flat planes and made note of where the seams would be, and how they would attach to the other planes of the dress.
Here’s an example, If my model’s waist measurement is 30 inches (circumference), then that means the top of the front part covering her waist will measure about 15 inches. The dress was not meant to be skin tight, so it was drawn to flare outwards slightly from the waist.
These drawings will allow you to estimate the amount of fabric you need to buy. I bought two yards of polyester and two yards of dress lining material.
Once these planes were drawn, I transferred them to butcher’s paper scaled up to actual size. I didn’t include pictures of this because they all looked the same and offered little in the way of usefulness.
Butcher’s paper is great because it is very hard to tear and bend.
Here are some tips for transferring your small drawing to butcher’s paper and keeping it symmetrical and to scale:
– Make stencils slightly larger than actual measurements. This leaves room for the seams!
– Check measurements with a ruler or tape measure constantly
– Use edges of paper to keep straight edges straight
– Use a compass if you are geometrically savvy
– Work on a hard surface
– Use a pencil, erasers are your friend
– Fold the stencils in half bilaterally to insure symmetry
– One stencil can work for more than one part of the dress! (If you notice in my photos, my dress could have been made with fewer stencils. I made extra so I could tape them to my model!)
Add Tip Ask Question Comment Download
Step 3: Cut the Fabric
After the stencils are cut, lay them onto your fabric and trace them with a chalk wheel. Be careful that the stencil doesn’t creep whilst you mark the fabric (it happened to me constantly). Use this opportunity to check your fabric to make sure there are no holes or defects!
if your fabric is badly wrinkled, iron it before this step.
Essentially you will be marking and cutting out two dresses, one in the fabric you have chosen for the dress and one for the liner.
Add Tip Ask Question Comment Download
What is a fashion Croquis?
A Croquis is a drawing of a fashion model that you trace over to design clothing. You can also call it a fashion figure or template.
Fashion croquis can be all different shapes, sizes, and styles. It all depends on the end use of your design and the demographic you are designing for. I’ve used different croquis throughout my career. Some were more stylized while others were super simple.
(P.S. If you want to take the pressure off of creating your own croquis and start designing right away, check out this 9-heads female figure Croquis Kit I made.)

What are the Proportions of a Fashion Croquis?
I will demonstrate how to draw a ”9 heads” croquis. The croquis is 9 heads tall from the top of the head to the ankles, which is much more elongated than the average woman. (The feet are excluded from the equation since they can vary in height depending on the type of shoes and heel height.)
A 9 heads model exaggerates the proportions of a fashion model to display clothes in an elongated and dramatic scale.
However, fashion models can, and should, have diverse body proportions, so I encourage you to evolve your croquis to be any shape and size.
This tutorial will teach you how to create the 9-heads croquis (with the proportions taught in fashion colleges) but you can adjust the proportions later to best fit your target demographic.

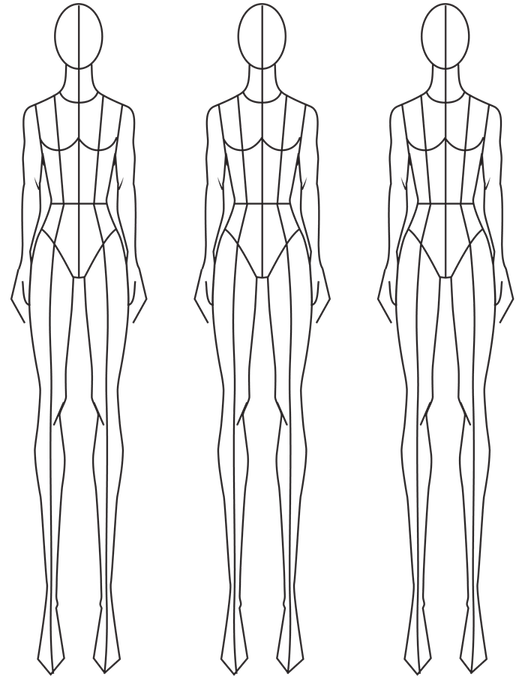
What Does “9 heads” Tall Mean?
The height and width of the head is used as an index for the dimensions of the rest of the body.
In this image, you can see how the body is broken up into 9 equal sections from the top of the head to the ankle bone. The feet are excluded because they can vary in height depending on the type of shoes and heel height.
It’s helpful to use the head as a point of measure instead of an actual measurement because your paper size can vary. From a tiny piece of paper to a billboard, you can map out the size and proportions of your figure by drawing 9 heads first.
If you are working with an 8.5 x 11 piece of paper, you can have each head be roughly 1” tall but this measurement will change depending on your paper size.


