First click the background layer on the Layers palette. Choose Edit > Select All (Ctrl+A), then choose the Paint Bucket again and click the canvas background.
8 tips to help you get started with Paint.net

DotPDN’s Paint.net is a free photo-editing software program with a lot to offer, especially for the zero price tag. I know it’s not Photoshop, Paint Shop Pro, Corel Painter, or Affinity, which have so many hundreds of features, it takes years to learn them all. But it does have the basic skill set to edit your photographs, it’s intuitive, and it’s easy to use.
Note: be sure to click the link to getpaint.net provided here and above. Searching for Paint.net online could lead you to sketchy downloads that might have bloatware or worse hitchhiking on the file.
The editing features include:
- Red eye removal
- Add or Reduce Noise
- Sharpen or soften images
- Input/Output Histogram for managing the tonal values of your image
- Adjustments for Brightness, Contrast, Curves, Hues, Saturation
- Invert Colors
- Posterize
- Black and White, and Sepia toned images.
- The Special Effects filters clock in at 35, which can be combined to create additional effects.
The one big problem is the Lasso tool. Unlike Photoshop and its cousins, Paint does not have a Polygonal or Magnetic Lasso, so selecting objects is NOT an easy task.
Using the Lasso Tool
With a little practice, you can master the Lasso tool using the Crtl and Alt keys with the mouse.
Press and hold the Ctrl key while you outline the target object. As long as the Ctrl key is pressed, you can start and stop the Lasso until the entire object is selected. If the selected area exceeds the object’s boundaries (in other words, if you have “drawn” outside the lines), press and hold the Alt key with the mouse to deselect the unwanted areas.
Use the Magic Wand
Use the Magic Wand to select large areas, then use the Lasso to refine the selection. If the Wand selects too much, decrease the Tolerance Level from 50 down to 40, 30, 20, etc., until the selected area is smaller and more manageable. If the background is less cluttered than the foreground object, use the Magic Wand to select the background, then select Edit > Invert Selection (Ctrl+I) to make the foreground object active.
If you cut the foreground object out of the background, you have to choose Layers > Add New Layer (Ctrl+Shift-N) before you paste the object back onto the canvas. Unlike Photoshop and its cousins, which automatically create a new layer as soon as you choose Paste, Paint requires you to add new layers for each object you cut out and then paste back in.
To reselect a previous layer, click/select the layer in the Layers palette, then click anywhere on the canvas. The selection outline surrounds the entire canvas, so it’s hard to determine exactly what’s selected. Choose the Move Selected Pixels tool (top right on the Tools palette). When the cursor changes to a cross with arrow points on the ends, position the cursor anywhere on the selected object, then hold down the mouse button, and drag the object to its new location.
Paint.NET Features

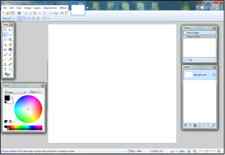
This is the workspace after the app loads. Each of the tools can be moved around or closed. The menu looks like a standard Windows app from before the Microsoft Ribbon design. File and Edit include the tools you’d expect. Edit adds a feature to paste into a new layer or new image.
View

The View menu includes zoom, grid, rulers, and options. Here I’ve opened the image pack for the Interior Design layout pack.
Image
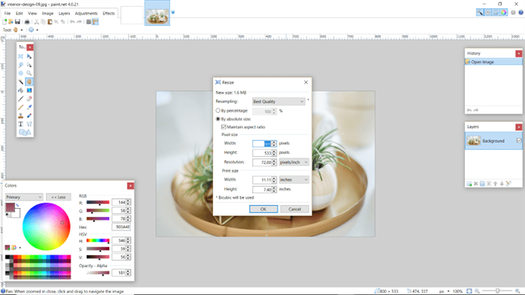
Image includes size and rotation options. The resize menu lets you resample the image for best quality, bicubic, bilinear, and nearest neighbor. Resize by percentage or enter a pixel size. Unfortunately, it doesn’t do batch resizing. You can copy the resize value to paste into the field, but batch resizing would be a better choice.
Layers

The Layers menu includes tools to add a new layer, duplicate a layer, merge, import, flip, rotate, zoom, etc. You can see the individual layers, move them, disable them, copy them, etc., in the layers tool to the right of the screen. You can add as many layers as you want.
I use this tool to create a gray overlay with 125 opacity as part of beautifying images for tutorials. I fill the layer with the color, select the portion of the screen I want to peek through, and delete the selected area of the layer (as seen in the image above).
Rather than deleting what I’ve selected, other options are available in the toolbar to replace, add, subtract, intersect, or invert. Layers can also be used to create masks.
Adjustments

The Adjustments menu includes tools to adjust the images including auto-level, black and white, brightness, contrast, curves, hue, saturation, invert colors, levels, posterize, and sepia.

Here I’ve adjusted the saturation and lightness. If I click OK and then open this tool again it retains the settings. This is helpful when adjusting multiple images that need the same or similar adjustments. The same goes for most of the tools.
Effects

The Effects menu includes artistic, blurs, distortions, noise, photo, render, and stylize. Each has lots of options and features and are fully adjustable. They work on any portion of an image that you select. Each of the adjustments has multiple settings.
Artistic

Artistic includes ink sketch, oil painting, and pencil sketch. Here’s the cute pillow made into an artistic ink sketch.

Here’s an artistic oil painting.

How about an artistic pencil sketch?
Blur

Blurs include fragment, Gaussian, motion, radial, surface, unfocus, and zoom. Here’s a motion blur.
Distort

Distort includes bulge, crystalize, dents, frosted glass, pixelate, polar inversion, tile reflection, and twist. This one’s a crystalized distortion.

How about a pixelate distortion?

Or a polar inversion?
Noise

Noise includes add noise, median, and reduce noise. This one adds noise.
Photo

Photo options include glow, red-eye removal, sharpen, soft portrait, and vignette. This example is vignette.
Render

Render includes clouds, Julia fractal, and Mandelbrot fractal. This one is clouds.

This one’s Julia fractal.

And here’s Mandelbrot fractal.
Stylize
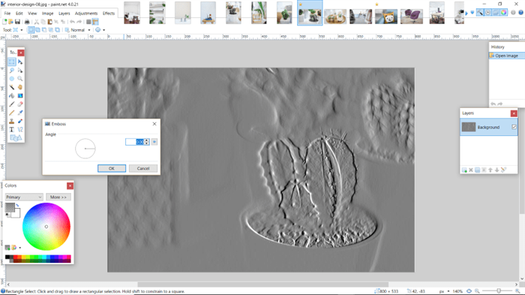
Stylize includes edge detect, emboss, outline, and relief. This one is emboss.

Here’s outline. This would be useful for creating a sketched look.
Tools

Tools include the typical selecting tools such as rectangle, lasso, ellipse, and magic wand. It also includes a paint bucket, gradient, paint brush, eraser, pencil, color picker, recolor, text, shapes, pan, gradient, line/curve, etc. You can choose your tools from a dropdown or from the floating toolbox.
Select Tools

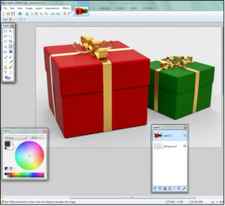
In this example I’m using the rectangle selection tool. I’ve copied a portion of the image and pasted it into a different location. Select anything to make a copy using the select tools. Paste it anywhere, move it around. Stretch, resize, recolor, etc. You can also move selected pixels.

Here’s an example of selecting using the magic wand. I selected portions of the candles and added some red with enough opacity to make it look like it blends with the wax. I also selected the bottom of the vase and added a darker shade of red to make it look like a little bit of its content is still in the bottom.
Brushes

Brush widths go from 1-2000 and you can set the hardness to any percentage you want. It has dozens of fill effects (brushes). It’s limited with its brushes, but you can install lots more brushes with plugins. It has 15 blend modes which includes dodge, burn, multiply, overlay, and more. It also has 2 selection clipping modes.
Pencils and Text

Pencil only has one tip but you can choose colors and gradients to help you mimic the various types of pencils. You can also add text, which includes lots of fonts and modes.
Shapes
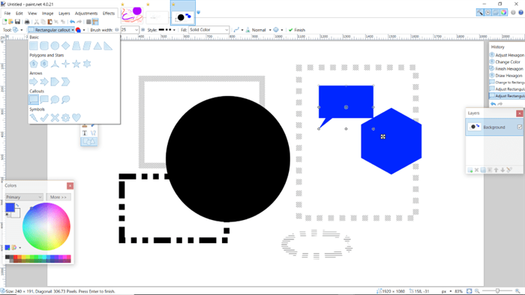
Create 27 different shapes, choose the style, colors, sizes, etc. Stretch them, drag them in any direction, etc.
Clone Tool

The clone tool lets you choose a portion of the image to clone and then you can paint the image with the cloned area. In this image I’ve cloned the floor and I’m using this to move the wall back a few feet on the right side.
History

It has unlimited history, so you can go back through every step and undo or redo to every point.
File Types and Quality Settings

Save as paint.net, BMP, JPEG, PNG, TIFF, TGA, or DirectDraw Surface. When you save, you have quality adjustments, which will vary depending on the file-type you choose. This example is a JPEG. It provides a preview so you’ll know if you like the quality. It provides you the file size too, which is great for making decisions about your image quality.

Here are the settings for saving as a PNG. I can choose the bit depth. If I choose 8-bit I can set the dithering level and transparency threshold.

Here are the adjustments for a GIF. I’ve found GIF’s difficult to deal with because it doesn’t show the animation. It will open and save them though.
Plugins

Paint.NET can be expanded with plugins. There are almost 1000 free plugins (over 800 active) available in the plugin index in the forum. You can add masking, liquify, brushes, more blend modes, more selection tools, transforming tools, pens, and lots more. Plugins are installed manually. The plugin index includes step-by-step instructions. It isn’t difficult, but it isn’t robust like WordPress.


