
This homemade playdough recipe would make a great inexpensive holiday gift for young kids. You can make multiple colors with and without glitter. The full recipe makes A LOT of playdough. I store it in an air-tight container when it’s not in use and just let my daughter use a little bit at a time.
Homemade Watercolor Paint
Peanut recently ran out of watercolor paint. This is nothing new. In fact, it happens quite often as she really likes to paint. However, instead of making another trip to the store, we decided to try our hand at making our own watercolor paint. The result? We will never buy watercolor paint again. This stuff works great!
So how did we do it?
All you need are 4 ingredients…okay 5. I forgot to include food coloring in the pic. Oops. Aw well.
Homemade Watercolor Paint
Ingredients
Directions
- Mix the first four ingredients in a small mixing bowl. Watch it fizz. When the ingredients stop reacting, separate the mixture into small containers. We used several small Ziploc containers but an egg carton would probably be a great idea too. Add food coloring to each container to get the desired colors. We usually put in about 6 or 8 drops per container. Allow to sit a couple of hours to harden. After about 4 hours, if there is any liquid remaining you may either paint with it right away or drain before storing.
Powered by
Mixing Colors
We created 9 different colors with one recipe which made more than plenty for each color. For more colors besides the traditional food coloring colors we used the following combinations to create more shades. This could be a great home school demonstration of color mixing by the way.
red+blue=purple
yellow+red=orange
red+green=brown
Note: You can’t make a true black paint with food coloring mixing. I know. Bummer. But, you can create a lot more shades of other colors like dark green and pink and aqua which is fun.
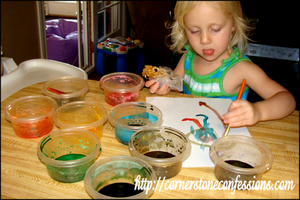
I think my favorite thing about the paint when its all said and done is the vibrant colors they produce. Peanut’s paintings were beautifully bright and very quick to dry. Needless to say, we will definitely be doing this chemistry experiment again. Now, what homemade art recipe should we try next? Any suggestions?
But now, O Lord, you are our Father; we are the clay, and you are our potter; we are all the work of your hand. Isaiah 64:8
Homemade Watercolor Paint Recipe
- 4 tbsp baking soda
- 2 tbsp white vinegar
- 1/2 tsp light corn syrup
- 2 tbsp cornstarch
- liquid food coloring
Watercolor paint recipe directions:
- Mix the baking soda and vinegar together until the fizzing stops.
- Add corn syrup and cornstarch.
- Mix until it has a uniform consistency. It will be crumbly.
- Divide into mini muffin tin, styrofoam egg carton, or plastic candy mold.
- Add about 10 drops of food coloring. Mix red and yellow for orange, red and blue for purple, and so forth. Stir the food coloring into the watercolor paint mixture with a popsicle stick, knife, or coffee stirrer. You’ll need to smash the color into the paste which is a little bit tedious. Eventually the paints will set to have a wet film on top.
- Let the watercolor paint set for a few hours or overnight.
I like putting the watercolor paint in a muffin tin. You can fill one row of cups with the watercolor paint recipe and a second row of cups with water to wash brushes off in.
There are some advantages to putting water in the bottom or top row of a three-row mini muffin tin. This way, you can dump the water into the sink without it running over the paints. Otherwise, you can blot it out with paper towels. The muffin tin also allows us to store the paint for as long as we need to.
When it comes time to wash the muffin tin, run water over it to rinse out the cups in seconds for easy clean up.
The paint does dry a little bit lighter than it goes on originally, likely due to the cornstarch. I am really pleased with how vibrant the colors are though. Less water on the brush is more with these paints too.
4 Homemade Finger Paint Recipes (Analyzed)
My daughter and I tested four different homemade finger paint recipes using ingredients that we already had in the pantry. We found that each finger paint recipe had a different consistency. All were easy to make, but some took less effort than others.

It’s likely that you may already have some or all of these ingredients at home. I’ll give you the homemade finger paint recipes, show you what they look like on finger paint paper, and mention how they may or may not stain clothing.
Though my daughter enjoyed making and playing with each finger paint. Of course, we do have a favorite. And, she enjoyed using a small paint brush to paint with in addition to her fingers.
1. Kool Aid Finger Paint Recipe
- Ingredients:
- 2 cups flour
- 2 packs unsweetened Kool Aid
- 1/2 cup salt
- 3 cups boiling water
- 3 tbsp oil
Directions: Mix wet ingredients into the dry ingredients.
Notes: The finger paint was a little bit grainy but it smells good. It dries nicely, if not a little thick.
2. Homemade Finger Paint Kids Can Make with Cold Water
- Ingredients:
- 2 cups white flour
- 2 cups cold water
- food coloring
- Put water into a large bowl.
- Slowly add the flour while your child is stirring (a whisk helps).
- After the mixture is combined, divide it into smaller bowls.
- Add your food coloring of choice.
Notes: We made a big batch of green, versus a mixture of colors, since we were making so many other recipes. My daughter (3 yrs old) could not whisk this recipe fast enough to avoid lumps so I stepped in and gave it a whirl. It was still a little lumpy.
Older kids may become frustrated by the way this recipe paints. When finger painting, the paint puddles together and doesn’t stick well to paper. It’s hard to cover any real area with this paint. My daughter still thought it was fantastic, though it’s probably the least effective.
However, you’ll always be able to make this on a spur of the moment if you have flour in your pantry. I’m sure it will save me in a pinch when she needs to be entertained immediately.
3. Easy Corn Syrup Homemade Finger Paint Recipe
This is beyond easy, if you have corn syrup in your pantry.
1. Squirt some corn syrup in a bowl.
2. Add a few drops of food coloring.
Notes: This is sticky, but it paints very nicely. This corn syrup finger paint recipe will always stay a bit tacky whereas others will dry.
However, we really liked this recipe because, again, it’s EASY and paints nicely. I also read that you can use condensed milk and food coloring, or pudding and food coloring. I like pecan pie, so we usually have corn syrup around, but I know that some people have an opinion regarding corn syrup.
4. Cornstarch Finger Paint Recipe: Our Favorite
- 1/2 cup cornstarch
- 2 cups water
- liquid food coloring
- Mix cornstarch and water in a saucepan and boil until the mixture thickens.
- Allow the mixture to cool and then add food coloring.
Notes: It will start to look like this in the pan.
Next, you can separate it into different bowls and dye each a different color. We like this recipe because it has a similar consistency to store-bought finger paint. It dries without being sticky and is just fun to play with, though it can be a little gloppy (for lack of a better adjective). The colors turn our vibrant too.
We put each recipe on the same sheet of finger paint paper. I made one more batch of green cornstarch finger paint and attempted to dye some cornstarch finger paint with natural food coloring using POM Wonderful pomegranate juice and a reduction made from fresh cranberries. It’s easier to buy natural food coloring than to create your own dye from fruit, despite the price, so I would recommend this.
Here they are on a new white towel.
And, letting the towel sit like this for several days, I applied a few spritzes of Spray N Wash.
The towel came out of the washer almost completely clean, with the exception of a small, barely noticeable POM stain. It’s pomegranate juice, so I’m not totally surprised. How your finger paint recipe stains clothes depends on what kind of food coloring you use. We used McCormick’s and Wilton colors.
There you have it. In conclusion, your kids will likely enjoy any of these finger paints. It just depends on how much time you have to help them make a recipe and what ingredients you have in your pantry.
Homemade Bubbles Recipe
When you have a homemade bubbles recipe that works, it’s easy to whip up a batch versus consoling sad-faced kids if you don’t feel like running to the store for more bubbles. I’ve tried several recipes but this one seems to work the best and it’s so easy.
Homemade bubbles ingredients:
- 2 1/2 cups of water
- 1/2 cup of light corn syrup
- 1/2 cup of Dawn dishwashing soap (regular Dawn is said to work best)
- Microwave the mixed water and corn syrup for 4 minutes.
- Slowly stir in the Dawn.
- Let cool.
What do kids do most, other than blow bubbles? They spill the liquid. If you have a giant container of homemade bubbles, if they spill, it’s less of a cost or supply issue.
Get a plastic beverage dispenser with a spigot and pour the homemade bubbles recipe into it. If the kids spill their bubbles or need more, they can serve themselves or you can help them. Just put a towel under the spigot to catch any drips.
If the container is glass or plastic, let the kids decorate it with Crayola Washable Window Markers. My daughter has attempted to color her favorite princesses all over ours. Except, I got lazy and didn’t funnel the bubbles into the container. Some spilled down the front, which is why Princess Belle and part of Ariel have gone missing.
Just keep in mind that if you do pour homemade bubbles into a drink container that you’d probably not want to use it again for drinks. They may wind up tasting like bubbles no matter how hard you try to wash it.
Save your bubble wands and bubble containers from party favors and other bubble fun. Reuse them with homemade bubbles.


