That said, some of those craft acrylics or student-grade paints can be more transparent. If you’re really looking for more opacity in your paints, it’s worth checking out some heavy-body acrylics. I use Liquitex Heavy Body in my professional paintings, and I love the thick coverage that they give me.
How do you make acrylic paint
Hi, Customer
Login
Your cart is empty
Posted by Natural Earth Paint & Sarah Scarborough on Jan 28th 2021
Posted by Natural Earth Paint & Sarah Scarborough on Jan 28th 2021
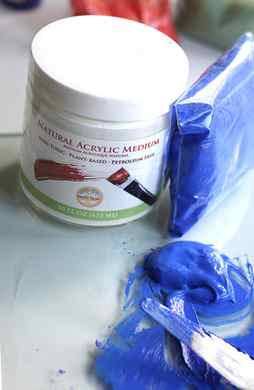
Today we’re sharing our tutorial on mixing and storing your own Natural Acrylic Paint with our Natural Acrylic Medium! Why should you make your own acrylic paints?
For years, we’ve been receiving requests for a natural acrylic paint alternative from customers who were tired of chemical sensitivities from fumes, skin irritation, and concerns about the environmental damage that conventional acrylics can cause. Conventional acrylic paints contain petroleum-based acrylic polymer emulsion (essentially plastic), toxic preservatives and additives like pthalates, formaldehyde, styrene, ammonia, benzene, vinyl chloride and pigments that are commonly heavy-metal based or petroleum based. And, despite these dangerous ingredients, these paints are legally allowed to be labeled “non-toxic” due to labeling loopholes.
In contrast, our Natural Acrylic Medium is plant-based and free from those harmful additives, stabilizers, heavy metals, and other toxic chemicals. You can finally paint with confidence knowing your handmade Natural Acrylic Paint is safe, high-quality, and environmentally friendly.
1. Gather Supplies
- Natural Acrylic Medium
- Earth & Mineral Pigments
- Palette Knife
- Glass Palette
- Aluminum Tube
- Pliers

2. Scoop the Medium onto the Palette
Scoop onto the palette the amount of Natural Acrylic Medium for the amount of paint you want. The amount of medium you use will be the amount of paint you will end up with. Either pour the medium out of the jar, or use your palette knife or a spoon to help scoop the medium out of the jar.
If you are using a glass palette, try placing a white piece of paper underneath the palette so as you mix the color, you can see the accurate color of the mix you will be making.

3. Mix the Medium and Pigment
Scoop the pigment out and onto the acrylic medium. Measuring spoons or teaspoons work great for this.
When mixing the medium and pigment, there is no set recipe for deciphering how much to mix. For a more opaque and less transparent paint, add more pigment. For a more transparent paint, add less pigment to the medium.
The color we are using is Ultramarine Blue.

4. Blend
Blend together the pigment and the medium with the palette knife making sure that the pigment is fully dispersed and there are no air pockets. As you blend the paint feel free to test the paint on a separate paper to see if it is the color you want. If not, add more pigment to increase the vibrancy and to make it more opaque.

5. Storage
The most important thing when storing your paint for future use is to make sure that it is stored in a container with the least amount of air possible. An aluminum tube is suggested for storing but you can use anything from empty medicine bottles, small jam jars and other little jars; as long as air can’t get in. However, with jars, remember that the more air you’re sealing into the container with the paint, the more your paint will dry out as well so try to store the paint in a container that wont have plenty of excess air inside.
Using your palette knife, scoop the paint into the aluminum tube. Make sure to tap your tube against the counter occasionally to help any pockets of air rise to the surface.

6. Create a Crease
Create a crease/fold where the paint stops to help you know where to flatten the rest of the tube from.

7. Flatten
Flatten the rest of the tube from the crease you made in step 6, to the back of the tube. Push the paint towards the front of the tube while flattening. A ruler or palette knife can be used to help flatten.

8. Fold
Fold the tube forward from the end. You want to only fold a small amount of the end because we will be folding the rest inward and this will help the seal stay closed.

9. Crimp/Press
Crimp or press the folded end down with your pliers. You want to make sure that it is flat. The flatter it is, the better the seal is and less air will escape and also paint wont squirt out the back when you squeeze the tube.

Repeat steps 7 & 8 until the fold has reached the part of the tube with paint.
11. More Pigment
In this image, more pigment is being added to a bit of the previously mixed paint.
12. Color Differences
You can see the difference between the colors depending on the amount of pigment added to the medium. The top color has less pigment added and the bottom two lines have more pigment added. The paint can also be thinned by watering it down with water on the palette.

13. Clean Up
Clean up your supplies with a light soap and water and let them air dry. The longer you wait to clean them, the more of a chance that acrylic paint will dry on them and it will be harder to clean off.

Label any tubes you mixed so you know what colors you have. And there you have it, handmade Natural Acrylic Paint; enjoy!
More of a visual learner? Watch the video version of this tutorial here !
Interested in more recipes featuring Natural Earth Paint products? Visit our Recipes page!
Follow us on Instagram, Facebook, and Pinterest for more natural inspiration.
Add White
My go-to technique for making acrylic paint more opaque is to add a bit of white to the transparent color. I specifically use Titanium White since it’s the white color with the most opacity. My favorite brand of acrylic paint is Liquitex, but you can find Titanium White in most major acrylic brands.

Adding white will alter the tint of your original paint color slightly, but just add it a little bit at a time so you can control the color you’re creating and keep it as close to the original color as possible.
You can also play with adding more of the original color back to the mixture after you’ve added white. This can bring it closer to the original hue without losing the extra boost of opacity from the white.
Work in Layers
One of my favorite things about acrylic paint is that it dries quickly. This allows me to paint with lots of layers in my abstract compositions. Painting a transparent color on top of a lighter layer can really help it pop. Additionally, you can paint over the transparent color a few times to increase the opacity even if it’s on a darker background.
Hot tip! If you need your layers to dry even more quickly you can go over the area with a hair dryer to speed up the drying time.
Use a Dry Brush
Sometimes in my acrylic paintings, I add water to my brush to create more of a wash effect. This is a great technique if you’re working on a background layer or something with more of a watercolor feel to it, but water ultimately increases transparency.
So if you’re going for a matte look with your paint, be sure to use a completely dry brush so you’re not accidentally increasing the transparency of your paint.


