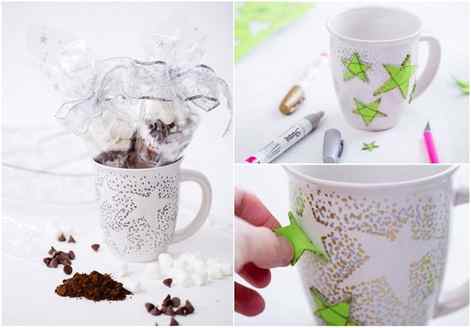
Since you have to give it plenty of time to dry in between layers and coats, this project might take up to a few days or even a week to complete. You can speed up the dryer process with a hair dryer.
How to Paint DIY Coffee Mugs with Gloss Enamel

Hey there! Today we’ll show you how to paint your own DIY coffee mugs using gloss enamel craft paints. This hand painted craft idea is easy to do. Plus the finished coffee cups are dishwasher safe. They make a great gift for Valentine’s Day, Mother’s Day, birthdays and Christmas too!

Women’s service day event in Michigan
As you may know, I’m one of the original founders of Women’s Service Day, an annual event in West Michigan. It’s a one-day service project where volunteers offer their time, skills, and talent to nonprofit organizations and also network among women in the community.
This past fall, we organized the 16th annual event on October 5 with over 180 people participating. Volunteers helped with tasks like cleaning, painting, staining, cooking, landscaping, construction, assembling, organizing and making a difference in our local community.
Sixteen years ago, when we started the event it was our goal to find a dozen colleagues to help with a women’s build at Lakeshore Habitat for Humanity. We had 50 women sign-up to volunteer that year so we needed to expand our volunteer efforts to other agencies where people could meaningfully serve women and children that day. The positive response that first year and the continuous spirit of giving in the years that have followed are what’s kept this event going year after year.
What we do
Over the last 16 years, I’ve had many different responsibilities on the organizing committee including agency coordination, volunteer registration, social media management, and photography. While I chose to make this 16th event my final one on the core organizing/planning committee, I’ll continue to be involved in other supportive ways. This special day is so near and dear to my heart!
For example, this coming year I’ll likely just help with preparing and serving food for the luncheon that occurs midway through the day. I’ll probably also create something for the raffle that occurs during the luncheon as I’ve done in past years. The raffle features handmade crafts, art, and donations from area businesses to raise money for a specific project or organization in our community.

Several years ago, I made a red, white and blue burlap wreath for the raffle. Then for two years, I painted wine glasses and appetizer plates for the raffle using gloss enamel craft paints. I first learned how to paint wine glasses at a surprise craft party my Women’s Service Day friends threw for my 40th birthday. It’s quickly become one of my favorite kinds of crafts to make since it’s simple and easy to do.
One set of hand painted wine glasses and appetizer plates I made for a raffle had silly phrases like “fill ‘er up”, “cheers” and “feeling wine-y”. Then the next year I painted wine glasses and appetizer plates for fall using metallic enamel paints.

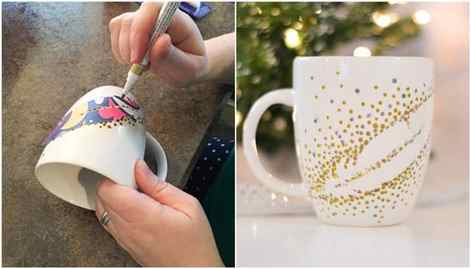
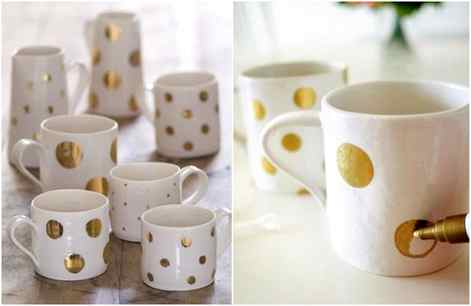
For the most recent event we had last October, instead of doing wine glasses and plates again, I decided to hand paint DIY coffee mugs. I gave each one a unique floral design using colorful gloss enamel paints.

Then I also painted a cute little cream and sugar set that combined all the floral designs. I especially love that the gloss enamel paints are dishwasher safe!

How to Paint DIY Coffee Mugs
Disclosure: This blog post contains affiliate links for products or services we think you’ll like. This means if you make a purchase from one of these links, we’ll make a small commission at no additional cost to you so we can keep the great ideas for the home coming your way. All opinions expressed are our own, derived from our personal experience.
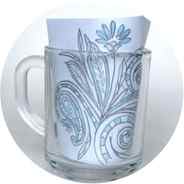
Clear glassware is inexpensive and you can find it at any local department store or online. This makes it a great low-cost gift to make for Mother’s Day, Christmas, birthdays, teacher appreciation and hostess gifts.
MASTER-CLASS №1: FUNNY painted cups
This master class is great for sharing creativity with kids, as it is simple and, at the same time, fun. This time we will create diy painted mugs with funny drawings at the bottom of the cup. Discover 100+ new rock painting ideas with Artistro later!

Supplies for painting mugs:
1. Wadded disks and any degreaser – ethyl alcohol, nail polish remover or white spirit;
2. Acrylic paint – for painting the bottom. In this example, black paint is used, but you can choose any color;
3. Marker for ceramics and glass of contrasting color or acrylic or contour paints for painting utensils;
4. Scotch tape – usual or painter.
Check out these 100+ easy things to draw for inspiration!
How to paint a mug:
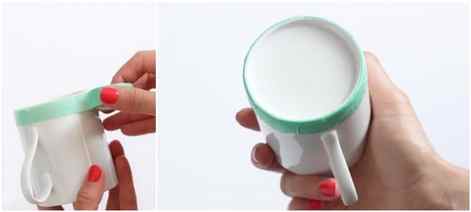
1. Degrease the bottom of the mug or glass;
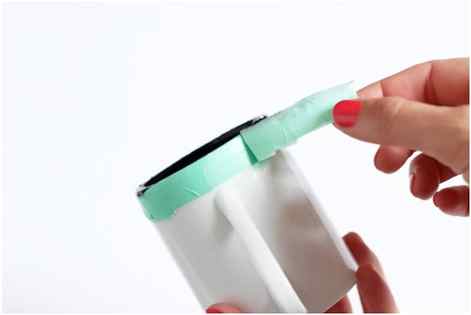
2. Glue the scotch tape as shown in the photo below;
3. Next, apply in a thick layer of paint on the bottom of the mug;
4. After all, the bottom will be painted, peel off the tape and place the mug in the oven bake at a temperature of 325-350 degrees F for 30-35 minutes.
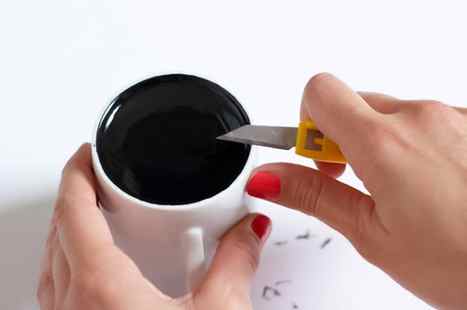
Then allow the mug to cool down;
5. As soon as the mug cools after baking, smooth the edges of the painted cup bottom, for example, with a knife as shown below in the photo;
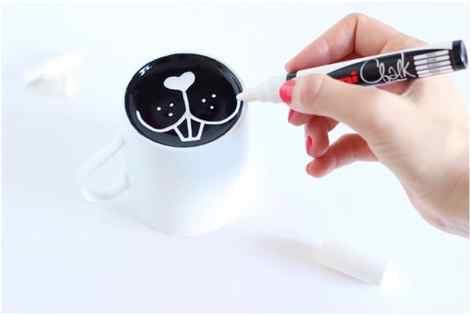
6. And now it’s time to paint. The drawing can be applied with contour or acrylic paints or a special acrylic marker for ceramics such as Artistro. Felt-tip pens and markers are not necessary to bake, they dry for 24 hours, but acrylic paints can be dried either naturally, leaving to dry for 1 day, or bake at a temperature of 325-350 degrees F for half an hour.
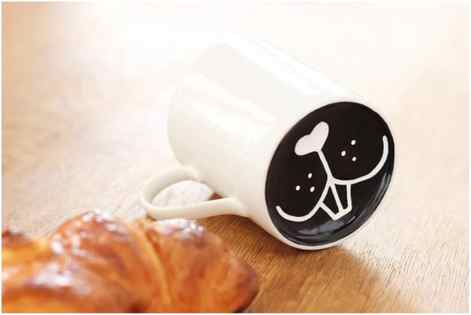
Here are the other ideas for drawings on the bottom of the cup.
Be sure to check out our painting on stones step by step guide later 😉
MASTER CLASS №2: DOT painted cups
The technique of dot painting (point to point or peak) – will be a little more difficult, and still, anyone can cope.

Supplies for painting mugs:
- Contoured paints for glass and ceramics, acrylic paints with a small brush or marker for ceramics;
- Degreaser and wadding disks for degreasing, as well as cotton buds to correct the drawing.
How to paint a mug:
- Decrease the surface of a cup or glass.
- Draw a sketch of the desired pattern or image with your own hands or print the picture in the desired size.
- In the case of painting cups from glass, the sketch must be pasted with an adhesive tape on the back.
- If you paint on ceramics, then with the help of a sketch you will be able to outline the main contours and lines along which the drawing will be built.
- You can also make a stencil and template (with your own hands or print on a printer) or use an adhesive tape to create painted cups.
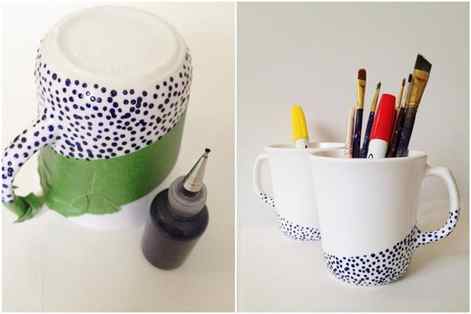
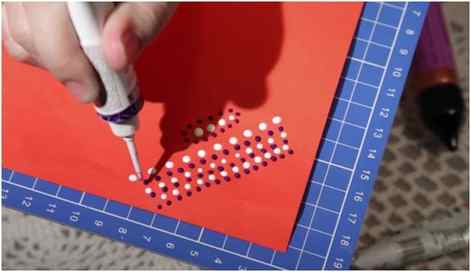
First you need to test all the tubes and make sure that the colors are not too liquid and not too thick – they should be squeezed out easily, but not a puddle. Then practice on a sheet of paper to put small, medium and large diameter dots with the same pressing and spacing. (see the photo below).The distance between the dots on painted cups should not only be the same, but also the minimum;
As soon as the dots become the same size, start drawing, keeping the distance from the edge of the circle about 0.75 inch.
Basic principles of dot cup painting:
As it was already said: in one line the dots should be the same in diameter and volume (if you draw with contours);
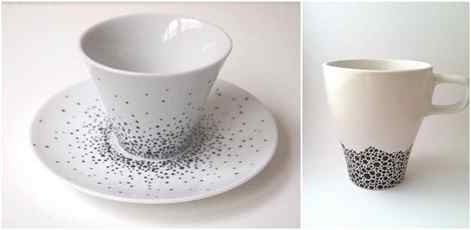
It is especially important to sustain the same and optimal distance. It must be such that the dots are distinguishable, but not disjointed, so that they form a single line on painted cups. In this case, keep in mind that the larger the point, the greater the distance between them is permissible, and vice versa, the smaller the point – the smaller the interval should be maintained;
First you need to draw large, that is, the main parts of the picture, arranging the entire composition, and only then draw the details.
The finished drawing needs to be fixed. For this, the painted cups should be put in the oven for half an hour to bake at a temperature of 325-350 degrees F. Marker pensmost often do not require baking and dry up for 1 day.
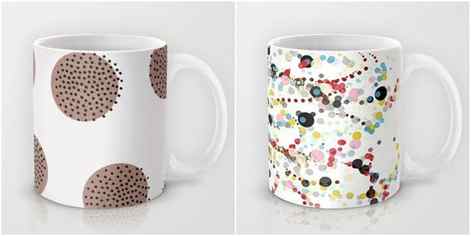
You can create painted cups with not only dots, but peas, which can be applied with acrylic paint with the eraser from a pencil, a cotton swab or a brush. Here are some interesting ideas for painting glasses and mugs in peas.
Wiping Off After Painting
Cleaning up after painting a ceramic mug is easy with the right techniques. Pour a small amount of cleaner into a cloth and wet it thoroughly. Wipe the surface of the mug clean with the cloth, making sure to get into all the crevices.
Let the mug dry completely before using it again. Remember to use a mild dishwashing detergent and warm water when cleaning your ceramic mug. For tough stains, soak the mug in a solution of part white vinegar to parts water for minutes or until the stain disappears.
If necessary, you can also rub a baking soda paste onto the stain and let it sit for minutes before washing as directed in step above. Be careful not to scratch or damage your mug when cleaning it – use soft cloths and be gentle!
After Painting
Painting a glazed ceramic mug is a great way to add some fun and color to your kitchen. The mug can be painted any color that you like, as long as it’s complementary to the colors of your kitchen.
Use painters tape to help you keep paint off the surface of the mug while you are painting. Apply primer and then choose your favorite paint color from the many options available. After completing the first coat of paint, let it dry for an hour or so before applying a second coat.
When you are finished with the painting, use a dull blade to finish the edges and clean up any mistakes that were made. Finally, put the mug back in its place on your kitchen counter and enjoy its new look! Be sure to share pictures of your painted mug on social media so others can admire your work too.
If you choose matte finish, you need to careful while applying them.
Conclusion
If you’re looking to paint a ceramic mug, be sure to use a primer and paint that’s designed for ceramics. Apply the paint in thin layers, being careful not to get any on the inside of the mug.
Allow the paint to dry completely before handling or cleaning the mug. Never use water to clean your ceramic mug – only a mild soap will do.


