Step 5 – Paint grey+white between iris and lower lid.
How To Paint Dog Eyes

No truer words could be spoken than when referring to our pets. Yes, animals. Our sweet, loving furbabies.
“A dog is the only thing on earth that loves you more than he loves himself.” – Josh Billings
Attempting to paint a dog’s eyes can be, well, daunting, to say the least. But if you get the eyes right, everything else falls into place.
I think you’ll be surprised at how simple these eyes are to paint.
Just reserve judgment until the end of this post, ok?
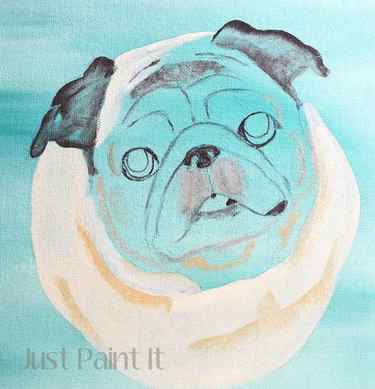
First, we start with a sketch. The pattern for this pug is in my last post.
I like to do the eyes early on, no matter if I’m painting or drawing with colored pencils. Once the eyes are done, I can “feel” the pet better.
So let’s get started, shall we?
How To Paint Dog Eyes
Paint Colors
Obviously different dogs have different eye colors so I’ll list the colors I used for Roxie.
- dark burnt umber
- burnt umber
- raw sienna
- white
- medium grey
- black or dark grey
Paint brushes
- You’ll need a round or flat to fill in the pupil then you’ll need a fine tip liner or round for everything else.

Step 1 – Paint the pupils with a very dark brown or grey, leaving the reflective spots blank.
I like Dark Burnt Umber by Ceramcoat but other colors work too. I used to use black but I found that a) it can be too harsh for the overall painting, and b) if you need to go darker, you can’t once you’ve painted black.
I also used to paint the pupils completely, without leaving the blanks. You can do that, certainly, and there’s nothing wrong with it. For me, it gives a little more ‘life’ to the eyes right from the start so I feel like I’ve already accomplished something.
You know us artists. Hyper-sensitive and all.
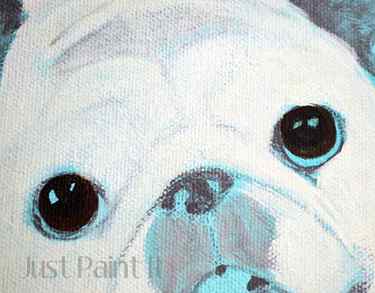
Step 2 – Paint the iris with the dog’s eye color.
In this case I used burnt umber, a warm dark brown, but not as dark as the pupils, obviously. (It looks darker in the photo than it does irl.)
Generally speaking, dogs’ irises are much smaller than humans, because their pupils are much larger. From what I’ve seen, at least.
I should probably insert some sort of disclaimer here – I am not a veterinarian, animal specialist or anything more than a plain ol’ animal lover. This tutorial is based solely on my own painting experience, not from anything I’ve read or seen. The information I offer here is only my opinion, nothing more.
Basically, if I say something that you know to be incorrect, feel free to leave me a comment. I’m always open to learning.
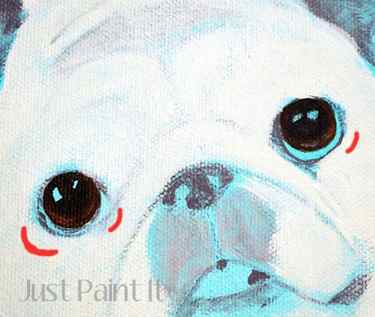
Step 3 – Highlight the iris with color lighter than the iris.
If I used Burnt Umber for the iris then I’ll use Raw Sienna for highlighting. If Raw Sienna is the iris color, then I’ll go into the golden shades for highlights.
You want to paint the highlights in a slight curve, as indicated by the red marks. This will not only emulate the roundness of the eyeball, but also increase the depth too.
Step 4 – Outline the lower portion of the iris in dark burnt umber.
Again, the same applies as stated above for the pupil. You could use black, but it accentuates the rim of the eye more than I like.
You don’t want to paint the outline in a complete circle as the upper eyelid hides the top part of the iris.
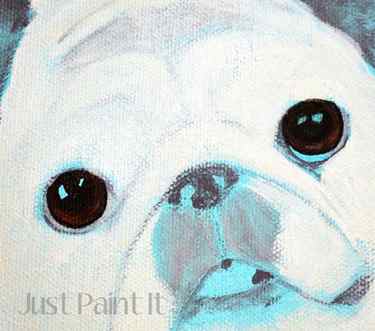
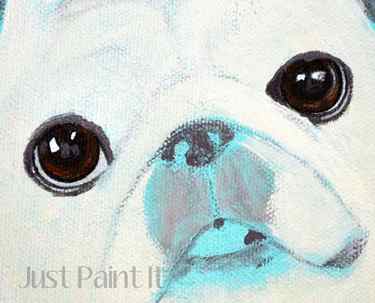
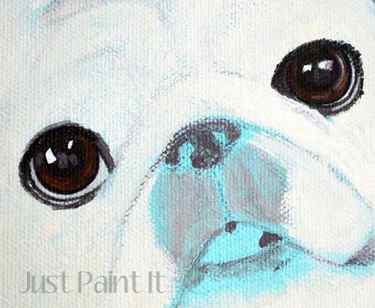
Step 5 – Paint grey+white between iris and lower lid.
Using white is similar to using black in that it’s very stark. If you paint this area with just white, you’ll have an artificial appearance. Adding just a touch of grey softens the look just enough.
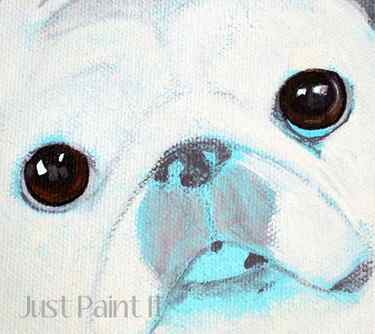
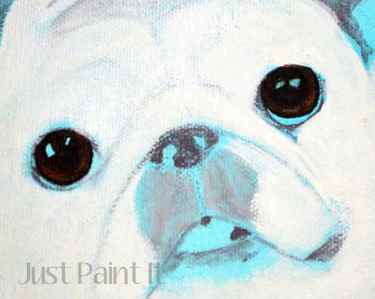
Step 6 – Paint light reflections in the pupils.
Now you can use white full strength in the blanks in the pupils. You might need two coats to get it as bright as possible.
I also added a tiny curved line in the eye on the right only because the photo I was working from had one.
That’s an important point to painting eyes – pay attention to the eyes in the photograph you’re using for reference and where the light reflections are placed. If I follow a photograph stringently, I always get a good result, as opposed to dotting some white here, there and wherever.
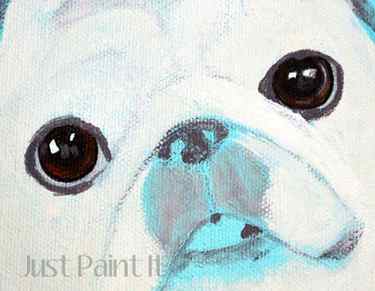
Step 7 – Paint grey in the pupils.
Sorry, I didn’t take separate photos for these steps. Anyway, I painted just a couple dots of grey on the pupils, following the photograph. I’m not sure if this was a secondary reflection or if it’s because she is an older pug and might have cataracts. In any case, the grey added that much more realism. So check your photos.
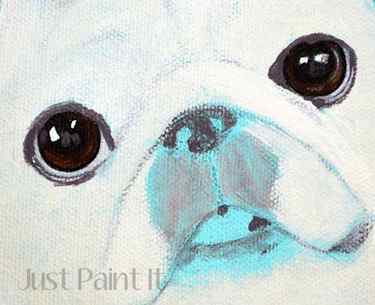
Step 8 – Outline eyelids with grey.
Yes, they look too thick right now but, stick with me. You want a thicker line on top for tiny hairs to drop over. Without the line, you won’t see the little hairs. We’ll get to the thick line on the bottom in the next step.
Note: the eyelid color will change with each dog.
Step 9 – Paint a thin white line in middle of lower eyelid.
This tiny white line is actually another light reflection on the ridge of the eyelid. Use your photo for reference to determine how long the white line is.
Step 10 – Add shading to the eyelids.
I used Wrought Iron which is a very dark grey, almost black. Now, where to put it? Okay, first off, you’ll want to rim the entire eye, right over the medium grey we applied in Step 8. You can see it better on the eye on the left , I think.
Notice how on the lower lid by adding a darker line in between the white line on the eyelid and the white of the eyeball how that darker line creates the appearance of a ridge. Do you see it? It’s very subtle but everything in painting eyes is.
Step 11 – Add additional shading to eyelids.
Finally, check your reference photo again and add any additional shading such as in the corners of the eyes and the upper eyelids.
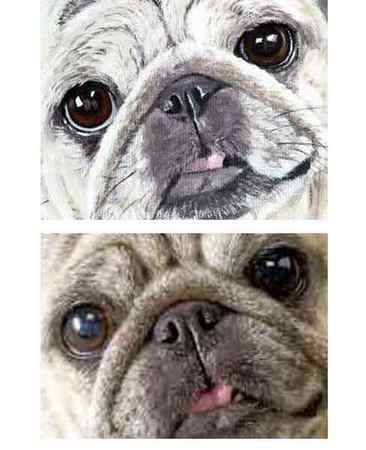
I placed my painting next to the actual photo, not for you to judge my painting, but more so you can see the details of the actual eye as opposed to my painting. There are details I didn’t paint, and there always will be. You could paint each and every detail however it’s likely they wouldn’t even be noticed. You have to be able to judge your own work and acknowledge when enough is enough.
It’s an ongoing thing.
You may be thinking eleven steps are a lot to paint dogs’ eyes but they aren’t really. Besides, when the eyes look ‘right’, the entire painting most likely will too.
Years ago I had professional ‘head shots’ taken when I was a dance teacher. (required by the studio where I taught) When I was trying to choose the best photos, the photographer told me just to look at the eyes. He said that people always look at the eyes first.
I believe it’s the same with animal art – you look at the eyes first.
Give these a try, would you? I’d love to know what you think. If you’d like to have more animal painting tutorials, just let me know. I might not know what I’m doing but I’m always happy to share. Ha!
Have a great week!
Comments
- Carol says July 7, 2014 at 8:58 am
Stunning results. Please, please do a Bald Eagle and a White Husky. I just love your posts. Thank you. Also, I need to paint words onto a Bible I painted but haven’t a clue as to how I can do it. It is on slate so I don’t think I can use tracing paper. I thought of ordering a custom made stencil but from what I’ve seen, it is very expensive. Any help would be appreciated. Thank you.
- Colleen says July 7, 2014 at 4:26 pm
How large do you need the words to be, Carol? Do you know anyone with a personal cutter – a Silhouette or Cricut? Short of that, try a sign shop. It shouldn’t be that expensive if there aren’t a lot of words. They do everything by computer so you could pick out the font, size, etc. Good luck with that! I’d love to paint a bald eagle. I painted some canadian geese in a wall mural a few years ago but not clearly. And a white husky. Beautiful. Thanks for the suggestions!
Thank you for sharing this awesome tutorial with all of us. I learned a lot. Keep up the great work!
- Colleen says July 7, 2014 at 4:27 pm
You are so welcome! They look a lot harder than they actually are, which is why I wanted to break it all down.
Thank you so much for sharing this! I too am a self taught (wannabe?) artist and love to learn everything I can! I’m so excited to have found your blog!
I’m going to try your eye tips on a horse mural I am painting in my children’s bedroom. Right now it looks fairly amateurish but I hope to get things looking even more realistic now that I found this blog!!
How good you are to share what you have learned!
-LOVE- your dogs eyes! This tutorial! Your writing style and blog!
- Colleen says July 7, 2014 at 4:32 pm
Hi Christa! Yay, I’m glad you found me too! Murals are tricky because you can’t get the detail that you can on canvas or paper, but then you don’t need it either. Like I mentioned in the post, just get a good photo to reference for your light reflections and you’ll be fine. You don’t have to blend as much in murals. Add some paint, stand back a few feet, add some more. I’d love to see it when you’re done, if you’d like to share. Have fun! xo
I loved the nature tutorials, flowers, etcetera. But I’m not interested in dogs or painting pets. It seems to be going in that direction now. Loved your blog until now. Sorry to unsubscribe.
- Colleen says July 7, 2014 at 4:34 pm
I understand, Annie. Actually, the only reason there are so many animals is because I’m painting commissions. I will continue offering tutorials and flowers as well. But I totally understand and wish you well. There are only so many hours in the day to read blogs and I know you’ll find one that is a better fit for you. Thank you!
You’re Incredible Colleen! Wonderful job and great tutorial. Thank you!! I’m sure that many of these techniques can be applied to any eyes, No?
- Colleen says July 14, 2014 at 6:40 am
For most dogs, it’d probably work. Cats are a little different because of their eyelids. And I need to paint a horse! haha. I keep saying that. One of these days. Thanks so much, Laura. Have a great week!
Wow! Great painting…. I’d love for you to do more animal tutorials please.
Thank you for putting together this tutorial! I am painting a pet portrait as a Christmas gift and wanted to really make the eyes pop. They can really make or break the painting and express such emotion. I love your step-by-step instructions, it was so helpful. Thanks, and I can’t wait to explore the rest of your blog!
- Colleen says December 23, 2014 at 7:40 am
I’m so glad it helped, Michelle. I want to do some more, only videos. But you’re right, if you get the eyes, all of the focus goes there. I’m sure whoever you’re painting it for will absolutely love it. Merry Christmas!
Hello. Colleen,
I am a self taught artist. I paint a lot of different subjects but my very favorite has always been dogs.
I have been working with my 13 year old grand daughter who is showing a lot of interest in painting, especially dogs.
In three years she has showed a great deal of improvement. I want so much to help and encourage her.
It takes articles like what you are writing to help me improve so that I might be able to pay it forward and possibly help others.
I really do appreciate your step by step and easy to understand lessons.
You’ve gained yet another reader!
- Colleen says September 7, 2019 at 1:42 pm
Hi Bonnie,
thanks so much for letting me know this was helpful. It gives me such encouragement! Sorry I took so long to get back to you. Had shoulder replacement but getting better fast! Thanks again,
Colleen
What a great help your tutorial is. How do you get such fine lines around the the eyelids? I can’t seem to get a brush to do lines so fine. I am trying to do a springer spaniel and have been avoiding the eyes. My husband says it looks like a ghost dog.
I just spent the last hour typing a post two different times and message said Error
- Colleen says April 10, 2015 at 10:34 am
You got an error message trying to post a comment, Peggy? That’s odd. I’ve received other comments so I wonder why that happened. Sorry about that. Let me know if you have further problems and I’ll ask my tech gal.
This was only a small portion of the comment i posted so not sure what is happening? Long story short thank you for sharing to help others! I am working on a watercolor )may add soft/ oil pastels) of Red Heeler (Australian Cattle Dog) and my reference photo doesn’t give me clear shot of the eyes looking for help? I have a page on FB link is:
https://m.facebook.com/profile.php?id=307840146052114
I’d love your input! Thanks so much
Peggy
- Colleen says April 14, 2015 at 7:44 am
Yeah, something is definitely going on with my comments because I just saw this by you. I’ll have it check out. Anyway, when I need a close up of a particular animal that my reference photo doesn’t provide, I start googling. So for instance, “Red Heeler eyes” or “Red Heeler Head” or Australian Cattle with same search terms. I usually have success with that, so hope you do too! I’d love to see it when you’ve finished. Thanks for your patience. ~Colleen
This is very helpful. I understand everything you’re saying about feeling the art through the eyes. Awesome.
- Colleen says January 26, 2016 at 8:23 am
I’m glad you found it helpful, Jess! Thanks so much.
THANK YOU. I’m a beginner with acrylic paints. I’ve talken some on line classes, even a pet portrait class, but the instructions “How to paint Dog Eyes” was better than any of the on-line classes I have taken! I have a pug, and was able to do wonderful eyes for the painting! I hope you teach painting, because you would be great at it.
Dear Colleen:
I am self “teaching” myself also and don’t have a lot of time to spend learning. I have watched quite a few “How to sites” and some really grate on your nerves and take forever to get to showing you anything or go so fast you get nothing out of it.
I really like your site, the way you get right to helping people and the way you explain each step. THANK YOU for making it easy to follow !
I have only one suggestion, quit apologizing, even the so called “experts” don’t know it all and aren’t always the experts they think they are !
- Colleen says July 3, 2017 at 12:54 pm
Ha, Jamie! I didn’t even realize I apologize for anything. That’s too funny. I’m glad you like the tutorials though. I really want to do more videos since I think they’re better teaching tools for painting. If I apologize a lot in my written posts, I’m sure I’ll do a LOT more on video lol. Thanks so much!
sweet way to paint eyes! I have a project im painting for a friend and was looking for more hints on boston terrier eyes….I believe as well that the eyes are where the magic happens. I always try to work on them the longest and give them the greatest detail. Im happy to have found your website! Thank you so much for the great tutorial Michelle
painterlygypsy
Hello Colleen!
I just love the way you are able to catch the round shape of the dog’s eyes! And it’s all in the details. Possibly as other have done, I’d save the eyes for last or didn’t put enough emphasis on them as I should. You are right – people go for the eyes first! So that’s what I’m doing this time.
I’m trying to paint Memorial pet portraits for our four previous dogs, then I’ll paint the one we have now. We started out with one dog and found out that having 2 at a time was actually easier. I’ve tried to paint my Border Collie from real photos (digital wasn’t out when he was around, yet I think disc ‘film’ was) Anyway, his long black and white fur was also giving me trouble as I’m trying to capture the reflection his black fur picks up. The fur falls in waves, and a single hair will change colors from black to purple (reflection) to black again.
So, I’m starting with his wonderful amber eyes and worrying less about the background When we had our other dogs, the thought of painting them wasn’t even something I’d considered, so the choice of paintable images is slim. The lighting isn’t the best or the angle is off, and still I’m wanting to paint that one special characteristic/trait/goofy habit that each dog had – a special toy they loved, the way they crossed their paws, etc. We’ve had 2 Lhasa apsos, a Welsh Pembroke Corgi and my Border Collie. Now we have Kip, our Border Terrier. I haven’t decided if I’ll paint his ‘scruffy’ coat or paint him after I hand strip him to a ‘show’ coat (he’s not a show dog, yet the clean look is cute also).
Again, I appreciate this tutorial on how to make the round eyes that dogs have. Lhasa’s especially almost have very round eyes!
Cathy
P.S. I’m old enough to know what shorthand is, just can’t read it or write it
- Colleen says March 12, 2018 at 12:06 pm
Hey, Cathy! Thanks for writing about your projects. Wow! I totally get the black hair thing. They are the most challenging for me. Lil Mo, our bull mastiff, was all black and it was a huge challenge. I’d love to see pics when you’re finished, if you don’t mind sharing. I love seeing other people’s work! Let me know if I can help at all. xo
Colleen
You are so gifted and generous to share this fabulous skill. Please be assured that the 11 steps are so worth it! Thanks again for this tutorial
- Colleen says September 7, 2019 at 1:45 pm
Thanks so much Pamela!
Hi Colleen…I’m self taught too and have recently last year or so, devoted most of my efforts to pets…they are HARD to do. I like your concept regarding doing the eyes first.it makes so much sense! I have been doing them last with not the best results. Your tutorial gave some very good pointers wish I could copy it for future reference. I’m currently working on a miniature Australian border collie with ice blue eyes….what a trial!! I just can’t seem to get those eyes right….but I think I will get a new rock (oh yes, I paint on rocks) and start with the eyes and perhaps get a bigger picture of the pet. I attempted to find a tutorial for blue eyes specifically but the only one I was able to open was yours on the pug. Thanks for the info.
- Colleen says February 15, 2020 at 12:18 pm
Hi Lynn! Have you tried Youtube for eye tutorials? I frequently go there for watercolor help. I wish I could help you with blue eyes but I can’t recall painting them. Good luck and thanks for stopping by!
Colleen
How to paint dog eyes

I started by applying a base made by mixing a little bit of burnt umber with titanium white, yellow, and a tiny amount of purple, just so the yellow wouldn’t be too bright. Then I sketched the design for my eye with a charcoal pencil.
It was at this point that I my attention was drawn to what looked like some big white patches in the dog’s fur.

,I didn’t want to add patches of pure white, but the leaving the fur as it was didn’t feel right either. I mixed
burnt umber with a little bit of titanium white to see how that would look,

and I was very pleased with the results. I used burnt sienna as a base for his eye and mixed that with burnt umber for my shadows.
In the reference photo, I think you can see there’s a high gloss shine to the eye. I achieved this with a combination of titanium white and zinc white from the Amsterdam line. Unlike titanium white, which is opaque, zinc white is translucent. For the big highlight on his pupil, I used ultramarine and a touch of cyan blue in addition to the two different whites. I was also careful to keep my wrist loose so I could paint a smooth, continuous line, which was also essential to achieve this look.
I’ve used yellow mixed with a bit of burnt sienna for the highlights on his eye and glazed over his rim with some ultramarine blue. It was important to me that the gray underneath still show through.
I used titanium white to paint the fur lines above his eye, being careful to follow the direction of my reference photo. I went over these lines with my yellow and burnt sienna mixture. Having the titanium white underneath, meant that the lines would now show up over the black.
How to paint realistic dog eyes
Follow Lucy Swinburne’s ten steps to painting dog eyes in pastel
One
Make sure your ivory pencil is sharp then fill in the iris in a light layer on the left and right eye.
Work around the pupils on both eyes, starting from the bottom of the eye and moving in towards the pupils.
Two
Use sharpened green grey to fill in the pupils as a base for the black to come.
Add short vertical lines under the pupils within the iris.
Re-do the white highlights within the pupil with a sharp point.
Three
Go back over the same area with a soft layer of ochre light, but don’t obliterate the ivory.
Try not to go over the white highlights.
Four
Work from the pupil to the outer edge of the eyes with ochre dark. Concentrate the colour mainly under the pupil and fade it out gradually towards the bottom of the iris on the left eye first. The right eye needs to be darker; press very gently as it is quite a bright colour. If you use too much, lift it off with a putty rubber.
Five
Use ivory again, working from the outer edge in towards the pupil on the left eye.
Content continues after advertisements
Six
Repeat Steps 4 and 5, keeping the shading in short streaks on the left eye.
Then work from the bottom of the pupil down towards the base of the iris.
Top up the white highlights in the pupils.
Seven
Sharpen the black pencil and fill in the pupil on the left eye first.
Don’t be tempted to draw an outline around it, just fill it in roughly, copying what you can see in the photograph.
Eight
Outline the eyes and add the shadow on top of the iris, which is cast by the top eyelid..
Nine
Darken the iris where you can see depth in the photograph. If the eye colour is too pale once black is added, reinstate the colours carefully. Clean the pencil tip each time you use it.
Ten
Finally, re-do the white highlights within the pupils and skim glacier blue over the top part of the pupils to create a watery effect.


