October 23, 2020
How to paint flowers on wood

- Post author: Katie
- Post category: Gift Ideas & Cards / Sola Wood Flowers / Spring – Flowers
- Post comments: 2 Comments
I recently purchased some hydrangea sola wood flowers from Oh Your Lovely. I was very excited to work with these flowers. Since they come in a bundle of about 25 smaller flowers, they are a little different to work with than the typical sola wood flowers. So, I decided to show you how I went about coloring two hydrangea bundles. These particular bundles of hydrangeas were a special order from a friend of mine. She loves hydrangeas and wanted me to make some to match a vase she purchased. I was sent a picture of the vase to try and match the blues in it. However, since I do not have the exact vase, I will just take the finished pictures in a vase that I have. I have also seen people separate their hydrangea bundles into individual flowers or smaller bunches, about 3 flowers, and add them to arrangements or bouquets.

Supplies:
- Sola wood flower hydrangea


- Green spray paint or acrylic paint
- Acrylic paint in color or colors you want your flowers to be. I did these two blues to match my friend’s vase. I also added white to the centers of each flower to add more character.
- A vase
- Small paint brushes
- Plastic containers to mix paints and water. I use cool whip containers and things like that. You do not need anything fancy. Just something that is a good size for the amount of paint mixture you need and you do not mind getting it dirty and possibly throwing away after the project is finished.
- Saran wrap to protect your flowers when spray painting the stem
- Water. Tap water works just fine.
- Optional: vegetable glycerin. This helps the flowers to be less fragile and more flexible and softer. This was the first time I tried using this. Check out this post I did. At the end there is a video that explains more in-depth the benefits of using glycerin. This is a link to the one I ordered.
- Vegetable Glycerin/Glycerine Quart (32 fl. oz.), Natural Pure USP Food Grade/Cosmetic Grade, For Skin, Hair, Crafts, Soap Base Oil – Kosher, Halal and Pharmaceutical for by Raw Plus Rare
- Drying rack. I use empty egg cartons.
The first step is to spray paint or paint your stem of the hydrangea green. I chose to spray paint the stem so the acrylic paint would not drip on my flowers when drying. TO protect my flowers when spray painting the stems I covered the flowers with saran wrap. I used the stem to poke a hole around the stem so it was not big enough for the spray paint to get through. I left some of the stem close to the flowers covered. This part will not show when the flowers are in their vase. I also paint these blue to blend in with the flowers more when I was painting the flowers. I only needed one coat of spray paint. Once the stems are dry you can move on to the next step.


The next step is to make your paint mixture. If you are using the vegetable glycerin, then start by making this mixture first. You will need 8 parts water to 1 part vegetable glycerin. For example, 4 cups of water and ½ cup of the glycerin. You can make extra of this mixture and store it till you are ready to use it again. You can use tap water, and it does not need to be warmed or anything special. Make sure to stir this mixture well. Every time you go to use this mixture it will need to be stirred well. Use this water glycerin mixture just like you normally would if it was just water, when adding it to your acrylic paint. You can check out my other sola wood flower post for more information on how much water to paint you need. Make sure the water glycerin and now acrylic paint is mixed well before dipping your sola wood flowers into the mixture.
The third step is to dip the hydrangea bundle into the paint mixture. Always dip the flowers with your lighter color, then add the darker colors later. Since the bundle is big, I dipped the top of the bundle first, then rotated the bundle in the paint mixture to cover all the sides. I also tilted the container as I rotated the flower bundle to help cover the sides. I then let this dry a little as I did the second bundle. To prevent the extra paint on the flowers from dripping down the stems I laid the flowers on my egg carton/drying rack upside down (flowers touching the drying rack and the stem up in the air). Once both bundles were covered once with my light blue paint mixture, I held the bundle by the stem upside down over another empty plastic container and poured my paint mixture over the inside/bottom of the flowers. I set this bundle to dry upside down again as I did the same thing to the other bundle. I did this method twice to each bundle. When I say I am setting them aside to dry I never let them fully dry. I am only setting them aside to allow the extra paint to drip off. Next, I took my paint brush and painted on the paint mixture in areas that still needed some paint. Since the flowers in the bundle are so close together it is easy to miss spots. So, I recommend saving your lighter colored paint mix in case you find some more spots you missed the next day. To save the paint mixture I just put the container lid on. Also, I recommend stirring your paint mixture a few times during this first layer of paint covering to ensure the glycerin remains mixed with the water and paint. You can adjust the petals carefully while they are still wet as needed.


Now for the darker color paint mixture. You will not need as much paint mixture for this second color. Once I got the color and consistency to my liking, I hand painted with a small paint brush the areas I wanted the darker color. It works best if the flowers are still wet. This helps the colors to blend better. I touched the darker color around the centers of the flowers and let the moisture spread the darker color. I would then add a little more of the darker color where needed to help it bled outward. You could also add the darker color to the tips of the flowers and blend it down towards the center. Just be sure not to miss an of the flowers.


After the darker paint mixture is applied to your satisfaction, leave the flowers to dry overnight. The next day I looked over the flowers and added any of my saved light blue paint mixture to areas that needed it. Do not forget to stir your paint mixture before applying it to the flowers. As the flowers dry the petals may open up more or shift around revealing areas where the paint could not get to before. Once the flowers were covered to my satisfaction, I took another dry paint brush and dipped it directly into my white paint, no water or glycerin mixture added. I did not add the water or glycerin this time, because I did not want my white centers to drip down or blend with the blues. I then touched all the centers of my flowers. I did not cover the entire center white. Some of the centers were pretty big, and I thought that would be too much white. So, I just did small spots of white to each of the centers. Below you can see what a difference the white centers make. You can also see if you like the white centers or not. You can skip this step if you wish. Now allow the flowers to dry and once dry you can add them to a vase to display them. You can add some berries or greenery if desired to your vase.

When working with the vegetable glycerin it is okay if it gets on your hands. It should make your hands softer if it gets on them. I believe the vegetable glycerin is sometimes added to hand lotions. It also made the flowers smell nice in my opinion. Once the flowers were dried, I did a Squish test. The glycerin did make the flowers softer and more flexible. They did not creak when I squished them, and they came right back to their original shape. I will be adding this to my future projects as well as spraying a glycerin, water mixture (still the 8 parts water to 1 part glycerin) to my previously made projects. To add the mixture to previous projects, just add the glycerin and water mixture to a spray bottle and spray your already painted sola wood flowers until you are satisfied with their flexibility. If you add to much glycerin to your sola wood flowers, then they will just always feel wet. Spraying this mixture onto the previously painted flowers should not cause any paint to bleed, but still be careful when applying it.


This post may contain Amazon or other affiliate links. If you purchase something through the link, I may receive a small commission at no extra cost to you.
Please Share This Share this content
- Opens in a new window
- Opens in a new window
You Might Also Like
How To Make A Beautiful Layered Rose With Cardstock

May 24, 2021
DIY Ohio State String Art
July 27, 2020
Dollar Tree Makeover Of Love Sign Perfect For Wedding Or Home Décor
March 1, 2022
This Post Has 2 Comments
Danuta Walters 26 Sep 2020 Reply
Love your explanation. It sure is wonderful to get every detail bit bi bit thank you , you are great!
Katie 27 Sep 2020 Reply
Thank you so much Danuta! I am glad you enjoy my posts and all the detial I put into them. Your kind words made my day.
Leave a Reply Cancel reply
This site uses Akismet to reduce spam. Learn how your comment data is processed.
Library Password
- Get Password For Library Opens in a new tab
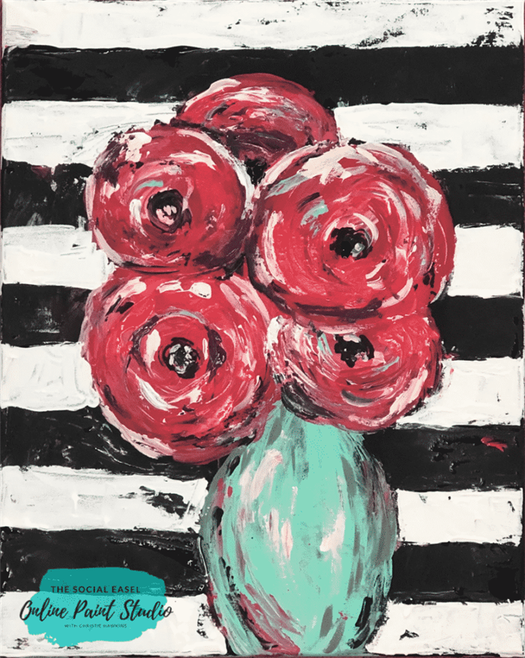
Painting Palette Knife Flowers!
Painting palette knife flowers is hands-down one of my favorite things to do! I could do a new version every single day! Seriously! And it’s fast! Want a quick win and a lot of fun? You need to try this!
* This post may contain affiliate links. If you purchase, I could make a small commission at no charge to you. Please read my Disclaimer and Privacy Policy HERE.


A lot of people are scared of palette knife painting because it’s foreign and they haven’t done it before. Once you try it out you are not going to be able to stop! And the best part? You can do it with any paint that you already have at home!
My preferred brand is Deco Art but you can use any craft paint or thicker acrylic paint. All you need to get started is a set of pallet knives or even a cheap plastic one from the store if you don’t want to spend a lot. So many options!
The thing I love most about the palette knife, especially while painting flowers, is how freeing and relaxing it is!

There is literally no right or wrong! Each flower is unique and does not have to have a specific shape.The fun part comes when you layer in all the additional colors. Turn your type A side to OFF and let that little creative kid that you have buried deep inside come out! I promise, you will have so much fun!
One of the most common questions I get asked is what color should I use? The answer is… Whatever color you want! Pick YOUR favorites!
If you are making this to fit into a specific room in your house look around at some of the accent colors that you have in there and use that to design your painting!
I have done these in every color combination possible. Do something unexpected, different and exciting! Challenge yourself to get out of your comfort zone! Your brain and soul will thank you!

These flowers look beautiful added onto wood signs or even frames. Palette knife flowers can be painted on canvas, wood, mixed media pads… Any surface will work! You have no limits! What are you going to paint on?!
If you want the paint to be even thicker and have more texture you can add Gel Medium!
This is a transparent medium that you add to your paint to thicken it up. It does not change the color at all and really fun to work with! It comes in different finishes so you can choose if you want matte, gloss, or satin.
Who is Pumped to try out Painting Palette Knife Flowers?
Watch my live video below where I show you step-by-step how to do this! This is a free tutorial for you to watch and learn from me! Don’t miss out on another painting tutorial and subscribe to my YouTube channel HERE!

Stay tuned to Facebook and my YouTube channel for new videos each week.

You Might Also Like

Shade and Highlight Acrylic Paintings

October 23, 2020
Draw and Paint an Americana Mason Jar Bouquet
May 22, 2021
How to Create Original Art – Painting Flowers in Milk Bottles
May 29, 2021
- Opens in a new tab
- Opens in a new tab
- Opens in a new tab
- Opens in a new tab

Shop My Favorite Supplies & Affiliates
- Amazon Shop
- Blick Art Supplies
- Re-Fabbed Boutique
- DecoExchage
- Printful


