Soon, you’ll see it start to come together. This is where I got a little excited and just HAD to see what a few of them looked like grouped together.
Materials
- Sharpie Paint Pens
- I ended up using 3 medium point oil-based gold metallic pens
- Make sure you’re using Sharpie Paint Pens and NOT a regular Sharpie or you’ll have a helluva time painting over it if you ever want to.
- I’ll warn you, this project isn’t necessarily quick. But I think the end result is worth it for sure!
I jumped into this project with a vision, but there were a few things I needed to do before I could get to the fun part. First things first, I needed to figure out the scale of my design. To do this, I simply drew one of the diamonds for the design in approximately the size I was imagining on a piece of paper and taped it up on the wall.

I’m glad I took this simple step, too, because the first diamond was larger than I wanted.
Once I figured out the sizing, I created a mocked-up design on some paper and taped that up as well. This helped me feel more confident to move forward.

Step 2 – Draw your Vertical Lines
Next, I worked on penciling my pattern onto the wall. I started by marking every 4 inches along the bottom of the wall by the baseboard.
I actually started in the middle of the room so I didn’t end up with a full diamond on one side of the wall and a partial diamond on the other. Now, both sides have partial diamonds and I think it flows nicely.
The mocked-up design was created out of 6×6 squares, but that doesn’t translate to 6 inches from corner to corner – it’s more like 8.5. To make it easier on myself, I didn’t fret over the diamonds being that EXACT dimension as long as they were close. I ended up making my diamonds 8×8 from corner to corner.
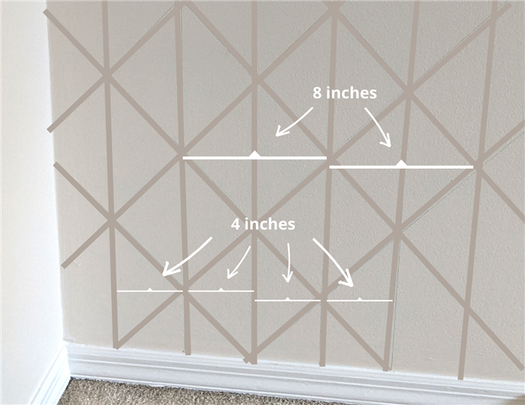
The image below hopefully helps show that the diamonds themselves are 8 inches, but because they all have a vertical line running through them as part of the design, I marked along the baseboard every 4 inches.
From here, I used a laser level that I hooked on to a laundry basket to lightly pencil in my vertical lines. This is the level we have. You could also use a traditional level for this step, though it’ll take you a little longer.
Pro tip: As you’re drawing your vertical lines, measure along the way every once in a while to make sure they’re still 4 inches from one another. I didn’t do this and had to fix quite a bit because of it (I think my level may have shifted a couple of times). I’ll show you what I mean a little further down.


Step 3 – Draw your Diagonal Lines
Once I drew my vertical lines, it was time to pencil in my diagonal lines. For this step, I measured up 4 inches from the bottom of every other vertical line and made a tick mark. Then, I went back and measured up 8 inches from the bottom of the remaining vertical lines and made a tick mark.
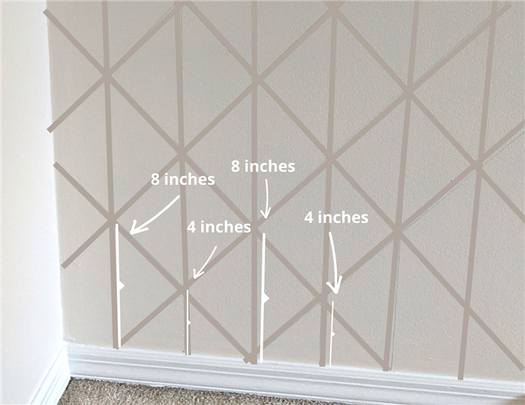
Once you’ve marked your vertical lines along the bottom accordingly, you can make a tick mark every 8 inches on each line until you hit the top of the line where it meets the ceiling.
When you’ve finished making all your tick marks, lightly (again, emphasis on the lightly part) connect your tick marks diagonally.


