You can use a heat lamp to increase the temperature near the painting. The ideal temperature is between 65 and 75° F.
Learn the Acrylic Pouring Basics
Paint pouring is such an intriguing art form that is both satisfying to watch and satisfying to create. We had the pleasure of speaking with professional artist, Celeste Jones to learn some tips and tricks from her as she prepped for her next amazing work of art.
Acrylic pouring art doesn’t require brushes but you can use a variety of tools to create unique designs with your favourite colour combinations. What makes fluid painting so interesting is that every piece you make will look slightly different, than any previous, or future work. Perfecting the art of acrylic pour painting requires a lot of experience and skill, but beginners can enjoy the abstract and unpredictable nature of paint pouring.
Creating a fluid painting can get a little messy, so we highly suggest protecting your surface before you get started. Celeste worked over a table that had been covered with plastic wrap before she even poured the paint into the mixing cups. You can use a variety of items to cover your surface like newspaper, tin foil, cardboard or a paint drop cloth. This will make cleaning up after your art project much easier.
You’ll need your favourite Arteza Pouring Acrylic Paint Set and an Arteza Stretched Canvas for this next step. Once you have your supplies ready to go, set 4 to 6 plastic cups (facing down) so that you can lay the canvas on top of it. This will let it drip off the sides as you work.
To complete your supplies for the activity, you will also need more plastic cups to mix the paint in, coffee stirrers or straws, gloves to protect your hands, and a painting smock or apron. You will also need glue. School glue and some water will do just fine, but for adults and more advanced painters, you can also use a latex-based paint adhesive like floetrol as your pouring medium. It is important to use the right medium in combination with your acrylic paint to make it more fluid.
It is possible to create a beautiful painting just by the way you move the poured paint on the canvas, but to get the most dramatic effects, you’ll want to have a hairdryer handy as well.
Step-by-Step Techniques for the Best Acrylic Pouring Art
Step 1: Prepare your glue.
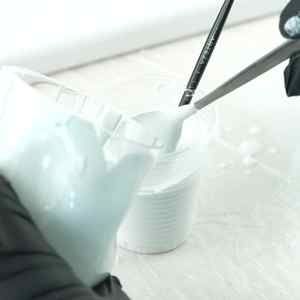
Celeste first poured the bottle of glue into a cup and added a splash of water to get the consistency that was desired. What you want is for your glue to pour easily, but not be too runny. In Celeste’s experience, a ratio of ~1 part paint : 3 parts pouring solution (glue+water ~50:50) offers the best results, but you may develop your preference based on the surface and medium you’re working with.
Step 2: Pour the glue on the canvas.

Once your initial round of glue is ready, pour the glue onto the canvas. If it’s too concentrated, you can pick up the canvas and let the glue glide around the canvas for more even distribution. This will act as your primary layer.
Step 3: Mix the glue and the other paints.
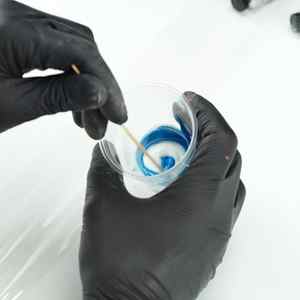
You should have a cup for each colour you are going to use. Celeste poured some glue into a cup, about 1.5 ounces. She recommends that you add two pea-sized drops of regular acrylic paint. Once you’ve combined the glue with the paint from the tube, mix the glue and the paint using a wooden coffee stirrer (or similar stirring utensil). You will notice that the paint will retain much of its pigmentation, so if you want the paint to look more diluted, use less of it.
Step 4: Make art!
Celeste then got ready to pour the paint. She took each colour and poured it one by one. Depending on how much you pour, you may want to move quickly so that it does not begin to dry before you’re ready to use the hairdryer. Remember that the first colour you pour will be the primary colour in the finished product. For this reason, white is a great starter colour for beginners! Once the colours are poured, you can pick up the canvas and swirl it around a bit to create a unique combination.
Step 5: More glue.

To manipulate the paint even more, you can add more of the pouring fluid or glue around the design you’ve created. The paint should react interestingly by marbling the colour even more. You’ll notice that wherever the glue is, that is where the paint goes.
Step 6: Use a hairdryer.
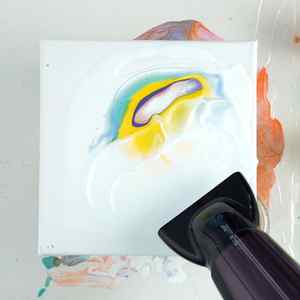
Once she let the paint flow to where she wanted it to on the canvas, Celeste used a hairdryer to make the paint form patterns.
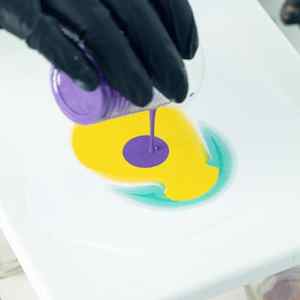
Step 7: More paint.
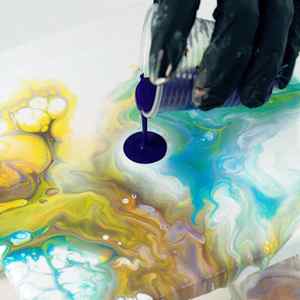
After using the dryer, more acrylic paint can be added to the canvas you are working on. Celeste then used purple to add another pop of colour to her artwork.
Step 8: Add glue to the corners.

After swirling the fluid acrylic paint around for a bit, Celeste added more glue to the edges of the canvas. You do this when the paint starts to move around to let your paint get pulled evenly over the sides of the canvas, in order to create a polished finishing look. To add an even more dramatic effect, use the hairdryer again.
Step 9: Time to dry.
Once the piece was ready, Celeste used waxed paper to gently pick up the canvas from the plastic cups. She then moved it to a safe area of her desk. The thing about acrylic pouring is that depending on how much paint you use, it needs a good amount of time to dry. So she put the painting somewhere out of the way and let it dry overnight.
Last but not least, gather all of your supplies, make sure that any of your clothes with acrylic on it goes right into the wash, and put the caps back on any fluid paint or glue.
Voila! Almost 24 hours later, the canvas with the spectacular poured acrylics had dried evenly, and we were left with a magnificent swirled effect. All of her initial preparatory work kept cleanup to a minimum, resulting in a unique art piece that couldn’t be easily reproduced using any other method.
Frequently Asked Questions
How do I know my paints are ready for pouring?
Your paints are ready when you have a creamy texture that isn’t too runny. You can always test your mixture on paper first before you move it to a canvas. Also, consider how concentrated you want the colour to be. If you want to dilute the colour, you’ll need more glue, and therefore a little more water to maintain the right consistency.
How many colors should I use?
Start with 3-4 different colours of varying shades and a white or a black. That should be enough to achieve a unique poured art effect without overcrowding your piece or increasing the dry time. If you work with black paint, be very careful not to let it bleed into your other colours and grey out your entire canvas. Therefore, Celeste recommends avoiding working with solid black for your first few acrylic pouring projects.
How long will it take for pouring art to dry?
The drying time for paint pouring typically ranges from half a day to 2 days. The factors that affect the drying time include – the humidity level in the drying room, your pouring solution water to glue ratio, how much paint you used, the types of paints and canvases used, and how evenly you’ve distributed the medium.
How do I keep my art safe while it is drying?
The ideal drying area for poured art is a dark, cool, and dry room. This prevents sun damage or uneven drying, while also limiting drying time. Your canvas should be placed on a smooth, cool surface (ideally glass) so that your design dries quickly and evenly.
So, to summarize, this is what we learned from our afternoon of painting with Celeste Jones. Fluid painting is all about the prep. Taking the right precautions and having the right materials heading into your acrylic pouring project is going to make all the difference. Getting your glue solution and paints prepared before diving into fluid painting will ensure that you’re able to add all of the desired colours without running into timing issues with dried paint. This will allow you the optimal amount of time to pick up your canvas, twirl it about and make awesome effects using a hairdryer.
Once your design looks just the way you want it to, find a dark and dry place where your canvas will be safe for 24 hours.
We hope that our time with Celeste has inspired you to try this exciting and fun art form! Remember to stop by our online shop to enjoy free shipping on premium art supplies such as Pouring Acrylic Paint and Stretched Canvases.
Watch this step-by-step guide on our YouTube channel.
The Drying Stages
Before we get into how to dry your acrylic paint faster, let’s do a quick review of the stages of drying that your painting will go through.
It’s important for you to know which stage of drying your painting is so you can decide whether to try to dry it faster or let the painting dry on its own.
When you first pour your paint, it will be easy to move around the painting surface. As the paint is exposed to air, the solvents and water start to evaporate, causing the paint to dry.
Next, your paint will form a “skin” on the top layer. This process can take anywhere between four and eight hours.
Once the skin forms, you may think your painting is dry because it is dry to the touch. However, the paint underneath is most likely still wet, so don’t go touching anything yet!
Finally, the paint is considered cured when all the paint has dried down to the bottom layer. Depending on the paint you bought, it could take up to five days to become stable. After this, it can take a few weeks for the small number of remaining solvents to evaporate from the paint.
At this point, your painting is ready for a few layers of varnish to protect your paint pour.
Keep in mind that paint also dries faster in the areas that are most exposed to air. This means that the corners may dry faster and be in a different stage of drying than the middle of the painting, for example.
Use Caution
In their rush to get their paintings to dry quickly, many crafters can cause the paint to dry too fast, which can result in unwanted cracks.
This can either be because the paint was too thick when you poured it, or that the painting dried too quickly. This is why it’s important to get acrylics specifically made for pouring.
To avoid cracks, make sure that you don’t expose the painting to direct sunlight. You also want to make sure the temperature of your room isn’t too high.
If the painting dries too slowly, on the other hand, then the paint could become gummy. This instability can ruin your design.
Keep an eye on your painting as it dries. This way, you can make adjustments to your room’s environment depending on whether you need to slow down or speed up drying time.
Tips for Faster Drying Paint
To decrease the drying time of your painting, you can control both the materials you use and the environmental conditions of the room you’re drying your painting in.
When you use a porous surface like a canvas board, your painting will dry faster.
This is because the solvents and water in the paint leave the painting through the back of the canvas in addition to the top of the painting.


