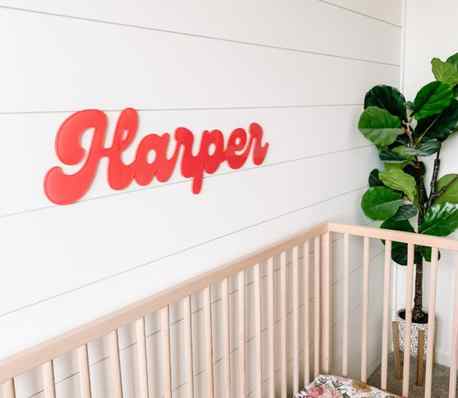
Once I put enough mounting tape on the back of the name sign, I pressed firmly into the wall to set it in place.
How to Spray Paint Acrylic Name Sign
Acrylic is gaining popularity in the crafting, home decor and event decor categories. The material is lightweight and easy to paint and decorate for almost any occasion.
We offer Acrylic Letters and just released our Script Acrylic Letters that look great in kids rooms, nurseries, playrooms and even for wedding events or other home decor.
Since we only offer black, white and clear color options at this time, I wanted to show you how easy it was to spray paint acrylic.
I ordered our Script Acrylic Letters in clear, grabbed a beautiful spray paint color from a local store and back painted the letters. This created a truly unique and one-of-a-kind look for the acrylic name sign that I ordered.
Follow along to see how easy it is to do it yourself!
Materials
For this DIY project you’ll need Script Acrylic Letters, spray paint (we used COLORSHOT Paint), mounting tape or command hanging strips and scissors.
When you receive the letters, there will be masking on the face of the letters to prevent any scratching. Keep this on until you are ready to hang the letters.
Here’s what I ordered:
Text: Harper
Font: Genty Script
Height: 7 inch
Thickness: 1/4 inch
Color: Optical Clear
Approximate Width: 27.2″
On the product page, you are able to customize the text, font, height, thickness, color and mounting.
I love that you can change the height and see an approximate thickness to know about how long it will be on the wall. This allows you to be able to plan where you want to put it!
Back Paint the Script Acrylic Letters
First, gently wipe any debris that may be on the back of the letters using a soft microfiber cloth. You’ll want to make sure there is nothing on the back of the letters before painting.
Next, flip the letters over and spray paint the back. Hold the spray paint a few inches away (not too close or else you’ll get streaks) and evenly spray the entire name. I ended up doing two full coats, allowing adequate time in between coats to dry. Depending on the color you choose, you may need one more coat, but you can be the judge of that.
The spray paint I used is called COLORSHOT and I was very impressed with the quality of the spray paint and finish on the acrylic. I ended up finding this brand at Walmart and they had a beautiful selection of trendy paint colors. This vibrant color is called Summer Pedicure.
Make sure to use the spray paint in a well-ventilated area to avoid inhaling fumes.
A Guide to Painting on Plexiglass – Tips and Ideas

Plexiglass is one of the most demanding and amazing glass materials available! It’s no surprise that you’ll find it in both domestic and industrial settings, given that it’s shatterproof, ductile, and transparent, and the plus point is it’s available in a wide range of colours. It has even made its way into the do-it-yourself category, so you can paint it as you like.
DIY hand-painted acrylic sheets will become exquisite artwork at home, and at the same time, you can also consider transforming it into an unparalleled personalized gift! You can design your image with your style and make it into a personalized acrylic keychain. It combines the advantages of plexiglass and the practicality of the keychain, which is the most straightforward implementation path for you.
Custom keychains are unique as each keychain is tailored to the specific requirements of the customer. You can choose from different sizes of keychains, colours, shapes, and personalized elements. Combining these variables will meet all your needs for custom elements, ensuring that your keychain is different from all other gifts!
This unique gift is suitable for any occasion, whether it’s a birthday, graduation, wedding, or holiday. You can use it as a personalized party gift, set the atmosphere for special occasions, or as a souvenir for your closest people. The customized acrylic keychain will showcase your personality and unique style, and your friends will be amazed by its beauty and uniqueness. And when it comes to preserving these cherished memories, consider the best custom canvas photo prints to capture those moments forever.
The following guide will come in handy if you’re painting over a large sheet of plexiglass for a DIY home project. Painting on plexiglass is a task that requires a special kind of paint so it stays on until you want to peel it off. Plexiglass, specifically, is best painted with acrylics, but plastic spray paints can adhere nicely. Let’s get into it!
How To Paint On Plexiglass

Plexiglass can be difficult to deal with; it needs extensive priming before any paint will adhere. Here’s a complete step-by-step process on how you can paint any plexiglass.
1. Sand The Plexiglass Sheet!
To begin with, you must sand the surface before you can start painting on plexiglass. This will create a rough surface that the primer can better adhere to. In the absence of any preparatory work, paint and primer applied on a smooth piece of plexiglass will peel off once dry.
It’s a good idea to rough up the surface of the plexiglass you’ll be painting on with some sandpaper of a medium granularity, perhaps 100 grit. You can use masking tape to protect areas you don’t want to be painted. Make the plexiglass less reflective by sanding it with a medium grain grit and pressure.

2. Clean the Acrylic Sheet
You can’t start painting just yet since a layer of plastic dust has settled across the plexiglass. If you try to paint over this area now, the result will be an uneven, lumpy coat of paint and you’ll have to start over.
You can clean the plastic by dipping a sponge into soapy water and scrubbing the surface. The plexiglass should be washed with fresh water and dried thoroughly with a soft cloth. We recommend waiting at least an hour, and preferably two, for the surface to dry. Wet surfaces should never be painted over.
3. Put on the Primer
As soon as the surface is dry to the touch, you can apply the primer. As the paint is applied to the primed surface, it will have a uniformly rough and porous surface to grip onto. That would be a huge improvement over simply painting the wall. Put down a few sheets of newspaper first to protect the floor from paint spills.
Priming with spray paint is significantly simpler. It’s also easier on the eyes and more uniform. Keep the can’s nozzle 8 inches from the plexiglass at a 45-degree angle. Spray in an outward direction from the plexiglass, then move the spray gun to cover the entire surface. Make sure to move around frequently and not linger in one area for too long.
4. Additional Layers Of Primer
There are times when multiple layers of primer are required because the plexiglass surface is not perfectly smooth. Let the first coat dry completely before spraying the second.
The initial coat of primer is rough enough that further sanding is unnecessary. Remove the masking tape before the primer is entirely dry. If you wait until the paint is dry before removing the masking tape, you risk peeling off the paint.

5. Start Painting
You should reapply the masking tape you took down before proceeding with the painting. You can now spray the area with the paint of your choice. When painting, the can should be held at a 45-degree angle, at least 8 inches away.
Spray light coats all over the plexiglass, just like you did with the primer. If you plan on applying more than one layer, though, wait until the first one is dry before proceeding.
Before applying the second layer, you should sand the surface lightly. The sandpaper recommendation I have for this stage is 140 grit. Sanding is followed by a sponge cleaning with water. Put on as many layers as you think are necessary. When the paint is sticky but not dry, you can remove the masking tape.
Is there any form of paint that will adhere to plexiglass? When painting on plexiglass, only use acrylic paints. Latex paints in particular are notorious for reacting badly with plastic, melting the surface.
6. Apply Waterproofing Sealant
Waterproofing sealant, applied in many coats, should be applied over painted plexiglass before it is placed outside and subjected to the weather. Depending on your desired effect, you can choose between a matte and a glossy sealer.
Best Paint For Acrylic Sheets
Painting or printing on a Plexiglass sheet is best done with acrylic paints or oil-based paints would work perfectly as well. Acrylic paint has the advantage of being cheap, widely available, and easy to apply. It can be used with a variety of tools, from paintbrushes and rollers to spray cans and sponges.
It’s important to remember that heavy paint layers on acrylic might dry slowly. Take your time and wait for each layer of paint to dry before proceeding to the next. Be cautious not to overheat the acrylic, since this could cause warping or harm the paint or primer if you wish to speed up the drying process by using a hairdryer.
Acrylic can be scraped off with a fingernail even after it has dried. A spray-on sealer made specifically for acrylic, which can be obtained in various craft and home improvement stores, will give you the greatest results. You may safeguard your artwork for the long haul by applying this thin, clear layer, which is extremely difficult to remove.


