Paint & Paper Library
DIY Wall Panelling Tutorial
Wall panelling seems to be everywhere at the moment, and for good reason – it adds a touch of stylish and classy character to what could otherwise be a boring, plain wall. The best thing about wall panelling is that despite how great it looks, it can be very cheap and very easy to install. I recently added some DIY wall panelling in my home, so I have put together this simple ‘how to’ DIY wall panelling tutorial to show you how you can easily add panelling in your home. It’s worth noting here that I am not a carpenter, there will be better, more professional ways of doing things I’m sure, but this way worked perfectly for me and produced great results! I should also mention that I didn’t plan to blog this when we started, so I don’t have many photos from the earlier stages!
What you will need:
I bought everything I needed for the panelling from Wickes, purely because it’s my local DIY store, but you’ll be able to buy these standard items in most DIY stores. I’ve linked the products I used for ease:
If you are planning to panel straight onto the wall like we did, really spend some time prepping your wall first as this will give a neat finish. Sand it down as best you can to remove old paint marks, fill and sand any cracks etc. Trust me, it will be worth the extra effort.
Step 1 – Measurements
To be honest, this was probably the hardest part of panelling the walls, I spent a good few hours (probably minutes but it felt like hours) staring at the blank walls trying to work out how I wanted the panels to be placed.
Firstly, decide where you want the dado rail to be. I positioned mine so that it was sitting just on top of the window sill, which meant my dado would wrap nicely around the window frame. Once you know the height of the dado, mark it out in pencil across the whole length of the wall or walls you plan on panelling. You can use a laser level for this but I just used a spirit level. One thing worth noting here…. houses and floors are not always level! So, do the best you can with the spirit level but work by eye as well, it’s just as important.
Once you’ve marked that out, you’re ready to position your panels. Panels can be square or rectangular, but in my case I wanted low and wide rectangles as it better suited the room as it’s long and thin.
Image from further along in the project, but shows the spacing for measurements Image from further along in the project, but shows the spacing for measurements
The maths bit: Start with the most prominent wall, and measure the full length of it. Mine was just over 4m, so I decided to make my panels 1m long and to have 3 boxes on that wall. You then need to work out the spacing in between each of the panels, and the gaps at each end of the wall too. I had 4 gaps, so I simply divided the remaining 1m of wall by 4, to give me 25cm. That meant that my 4m wall would be made up of: 25cm gap, 100cm panel, 25cm gap, 100cm panel, 25cm gap, 100cm panel, 25cm gap. I then did the same with the depth, so I worked out how deep I wanted each box l to be, and then made sure the gap at the top and bottom was the same so I had perfectly equal boxes. Draw all of this out neatly on the wall so you can check and double check it looks right. For the other walls, I created a mirror image of my first wall to make sure the room looked symmetrical.
I confess I may not have explained that well. Maths is hard to explain. But the best thing you can do is get yourself paper, pencil and a rubber and sit and draw it all out and then draw it out on the wall too. It is worth the time and effort as it’s the most important part to get right.
Step 2 – Cut your wood
Now you’ve got all the measurements you need, you’re ready to cut your wood! For this you need your mitre box and saw. Cut your wood to 45 degree angles, completing the boxes one at a time. Keep checking each cut as you go along to see how it looks against its connecting piece, this will help ensure really perfect joins. Its also a good idea to number each piece 1- 4 for each box so you don’t forget which piece joins neatly with which. Remember, the outside edge of the wood needs to be measured to the length you need, not the inside! Your 45 degree cut will make the inside edge slightly shorter.
Step 3 – Test it
Once you have cut your first box, use blu-tac to stick it on to the wall and check you’re happy with it before committing with glue. Use the guidelines you drew on to the wall previously so that you know exactly where to stick each piece. This is a good time to check your measurements and your angles. Make sure you’re happy with the spacing all around the box and that everything looks parallel. Use your spirit level to check everything is level too and adjust any of your pencil guidelines if necessary.
Step 4 – Attach to the Wall
Squirt a generous amount of instant grab adhesive to the back of your wood and apply to the wall. Use you spirit level to make sure it’s applied perfectly straight, and gentle manoeuvre it in to place if not. Ensure that the whole strip of wood is in contact with the wall. If the wall is bowed slightly then you may find gaps. It’s a good idea to hammer in some panel pins in these places to pull the panelling tight to the wall. Use a nail punch to embed the nail into the wood so you can cover the pin with filler later on. Don’t worry – you won’t be able to see these when you’re done!
Step 5 – Add your Dado Rail
Once all your panelling is in place, you can add your dado rail. For this you will need to make internal and external cuts to your wood, depending on where the join is, and for this you’ll need your mitre box again.
Your line should already be marked out for where you’re going to place your dado rail, but at this point I would double check it and remeasure it against your newly fixed panels. Make sure the lines are perfectly parallel along the whole length of your wall and that it’s level.
Fix your dado to the wall using your instant grab adhesive again. As with the moulding, you might find that the dado doesn’t sit perfectly flush to the wall so if this is the case, use some long nails to secure it in place. The dado is a lot heavier and thicker than your moulding so you wont be able to use you panel pins here. To make sure it was neat, we drilled a small hole part way through the dado first, and then hammered the nail in from there using the nail punch. This meant we could neatly fill over the top of the hole and you wouldn’t see the nail. If you need to join two pieces together, do a mitre cut on each to join them rather than a straight cut, as this will create a neater finish.
Step 6 – Fill and Caulk
Once everything is dried and secure, you can fill and caulk. Anywhere that you have put panel pins or nails, you need to pop a blob of Polyfilla over the top of the hole. Once this has dried, gently sand it down until it’s complete smooth and blends in to the wood. Don’t use the caulk for this, as caulk doesn’t sand well! Once all your nail holes are filled, caulk all of the edges around the wood, including the inside, outside, and the angled cuts and joins, and wipe over with a smooth damp cloth to get a really neat finish.
Step 7 – Paint!
And now for the most satisfying part, you are finally ready to paint! I personally didn’t prime my wood first, I just went straight in with the paint. I used matt emulsion on mine which worked perfectly and created a really good, flat matt finish (I don’t like sheen). Remember to give a light sanding in between coats to get a really good finish.
Here are some images of the panelling once the rest of the room was complete, so you can see the full finished look!
So that was my DIY wall panelling tutorial for you, I hope you found it useful! Please let me know in the comments below if you’ve tried panelling after reading this, I would love to see how it turned out!
Feature wall ideas: black

Brent Darby / House Beautiful
Black is a wonderful and bold choice for a feature wall. The crisp white ceiling and window frames provide great contrast, whilst the wall panelling adds a bit of depth and some lovely highlights and shadows – a clever design device that prevents dark colours from looking flat.
Feature wall ideas: bring the outdoors in

Little Greene
The wallpaper that launched a thousand Instagram posts. The super popular Massingberd Blossom wallpaper at Little Greene is a ready-made feature wall. Available in an array of sugary sweet colours and adorned with hand-painted blossoms.
Feature wall ideas: gallery wall
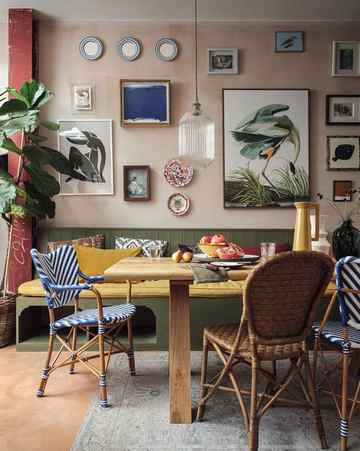
Barker and Stonehouse
The joy of a gallery wall is that it lets personality shine. Some are drawn to something neat and uniform, and some love the chaos of a mismatched collage. Either way, it’s a feature wall that can continue to evolve as your tastes do.
Advertisement – Continue Reading Below


