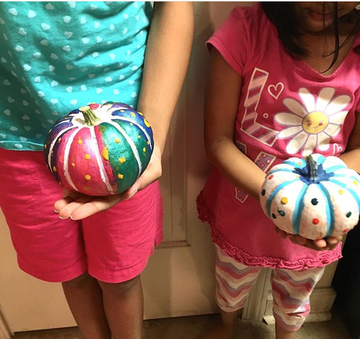
- Paint your pumpkin in your chosen colour/colours and allow to dry. My son chose every colour possible and I think the end result is just beautiful!
- Lightly Brush on the glue where ever you want to put your decorations.
- Apply your decorations and allow to dry.
Painted Pumpkins – A Pumpkin Carving Alternative
(Use of this website assumes your agreement with our Terms and Conditions please take the time to review them. Posts also contain affiliate links which earn us a commission. We are a participant in the Amazon Services LLC Associates Program and as an Amazon Associate we earn from qualifying purchases. See our Disclosure Policy for full details.)
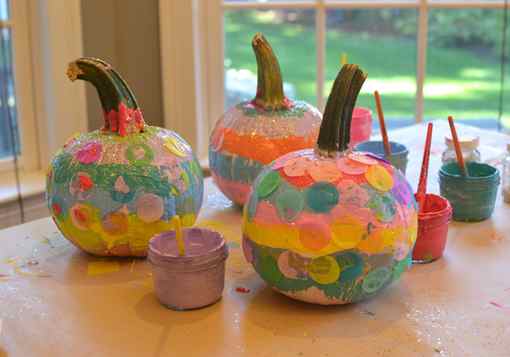
Painted Pumpkins are super fun to make and a great Autumn craft for children to do whatever their age from tiny tots to teens. Traditional pumpkin carving is so tricky and dangerous for little hands, but this is something everyone can have fun with.
On my way to and from work I’ve been passing a farm selling pumpkins of all shapes and sizes and well…I’m like a kiddy in a sweetie shop, and I just can’t resist. I think they’re so lovely, and I really do adore being able to bring the outside in!
So with a hoard of pumpkins the children and I set to creating with paint, glitter, sequins and glue and the end results are just lovely. So colourful and so much fun.
Painted Pumpkins – A Pumpkin Carving Alternative
Our Painted Pumpkins will look fabulous at Halloween and will go so well with our other homemade halloween decorations and treats.
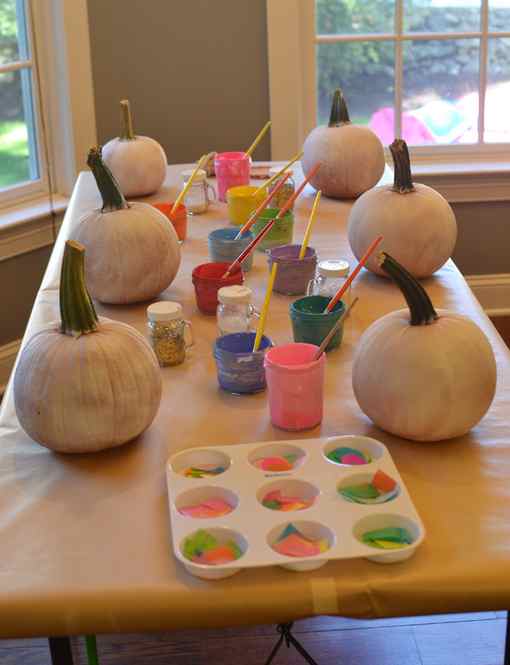
Supplies For Pumpkin Painting
- Pumpkins
- Poster paint or acrylic paint
- White glue (PVA, Elmers)
- A selection of decorations e.g., glitter, sequins, buttons etc.
How To Paint Pumpkins – A Pumpkin Carving Alternative
- Paint your pumpkin in your chosen colour/colours and allow to dry. My son chose every colour possible and I think the end result is just beautiful!
- Lightly Brush on the glue where ever you want to put your decorations.
- Apply your decorations and allow to dry.
I’m sure you’ll agree the end results are just so lovely.
I love that pumpkin painting is a great activity for the whole family to do together and a great opportunity to go wild with the glitter. You can never have too much glitter!
Have you tried painting pumpkins before?
No-Carve Pumpkin Alternatives with Kwik Stix
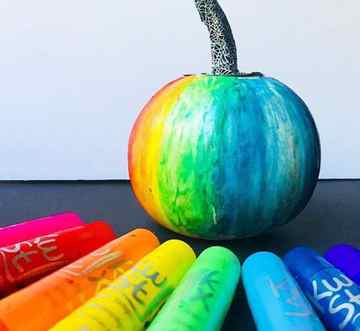
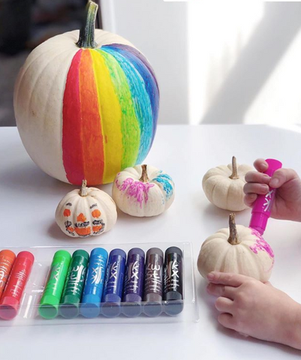
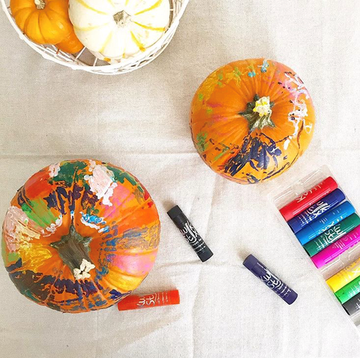
It’s officially pumpkin season! We are so excited to kick off the Fall season with no-carve alternatives for decorating. Did you know our Kwik Stix Solid Tempera Paint also work on pumpkins?! Their quick drying time of 90 seconds makes them the perfect no carve alternative for pumpkin decorating. No cups, smocks, water or brushes are required when using these washable paints! These tempera paints easily wash off so you don’t have to stress about a mess. Neon Kwik Stix add extra fun as the paint glows in the dark! Draw your favorite character, create a funny face or turn your pumpkin into a beautiful rainbow. Shop the entire Kwik Stix collection here
1. White pumpkins are great for painting! The bright and bold classic pack of Kwik Stix really pop.

2. Classic orange pumpkins work great as well!


3. Try the Kwik Stix Metalix for a fun and shimmery sheen on your pumpkins
4. Try the Neon Kwik Stix for glow in the dark pumpkins!

5. Add on funny faces!

6. Kwik Stix allow for a quick and easy clean up. No need for water or paint brushes, simply uncap twist and paint your pumpkins. Also, no messy pumpkin guts everywhere!
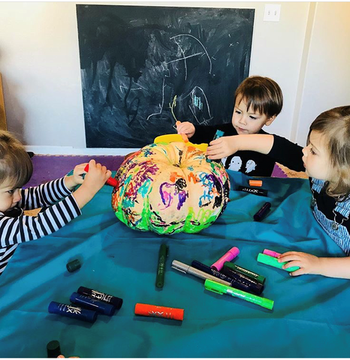
7. The possibilities are endless this year, there’s no limit to what you can create with Kwik Stix as a fun, safe, and mess free alternative to carving.
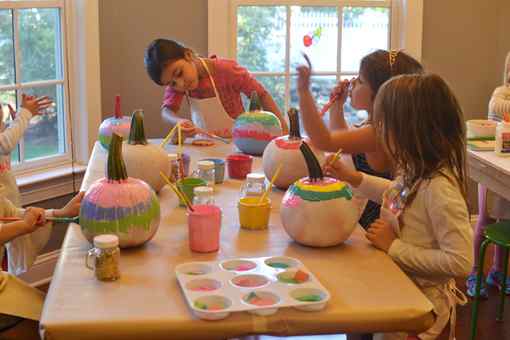
Painting Pumpkins with Kids

I have been waiting a year to post this!! The kids actually painted these pumpkins last year in art class, but I was too busy writing my book to edit the photos. And then all of a sudden the Holidays were here. But now…here they are! Aren’t they so gorgeous?
I used this one trick which I will tell you about in a second to get the colors really bright. And then I brought out one extra element at the end.


This post contains affiliate links. Thank you for your support!
Ok, so the trick is quite obvious now. Spray paint them white! I first covered the stems as best I could, then I used this spray paint and gave them a good spray.

Tah-da! White pumpkins. Easy peasy. I put them on lazy-susans so the kids could paint all around a little easier without getting their hands all messy. Here is what you’ll need…
Supply List:
~ Lazy susans (totally optional but helps so much)
~ Tempera paints (I love mixing these fluorescent colors with a little white to make them brighter and more opaque)
~ Brushes and jars for the paints

The process:
~ Well this is an easy one. Just paint! The kids all automatically painted stripes, I think just following the stripes on the pumpkins.


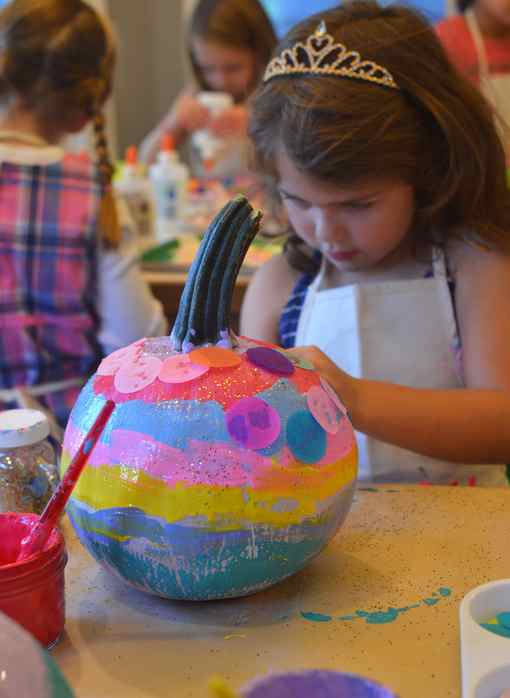
~ When they finished painting, I brought out the tissue dots and some glue. I imagined dots all over the pumpkins, but they all just did one line around the middle. This group usually doesn’t copy each other, so I think it was just the natural thing to do. I did suggest putting on more dots, but after 45 minutes of working on their pumpkins, they were done.


I so very badly wanted to keep them all. And in fact, I did get to keep them for a few days until they dried, but then the parents came back and picked them up. I think this year I will do it again with my own kids so we can keep them!

And how cute is this smiling face with the pumpkin on her head? Happy to bring her masterpiece home.
I brought smaller pumpkins to a birthday party recently and it was a huge hit! Make sure to supply cardboard for parents to carry the pumpkin home in the car, as they may still be a little wet with paint at pick-up.
One thing I didn’t do, which I think would be a good idea in the future, is to cover them in Mod Podge after they have dried. It would give them a nice sheen. You can’t do this with the birthday party pumpkins, but you can if you have an art class and the kids can pick the pumpkins up the next day.
Happy pumpkin painting!


