Have you ever been excited to print a photo, only to be disappointed by the blurry or pixelated result? It’s a common frustration that many people face, and it often comes down to one crucial factor: photo resolution.
Create and print a banner, poster, or other large publication in Publisher
When you create a publication, for example, Banners, and select a size larger than 8.5-by-11 inches in Page Setup, Publisher prints a publication that is larger than a single sheet of paper. In Publisher, you can print publications as large as 240 by 240 inches.
Important: Some features, such as gradients, lines, and border art, may not be printed correctly on banners that are larger than 10 feet.
What do you want to do?
- Create a banner
- Create a poster
- Add images to a banner or poster
- Adjust the overlap
- Print a banner or poster
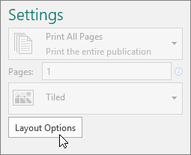
- Click File >New and choose Built-in to use one of the templates installed in Publisher.
Tip: Using Publisher 2010? Click File > New and select Installed and Online Templates under Available Templates.
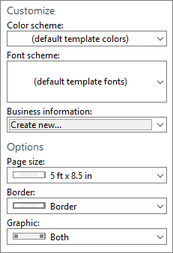
- To change the width and height of the banner, click Size, then choose the page size, or click Create new page size.
- To change the banner’s color scheme, select color scheme in the Schemes group.
- To change the banner’s font scheme, click Fonts, then choose a font pair.
Create a poster
To create a poster in Publisher, first create a banner. Then, change the page size of the banner to the poster size you want.
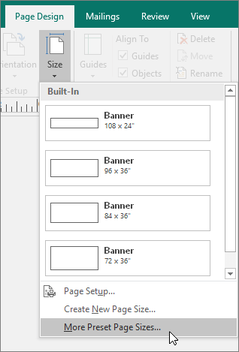
- On the Page Design tab, click Size >More Preset Page Sizes.
- Under Publication Types, select Posters, then choose the size you want.
- Click OK.
- On the Page Design tab, do any of the following:
- To change the width and height of the banner, click Size, then choose the page size, or click Create new page size.
- To change the banner’s color scheme, select color scheme in the Schemes group.
- To change the banner’s font scheme, click Fonts, then choose a font pair.
- In your banner, replace the placeholder text and pictures with the text and pictures or other objects that you want.
- Click File >Save As, then click the location or folder where you want to save the new banner.
- In the File name box, type a name for your banner.
- In the Save as type box, click Publisher Files.
- Click Save.
Mounted Posters

3/16″ White Foam Core
- 8 x 10 Mounted Poster
- 9 x 12 Mounted Poster
- 11 x 14 Mounted Poster
- 11 x 17 Mounted Poster
- 12 x 16 Mounted Poster
- 12 x 18 Mounted Poster
- 14 x 20 Mounted Poster
- 16 x 20 Mounted Poster
- 17 x 22 Mounted Poster
- 18 x 24 Mounted Poster
- 18 x 27 Mounted Poster
- 20 x 30 Mounted Poster
- 24 x 36 Mounted Poster
Handmade to order – in house
- 8 x 10 Framed Poster
- 9 x 12 Framed Poster
- 11 x 14 Framed Poster
- 11 x 17 Framed Poster
- 12 x 16 Framed Poster
- 12 x 18 Framed Poster
- 14 x 20 Framed Poster
- 16 x 20 Framed Poster
- 17 x 22 Framed Poster
- 18 x 24 Framed Poster
- 18 x 27 Framed Poster
- Home
- 20 x 30 Custom Poster Print
Details
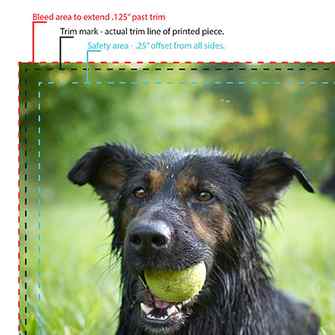
- Print Size: 20″ x 30″
- Image Area: 20″ x 30″
- Safe Print Area: 19.5″ x 29.5″ Centered
- Choosing “No Margin” option will cut off outside edge of image.
- Minimum Suggested PPI: 150ppi
- Minimum Pixel Dimension: 3000 X 4500
- Printed on uncoated 45# Bond
- Lamination option is 1.5 MIL clear glossy
- Shipping is determined by weight and location.
- Using a heat process to mount or laminate your poster print may damage it.
Specifics about our process
- All orders follow a strict 5 business day production schedule
- Normal orders are shipped out on the 5th business day
- Orders placed before 1PM CST will count that day as the 1st production day
- We offer 3-Day, 2-Day and 1-Day express production upgrades during checkout
- 1-Day Express orders must be placed before 10AM CST to ship same day
- Our printers have a native resolution of 600 DPI
- We use the standard CMYK color model for all printing
- We are serious about color and perform daily color verifications
Standard Production: 5 Days + Shipping
Posters are great for letting people know what’s going on in a BIG way. They are also perfect for yard sales, band posters, artwork and of course your personal photos.
Our Standard 5 Day Production is for people seeking a quality poster at a low, low price. Production time is based on business days only and does not include shipping time. If you need your posters quickly, you can add an “Express” option to your order during checkout.
Adding Express Production is easy! During checkout, just choose how quickly you’d like your order. More information is here.
Tips and Tricks for Enhancing Photo Resolution
1. Start with the Highest Resolution Possible
Always start with the highest-resolution image available. It is easier to downsize an image without losing quality than it is to increase it from a low-quality image.
2. Use Professional Photo Editing Software
Professional photo editing software Luminar Neo can help enhance the resolution of your images. It uses artificial intelligence to enhance your photos, including features for increasing resolution without losing detail.
3. Avoid Over-Editing
Over-editing your photos can lead to a loss of detail and a decrease in print quality. Make subtle adjustments, and always keep an original copy of your image.
4. Understand the Limits of Your Camera
Even the best photo editing software can’t make up for a low-quality original image. Understand the limits of your camera and always shoot at the highest resolution possible.
Common Mistakes to Avoid
1. Not Considering Viewing Distance
For poster printing resolution, consider the viewing distance. A poster viewed from a distance does not need as high a resolution as a photo that will be viewed up close.
2. Ignoring the Print Medium
The print medium (e.g., canvas, photo paper, etc.) can affect the appearance of your image. A higher resolution may be necessary for textured mediums like canvas.
3. Using Low-Quality Original Images
Always start with the highest quality original image possible. Trying to increase the resolution of a low-quality image will result in a loss of detail and a pixelated appearance.
Conclusion
Choosing the right level of detail for your images is essential for creating beautiful art. It’s key to understand metrics like DPI and PPI and how they influence the size and quality of your artwork.
Always start with high-quality images, consider the viewing location, and use advanced editing tools like Luminar Neo. Following this guide will help you avoid common mistakes, pick the appropriate detail level, and ensure your artwork looks crisp, detailed, and stunning.
In addition, remember that the medium on which you are printing also affects the appearance of your artwork. Textured mediums like canvas may require higher resolutions. Moreover, always consider the viewing distance. Artwork meant to be viewed from a distance may not require as high a resolution as those meant for close-up viewing.
Lastly, it’s crucial to always keep an original copy of your picture and make subtle adjustments during editing to avoid losing detail!
Remember, every piece matters — make yours stand out!