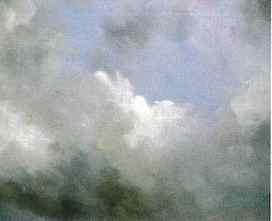
Lastly I decide I need to ‘push’ the scene a bit to create more drama, and to do this I simply play around with the effects of light; creating a more brooding intensity to the storm, a ‘spotlit’ focal point, and drop in a few suggestions of detail – including a traditional red Norfolk sail in the focal area to catch the viewers eye.
How To Paint Storm Clouds in Oil with Martin Kinnear
The greatest joy of working in oils is the freedom the medium gives the painter to work large, small, detailed or loose, translucent or opaque; no other medium offers so many options for expression and is so easy to get to a working competence with.
The support I’ve chosen is a 30 x 40 inch canvas. Working on this scale gives me the opportunity to work boldly and freely and is a great way to force oneself away from over-detailing or being fussy.
For all of those reasons I urge you to work on a similar support, aiming to finish the oil in two or three morning or afternoon sessions.
Materials List
Rather than slavishly record how I painted this in a step by step manner, I want to focus on broader principles that will be more of use to you in learning oils.
First of all think about the progression of the painting, how will it develop, and how can you break that development into stages?
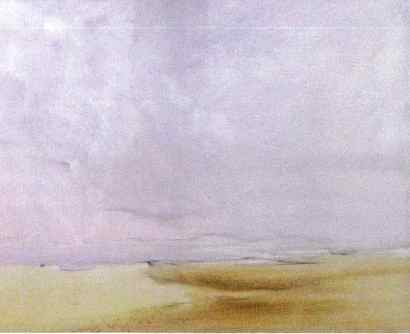
My first stage is the imprimatura or underpainting. We teach a number of ways of approaching imprimaturas, but for this one I use Turner’s preferred method of a fairly bright imprimatura that roughly accords with what we’ll paint over it; Turner called these ‘colour beginnings’. As i’ll be working straight over this, I simply wash in paint diluted with turpentine (not medium) and let it dry for 10 minutes while I have a cup of tea. Once I have a base colour I think about laying in the foundations of the picture, in large, simple blocks of colour.
Step 1: Creating the storm clouds
I work over the dry imprimatura with large brushes and medium thinned oil paint to roughly indicate the main elements of the painting. Working thinly and rapidly, there is no need to worry about details at all yet.It’s extremely important to control the translucency of the underpainting, too much opacity will kill the underlying luminosity created by the imprimatura, and too little will make the picture look weak and disjointed. One of the tips we teach here is to use paper towels as well as brushes to wipe back paint, soften edges and recover translucency; Turner famously even used his muffler to dab at his paints as he worked!At this stage any underpainting lacks three things; atmospheric depth, modelling and details, so I decide to let it dry before I push on; if you mix a fast drying medium it can be workable in about 8-12 hours.The theory of creating depth in a painting is straightforward; the support is flat, the world isn’t – so one has to trick the viewers eye into believing things are otherwise. If you paint slavishly from photographs you’ll always fail to do this well as the colours recorded by lens are not the same as you’ll need to create the illusion of depth.The illusion of atmospheric depth is created by placing cool subtler colours in the distance and warm, more saturated ones closer to the viewer, and a camera will never create this sequence for you.

Oil Painting Class: Clouds
ClassBento donates with every booking to

5 hours 2 to 6
label $150 – $175 (or 4 payments of $37.50 – $43.75 via – Afterpay)
($175 per guest when you book for 1+ guests, $150 for 3+ guests)
What you’ll do
Looking for fun Sydney activities or a new hobby? Try a relaxing oil painting class. During this oil painting class, you will learn how to paint clouds in various light conditions to make stunning original artwork.
This class is good for beginners and anyone who wants to experiment with using oil paints. You will have a brief introduction to oil painting and the materials that we will be using. We will also talk about how to approach landscape painting.
- How to understand colour: concepts of the colour theory and mixing and its application in the landscape
- Observe and paint landscapes in oils, composition, and creating depth using colour, tone and perspective
- Use underpainting and layering of paint while blending colours to create beautiful colours (working wet on wet)
A 20-minute break is taken at around 12:30 pm. Lunch is not included.
Important information:
In this painting class, we do not use toxic turpentine. However, a minimal amount of odourless solvents are used. Please note that for safety reasons the painting class is not recommended for pregnant women.
Terms and conditions
By taking part in a workshop you will be agreeing to the following conditions:
Liability waiver:
Any damage, loss or theft incurred to personal property brought into class premises.
Any physical injuries sustained as a result of participating in any class.
I agree to take on full responsibility for any damages, injuries and for physical and/or personal property, which might incur whilst participating in classes and/or events.
Photo and video:
I agree to give Christopher Vidal unrestricted publishing rights for any photographs or videos taken during classes and events. Photos will only be used through social media, newsletters, blogs, websites and general promo material.
You can take photos during the class.
Please note
The images in the advertisement are not the ones to be painted but a similar image (photo) will be used as reference material during the day.
Knowledge required
This is a beginners class and so no prior knowledge is required.
 
What you’ll get
All materials needed including brushes, palettes, and paints! No need to bring anything. You will also take a finished painting back home with you.
 
What to bring
- Just bring a notebook to take some notes, a camera to take photos/video and lunch.
- Wear some clothes that you wouldn’t mind potentially getting some paint on!
Head in the clouds

‘Head in the clouds’ is a comprehensive class of over 3 hours, in which you will learn how to paint a unique dark skinned portrait looking down and create a starry cloudy hair style.
(It was originally created for the year-long course Paint Your Heart and Soul 2022)
In this lesson I will guide you through the process of creating a realistic portrait using a reference photo, in oil paint. We will be painting in the fat over lean technique, the wet on wet technique and the wet on dry technique.
We will start with drawing the portrait and I will show you how you can use a scaling tool for the correct proportions of the portrait.
Then the first layer of transparant oils in three colours, will be added to block in the values we see in the reference photo. After the values are blocked in, we will use the subtraction technique to create form of the portrait.
Because this is an oil painting class, I will explain to you the warm and cool properties of oil paint, and what materials to use and how.
Then I will guide you through mixing all kinds of realistic skin tones, and how to lay down your paint on the palette to work most efficiently.
Now it’s time to start painting the portrait. We will build up the values, working from dark to light using the cool and warm properties of the oil paint to create depth. You will learn how to use oil paints and different brushes to create realistic skin tones, and facial features.
Once the hair is dry you will learn how to paint clouds and stars in the hair using different techniques and effects.
This online painting class is suitable for both beginners and advanced painters.
You can take the class at your own pace and in your own time.