Again, you can see that you can do a lot with just a few sentences.
Photo to Drawing


By john_psddude Textures4Photoshop Follow
More by the author:
About: Hi, I am John and I love digital art. I like to create all kind of graphic design resources, tutorials and other cool stuff for free 🙂 More About john_psddude »
In this Photoshop tutorial you will learn how to turn photo to drawing in just a few simple steps. To convert photo to sketch we’ll need these resources:
- Your Photo (I used this Girl image from Pixabay)
- Sketch brushes for Photoshop
- Line art Photoshop action
- Grunge texture
Add Tip Ask Question Comment Download
Press Ctrl+J twice to duplicate the Photo to Drawing layer two times.
So, you have now three layers. Name the duplicated layers Photo to Drawing 1 and Photo to Drawing 2.
Add Tip Ask Question Comment Download
Step 4: Photoshop Graphic Pen Filter
Now, we have to apply a sketch effect to each layer.
But, first it’s very important to set the Foreground color black and the Background color white.
For the Photo to Drawing layer, go to Filter > Filter Gallery > Sketch and choose the Graphic Pen filter.
Add Tip Ask Question Comment Download
Materials used:
Pencils: 2H, HB, 2B, 4B, 6B, 7B, 8B, 10B (Staedtler – Mars Lumograph) – 710rs
Eraser: Apsara Nondust and Tombow MONO Zero Eraser – 280rs
Blending: Blending paper stumps (120rs), cotton cloth, Watercolor brush, Q-tips (earbuds – 10 or 15rs)
Scale: Ruler (any brand – 10rs)
Drawing sheet or Century paper (5 or 10rs )

If you are a beginner then I would recommend not to go for such costly materials. The following materials will also work great for you.
Beginner Materials:
Pencils: HB, 2B, 4B, 6B, 8B (Apsara – 1 pencil 10rs)
Eraser: Apsara Nondust and cut portion of eraser (to highlight details of the sketch) – 5rs
Blending: cotton cloth (freely available at home) and Q-tips (earbuds – 10 or 15rs)
Scale: Ruler (any brand – 10rs)
Drawing sheet or Century paper (5 or 10rs – Check the quality of paper)
Total cost – 90rs or around 1.2$ (one-time investment only)

Before moving towards the sketch tutorial, you must know the difference between different kinds of pencils i.e. 2H, HB, 2B, etc. Here, H stands for hard and they leave less graphite on the paper, which means they are lighter. In contrast, B stands for Black and these are softer and leave more graphite on the paper, meaning they are darker.
The advantage of Staedtler Mars Lumograph pencils over Apsara is that they are darker, more black, and softer which is considerable for realistic works. So, you don’t have to worry at all, you can work with Apsara pencils itself.
Let’s get started…
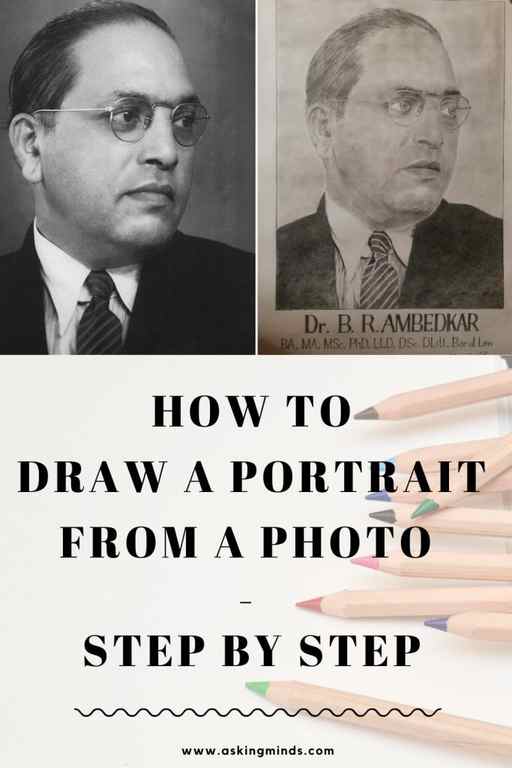
1.Take a black and white portrait picture of your choice for reference.
2. If you are having color picture then you can directly change the image into black and white with the help of available edit feature in your mobile phone or you can even find a bunch of free websites for converting the color image into the black and white format.
3. Please make sure whether the face is clearly visible or not.

4. Now, draw the grid lines using the “Drawing Grid Maker application” (download it from Play Store) or “Drawing Grid For The Artist” (for iPhone users).
5. With the help of a ruler, the grids can also be drawn with your hand only.
6. You can even number the lines for your convenience so you don’t have to count the grids while sketching (it’s up to you whether to mark it or not).
7. Make sure to draw the grids with the 1:1 aspect ratio only. If you are a beginner then I would recommend you to draw a 1inch x 1inch grids (squares).

Oh boy! now the real journey starts.
8. Take a Drawing Sheet and depending on your sheet size and requirements, draw the grids on it. I have drawn the 2inch x 2inch grids and made sure that the number of grids also matches with the reference photo.
9. Please don’t put pressure while marking the lines and use light pencils like HB or 2B so it won’t keep its impression when you erase them. You are drawing these lines for reference purposes only which will help to improve the accuracy.

10. It’s time to work on your sketch. To start with it, either count the number of grids or directly refer to the gridline number and draw the outlines.

11. Once you finished the task, have a look at it? Does it look good? Well, even if you are unable to recognize the person then also you won’t have to worry at all. Always remember, it’s just a skeleton and all skeletons look similar.
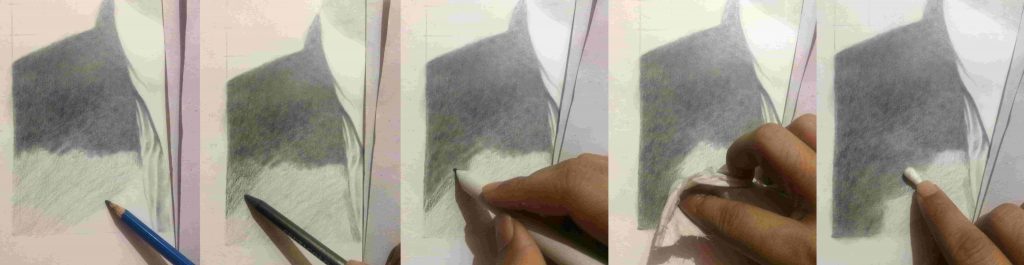
12. So, our next step is to add shading. Shading plays a similar role as skin layers on the skeleton, which helps us to identify the person uniquely.
13. To draw a portrait, I started from the topmost position. You can begin from any extreme end but I would recommend you to start from the top so that the shading would not get spread.
14. Also, keep tissue paper or white paper beneath your wrist to avoid spreading pencil shade on the sheet which comes into direct contact with your wrist.
Speculating About the Picture
Speculating… What does that mean?
Speculating means talking about possibilities.
For example, look at this picture:
Think about some questions:
Why are the umbrellas there?
Who put them there?
By trying to answer questions like this, you are speculating; you’re talking about possibilities and giving your opinion about the picture.
Speculating can help you to make a longer, more detailed answer when talking about a picture.
Let’s do an example:
- I suppose it might be some kind of art project.
- Maybe one person put an umbrella up there as a joke, and then other people started doing it, too.
Let’s look at one more picture:
Think, if you wanted to speculate about this picture, what could you say?
Another way to think about it: what questions could you ask yourself about this picture?
Possible ideas are: who made the footprints, and why? Where were they going? Where is the person who made the footprints now?
There are other possibilities, of course, so feel free to use your own ideas, too!
Okay, so what could you say to speculate about this picture?
Here are some examples:
- The footprints must have been made by a climber or a mountaineer.
- The person who made the footprints might be standing on top of the mountain now.
In our examples, you’ve seen some useful language which you can use to speculate about a picture. Do you remember?
You can use language like:
- I suppose…
- Maybe…
- [It] must…
- [He] might…
Let’s practise using these once more with another picture:
Could you make four sentences, using the useful language we just saw?
Let’s do an example together:
- I suppose the guy is a climber, or he’s on an adventure holiday.
- Maybe he climbed something, and now he’s on the way down.
- He must have a lot of experience, because his body language is quite relaxed.
- He might be focusing on what he’s doing, but he might just be enjoying the view!
Okay, now it’s your turn. Let’s take another of our pictures:
Can you make four sentences to speculate about this picture, using the language you’ve learned in this section? Pause the video and think about your answers!
Now, you have one more thing to do.
Speculating About the Context of the Picture
When you speculate, you can speculate about what you can see in the picture. However, you can—and should—speculate about what you can’t see, too.
How’s this possible? Well, think about this picture:
You can think about questions like: where and when was the picture taken? Who took the picture? What was the photographer doing there?
- I think this could be in the USA, or maybe Russia.
- It’s a good photo, so perhaps it was taken by a professional nature photographer.
You see? Talking about what you can’t see in the picture can be very useful, and can help to add details to your answer.
Let’s do one more example:
What could you say about this picture?
Let’s do this one together. You could say:
- This must be somewhere tropical, like the Caribbean or the Maldives.
- Perhaps it was taken by a tourist who came to the beach on one of those boats.
Okay, one more. This time, you have to do it yourself!
Here’s your picture:
Make at least two sentences to speculate about the context of the picture. Think about where and when it was taken, who took it, and what the photographer was doing there.
How was that? Hopefully you feel more confident describing pictures in English now.
Let’s put everything you’ve learned together and practise making longer, fluent descriptions.
Making a Longer Answer
When you describe a picture, you should:
- Give a summary of what you see.
- Talk about where things are in the picture.
- Add details.
- Speculate about what’s in the picture.
- Speculate about the context of the picture.
Let’s make a longer answer together. We’ll start with a picture we’ve used already:
Here’s a possible longer answer:
- In the picture, there are two people sitting at a table, looking unhappy. There’s a woman on the left and a man on the right. In the middle of the picture, we can see some things on the table, like cups of tea, biscuits, milk and so on. The two people look sad or irritated, and they aren’t speaking to each other. They’re both looking down at the table. I suppose they had a fight and now they aren’t talking to each other, or they might just be bored and not have anything to talk about. I guess it’s a stock photo because otherwise, why would the photographer be in the kitchen with them?
Do you think you could make an answer like this? Remember, all the language you need is in this lesson. You just need to take the things you practised in each part, and then put them together.
Let’s do one more example together:
- The picture shows umbrellas hanging in the air. In the foreground, we can see a streetlight, and the umbrellas fill the picture from left to right. The umbrellas are of many different colours, mostly bright colours like pink, yellow or green. They’re hanging from wires. I can see at least four lines of umbrellas hanging down in this way, but there could be even more. Maybe this is some sort of art project. It might also be a festival or tradition, that people decorate the street with colourful umbrellas like this. I suppose the picture was taken in a city or town, though I can’t tell where exactly. Perhaps the photographer was a tourist, and was just walking around the city when he saw this amazing and strange scene.
Alright, now it’s your turn. We’ll give you a new picture:
Pause the video and try to make a longer answer, like we just did. Follow the same structure.
Finished? I don’t think so! You should practise as much as you can. Take the other pictures from the lesson, and make longer answers about them, too.
Practise your answers several times, until you can do it fluently and comfortably. Post your responses on the Oxford Online English YouTube channel and we’ll give you feedback!
Do you want more practice with vocabulary? Watch our lesson to get advice on keeping a vocabulary notebook.