Once you’ve removed the pumpkin from the water, use a toothpick or a paper towel to pick up any excess nail polish on the water’s surface. You don’t need to change the water between pumpkins, just make sure there’s no residue left on top of the water before repeating the steps to create another pumpkin. The pumpkins will smell until the nail polish has dried completely, so set them outside or in a well-ventilated area to dry. Use your decorated pumpkins as a colorful Halloween centerpiece or add them to your mantel.
How to Make Nail Polish Pumpkins for a Colorful Marbled Look
You’ve never used nail polish like this before. We’re loving the bright and fun marbled look of these no-carve pumpkins—and they’re so easy!
Sarah Martens is the Senior Editor overseeing food at Better Homes & Gardens digital. She has been with the BHG brand for over 8 years.
Updated on August 27, 2019

Project Overview
- Working Time: 30 minutes
- Total Time: 1 hour
- Skill Level: Kid-friendly
Make your own marbled pumpkins by mixing nail polish with water—it’s that simple. The consistency of regular nail polish causes it to sit on the surface of room temperature water. Swirl drips of polish together to create a pattern and dip faux pumpkins into the water to transfer the colors and create festive painted pumpkins. These no-carve pumpkins take a bit of time to dry—allow them to set completely before using them as a long-lasting DIY Halloween decoration.
What You’ll Need
Equipment / Tools
- 1 Bucket
- 1 Gloves
Materials
- 1 Room temperature water
- 1 Nail polish
- 1 Mini faux pumpkins
- 1 Toothpicks
- 1 Paper towels
Instructions
Mix Water and Nail Polish
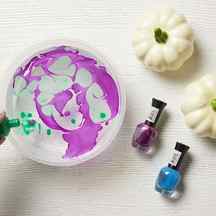
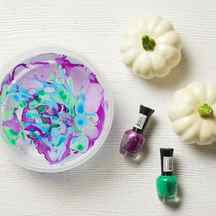
Fill a large bucket or container with room temperature water; the water should be deep enough to completely submerge your pumpkins. Keep in mind that there may be nail polish residue left behind after the project, so a disposable container or an old bucket is ideal for this step. Choose a color of nail polish and add 5-10 drops to the water; most of the polish will sit on the surface of the water, but a few drops may sink to the bottom of the container. Repeat this step with a few more colors (we used three colors per pumpkin), scattering the drops all around the water’s surface. Once all the colors have been added to the water, drag a toothpick across the surface to marble the colors together.
Dip Pumpkins

Once you’ve created the marbled design, work quickly to dip your pumpkin before the polish starts to dry. Place a faux mini pumpkin facedown on the surface of the water, then use a finger to push the pumpkin down into the water so it is completely submerged—the nail polish will stick if it comes in contact with your skin or nails, so we recommend using gloves for this step. Before pulling the pumpkin out of the water, use your fingers to swirl the pumpkin around the surface to pick up any remaining polish or coat any uncovered areas. Remove the pumpkin from the water and set it on a paper towel or paper plate to dry.
Dry and Repeat

Once you’ve removed the pumpkin from the water, use a toothpick or a paper towel to pick up any excess nail polish on the water’s surface. You don’t need to change the water between pumpkins, just make sure there’s no residue left on top of the water before repeating the steps to create another pumpkin. The pumpkins will smell until the nail polish has dried completely, so set them outside or in a well-ventilated area to dry. Use your decorated pumpkins as a colorful Halloween centerpiece or add them to your mantel.
Colorful Pumpkin Decorating Ideas

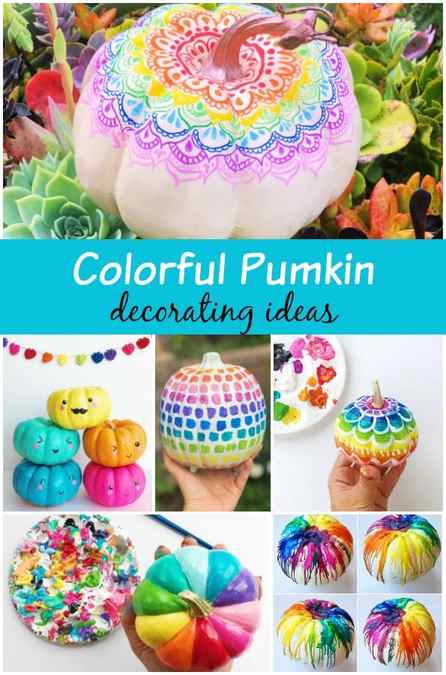
I don’t typically paint or decorate pumpkin in traditional Halloween colors. I can’t seem but help to make my pumpkins bright and colorful. I’m also not a huge fan of carving pumpkins so here are a bunch of no-carve colorful pumpkin decorating ideas to help inspire you. I’ve included a pumpkin decorating supply list as well as directions or a link to the tutorial for each pumpkin idea.
Supplies for Rainbow Pumpkin Decorating Ideas
(Affiliate links provided for convenience)
- Pumpkins – Real or Fake
- Medium Faux Pumpkins
- FolkArt Multi-Surface Acrylic Paint
- Martha Stewart Acrylic Paint
- For Kids – I love this washable tempera paint
- Posca Paint Markers Extra Fine
- Artistro Paint Markers
- Zeyar Paint Pens
Directions for Rainbow Pumpkin Decorating Ideas
Mandala Drawing Pumpkin Directions
- Start with a white pumpkin (real or fake). If you can’t find a white pumpkin, make your own by spraying the pumpkin with this white paint and primer spray.
- Using paint markers create a mandala design. I used these Zeyar paint markers, but I also recommend Posca Paint pens and Artistro Paint Pens as other options.


Color Palette Pumpkin Painting Directions
- Start with a white pumpkin (real or fake). If you can’t find a white pumpkin, make your own by spraying the pumpkin with this white paint and primer spray.
- Using acrylic paint brush colors onto the pumpkin with a simple stroke, using a flat paint brush. Start at the top fo the pumpkin and work your way down.


Pattern Pumpkin Painting Directions
- Start with a mini white pumpkin (real or fake). If you can’t find a white pumpkin, make your own by spraying the pumpkin with this white paint and primer spray.
- Paint colored circles around the the pumpkin starting at the top using acrylic paint.
- Once the paint is dry, start at the top and create simple designs around the pumpkin using white acrylic paint.

Kawaii Pumpkin Decorating Directions
- Start with a mini pumpkins. White mini pumpkins are a little easier to cover with paint than orange ones, but either will work.
- Paint each a different color using acrylic paint.
- Add face details using paint pens.
- If you want to add a leaf, simply cut one out of card stock and glue it onto the pumpkin


Color Wheel Painted Pumpkin Directions
- Start with a mini pumpkin. A white mini pumpkin is easier to cover with paint than an orange one, but either will work.
- Paint each a different color using acrylic paint.

Puffy Paint Decorated Pumpkin

See the full tutorial for how to make a puffy paint decorated pumpkins here. The best part about these pumpkins is that they also glow in the dark!
Rainbow Melted Crayon Pumpkin
See the full tutorial for how to make a melted crayon pumpkin here.


Nail Polish Marbled Pumpkins
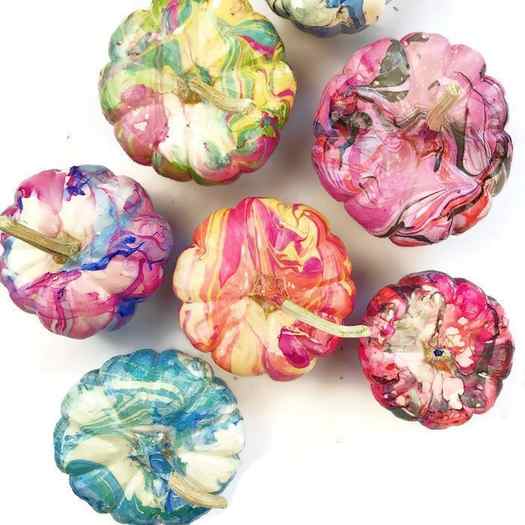
See the full tutorial for how to make a nail polish marbled pumpkins here.
Hope you have lots of inspiration after seeing all of these colorful and no-carve pumpkin decorating ideas. I’d love to see what you come up with. Come share with a picture of your pumpkins on Instagram or Facebook! I love showing examples of my tutorials being made!