You might find it easier to light the candle before you put it in the pumpkin, but always be careful with the open flame and don’t leave it unattended.
Carve your own crafty cat pumpkin
The evenings are getting darker and the pumpkins are aglow – it must be time for Halloween!
To celebrate, we’ve put together our own cat-themed templates to use when carving your pumpkin.
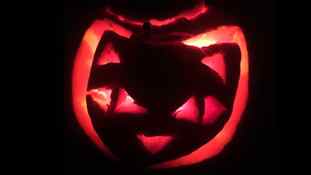
Choose from two templates, both featuring magnificent moggies. One is spookily simple and the other is devilishly difficult! Click on each template to download, print them and follow the instructions before enjoying the glow of your gorgeous cat pumpkin. Remember: keep lit pumpkins away from your own feline friend at all times.
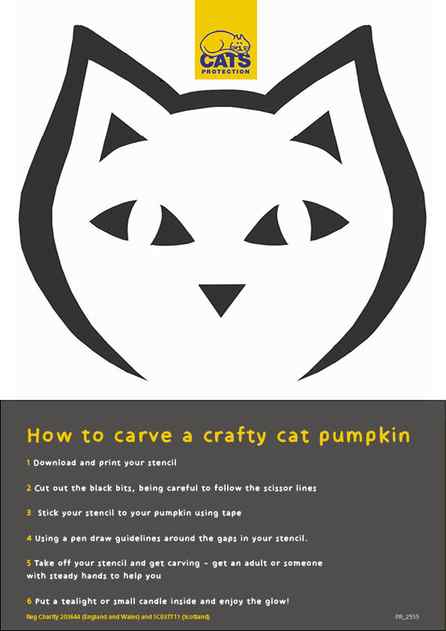
To enlarge, click on the image
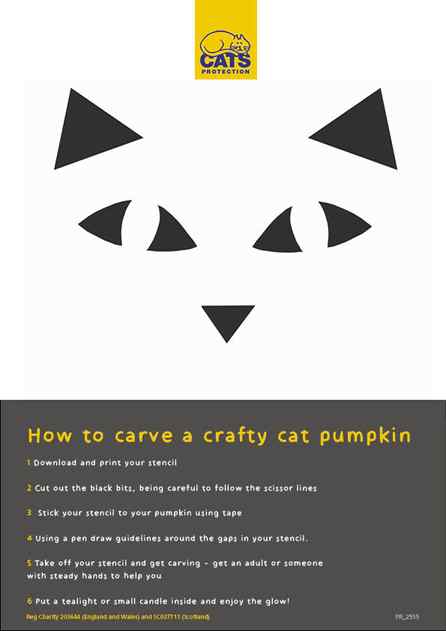
To enlarge, click on the image
We’d love to see your crafty cat masterpieces on show. Be sure to share a photo of them either on Facebook, Twitter or Instagram. Make sure you tag us in @CatsProtection.
Keeping your cat safe this Halloween
While Halloween spells plenty of fun for people, it can be stressful for your pet cat. With frightening costumes, strangers knocking at the door and some unfamiliar scents in the air, you’ll need to keep your feline friend safe. Take a look at our top tips:
- ensure your cat has plenty of different places to hide, preferably somewhere up high
- keep your cat inside after dark, especially if you can hear fireworks
- be cautious when opening your door to ensure your cat doesn’t escape
- never put a costume on your cat
- keep treats and sweets away from your cat
For more advice on keeping your cat safe this Halloween, take a look at our online guide.
What you’ll need:
- A medium to large pumpkin
- A small, sharp knife; ideally serrated
- A large metal spoon
- A large bowl
- A marker pen
- A tea light
Pumpkin carving can get slippery and you’re working with a sharp knife, so be extremely careful as you cut. And it goes without saying, don’t let children (or cats) carve pumpkins unsupervised.
Step 1: Carve out your lid.
Use your knife to cut off the top of your pumpkin, going all the way around near the top of the pumpkin. Use your judgement depending on how big the pumpkin is, but we’d say no more than an inch or two down your pumpkin. Keep your pumpkin lid – you’ll need it again later.
Use your metal spoon to carve out as much of the flesh and seeds inside as you can. Put it all in your bowl and stick it in the fridge. (We don’t like food waste here at KatKin, so check out step 7 for what to do with your leftover pumpkin.)

Step 3: Draw your cat onto your pumpkin
Next, take your marker pen and draw your design onto your pumpkin. There are all sorts of ways you could make cats the star of your pumpkin; some for beginners and some that are a little more challenging. Here are just a few ideas from us:
For beginners:
Why not try carving cat paws across your pumpkin? You could go for one big paw, two paws, or even a trail of little ones padding across your pumpkin. For each paw, start with the pad, aim for the rough shape of a kidney bean, but a little bit thicker.
Next, add four long ovals above. If you’re feeling adventurous, go for claws out – it is Halloween, after all – and add a little triangle above each oval.
For a little more challenge:
Try a cat face. Start with two V shapes at the top for the ears, or two triangles if it’s easier. Then, the eyes: for this, you’ll want to draw two almond shapes, but with a circle in the middle to give your cat pupils. Remember that the pupils can’t float in mid-air on your pumpkin, so they need to be attached at the top and/or bottom of the eye shape.
Give your cat a little heart-shaped nose, then next it’s time for the mouth. For this, start by drawing a big crescent, then add in triangular fangs along the top and bottom.
And finally, the finishing touch: your whiskers. These should be long, thin triangles, roughly three on each side, that extend out from either side of the nose.
For true experts:
Why not try making a spooky night-time scene with your cat in it? Start by drawing a large circle that takes up most of the height and width of your pumpkin. This gives you the edges of your scene: the area that the light will shine through.
Then you’ll need to draw in the details. We’d suggest a tall tree with spooky branches on the left, and a silhouette of a cat sitting on a hill on the right. Maybe you’ll even manage to get a moon or a few stars in there?
Remember that every part of your scene needs to be attached to the rest of the pumpkin somehow, so if you’re drawing the moon, for instance, it’ll need to be at the edge of the circle – it can’t hang in mid-air.
No Carve DIY Black Cat Pumpkin for Halloween

Before having the twins, my husband and I had a cat named Cosmo. On a cold and showing day, a few months after we got married, an orange tabby cat showed up at our front door and I fed him. And that was that. Since then we have owned at least one, but usually two, cats.
The cats have checked on my babies and snuggled with them, kept me company when my husband was deployed, and greet everyone who comes to our home.

Over the years we’ve had a total of five cats. Our sweet first cat named Cosmo, another orange tabby named Ranger, our calico cat Coco, our current tabby cat Artemis, and a black cat named Bear. Bear was the kitten of my sisters cat. The twins were at my parents house when he was born and so we had to have him!

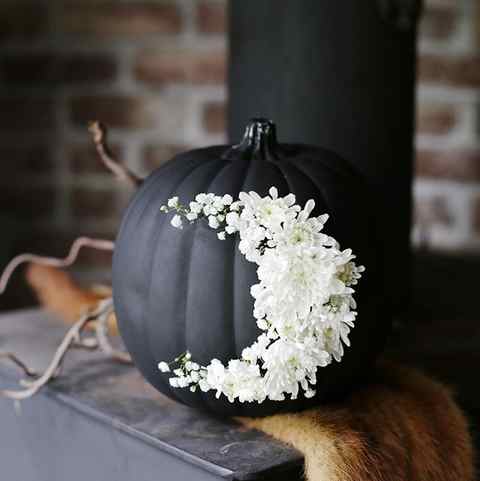
Owning a black made me very aware of how important it is to keep black cats safe, especially around Halloween. To celebrate all the black cats out there this Halloween I made a No Carve DIY Black Cat Pumpkin.

No Carve Halloween Pumpkin Supplies
- Black foam pumpkin
- Black foam sheet
- Pink felt
- Gray pipe cleaners
- White paint marker
I picked up a foam pumpkin that was already painted black but you could also get a regular foam pumpkin and paint it.

How to Make a Black Cat Halloween Pumpkin
While I didn’t really carve my pumpkin, I did make some slits for the cat ears. While you could just glue the ears to the outside of the pumpkin, I wanted them to be a bit more secure so I used a knife to create a slit on each side of the top of my pumpkin, wide enough to fit the foam ears.
Cut the ears out of the black foam sheet in a triangle shape. Then add a dab of hot glue and slip them into the slits that you have cut or just glue them directly to the outside of the foam pumpkin.

Create the nose using the pink felt and the gray pipe cleaners. Hold three pipe cleaners together and twist them together in the middle to create the whiskers.
Cut out a triangle with a curved side for the black cat nose. Glue the pipe cleaners to the felt and then glue that entire piece to your pumpkin.

The last step is to draw on the eyes. Use the white paint marker to create the eyes for your black cat pumpkin.

Ranger and Coco approve of the Black Cat Halloween Pumpkin!