Stacey Brandford
Sunday’s Muse

Polly (and Dude) – Founder of dreamy seaside boutique Little Bit Margate!

Our Indie Superstar Challenge will culminate with a special edition of Sketchy Bitches with guest muse Polly, who’ll be posing live from inside Little Bit Margate. After a few warm-up portraits, we’ll be attempting to draw a fun advert for Little Bit, then spend the rest of the session drawing portraits/adverts for each other! Hit the link below to find out more and book a ticket.
Sue’s Sketchtacular 7 Day Challenge!

Home is where the ART is and we’re all stuck at home, so we’ve teamed up with the fabulous Sue Kreitzman to bring you a whole week of colourful creative fun! This is a chance to spend some time reflecting, rummaging and creating lots of fab new artwork that’ll bring some much-needed joy ot the world!
We’ll be setting a challenge a day over on our Instagram channel, via short & sweet video prompts from Sue. If you want to get ahead, get cracking on the list of challenges below!
Please post your work on the appropriate day, and tag both @sketchappeal and @suekreitzman – no doubt we will share and love it all! And there’s every chance it could feature in the next issue of Sketch Appeal magazine – coming in Jan 2021!
Appealing Xmas sketches to render

” Christmas in Morcia “
Ben mentioned that it’d be neat to see the development process for one of the Knights pictures, so I drew up this quick Christmas-card frame to use as an example. If this were an actual image for LEGO, the dimensions would be several times larger in order to have the proper resolution for printing, and the image would go through a series of approvals by several departments to make sure that it creates no legal or cultural problems, that it fits in with the story and marketing direction for the Knights products, and that it doesn’t create certain other types of conflicts with other LEGO product lines.
If this image were for a multinational application, such as being included in a product instruction book, I would almost certainly be asked to remove the culture-specific references like the Christmas tree and the Santa Claus hats. This image is the type of thing you’d be much more likely to see in a market-specific application like the US edition of LEGO Magazine, if at all.
All the Knights images go through a four-phase process: rough sketch, final line, final color, and final effects, with the images being submitted for approval as each phase is completed. This phase-by-phase approval process for image production isn’t especially unique to LEGO; it’s the same as or at least very similar to what you might go through with almost any other client for whom you’re doing illustrations or graphic designs.
As for the specific artistic techniques, their purpose is to make the process as streamlined and efficient as possible. We often have a massive pile of material to get through in a very brief amount of time, and having these kinds of systemized techniques in place makes managing the projects a lot more successful.
Phase 1: Rough Sketch
I’ll start by scribbling out some very rough sketches of how I might stage the scene to illustrate a specific story point. In this case, the story point is that Sir Rascus is tickling Sir Santis while he’s trying to carry a giant sack of toys.
The purpose of these sketches are to work out the general composition of the scene, and how to best communicate the action. When I’ve got some compositions that I think will work, I send them to Denmark to review and finalize a direction to move forward.
Once the sketch is approved, it’s time to add all the details and clean up the linework. I tighten everything up gradually, sometimes refining the lines over the course of several layers of tracings if a subject is especially tricky.
I’ll sometimes send an intermediate image like this one back to Denmark as well if I need clarification on some of the smaller details.
If I can, I’ll try and re-use backgrounds and other elements as much as possible, in order to keep the art-production budget down. This shot of the arena from 2004 is one that gets reused a lot. In this case it’s pretty close to what we need; I can cover those grassy cliffs with snow a little later in the process.
The important thing is that I get the background in place before I finalize the foreground lines, so I can avoid any weird-looking overlaps or tangencies.
When it comes time to draw the final lines and details, I put every major object group on a separate layer in Photoshop and draw them completely, even if they overlap with other objects in the scene.
By putting everything on separate layers, it’s a lot easier to move them around independently if it’s necessary for a revision later, and it also means that other LEGO departments (for instance, the magazines) can pull individual objects out of a scene to re-use elsewhere.
Phase 2: Final Line
I set all the detail-line layers to 50% opacity and all the heavy-outline layers to 70%, and mask out any overlapping sections. This is the “Final Line” phase, and at this point I send the drawing back to Denmark again so they can check all the line details and send back a list of revisions.
Now, thanks to the heavy-outline layers I made earlier, I can quickly select the large color areas I outlined and fill them with the flat color of their color group. Now, by clicking on any of these colors with the wand tool, I can create an instant mask for all objects in that color group, which will make the final color painting much, much faster.
If I have a whole bunch of pictures to do and plenty of time, I’ll keep the entire batch at the same level – bringing all the pictures to Phase 1 before I start any of them on Phase 2, for instance. If the schedule is very short, on the other hand, I’ll bring one or two pictures up to this level of coloring as fast as possible and hand them to one of my colorists to take it to Final Color, while I start on bringing the next set of pictures up to this level. Whenever I have backup artists helping me out, ninety percent of the time I have them all working here on this one most time-consuming step while I’m doing all the others.
Phase 3: Final Color
I go through the color groups one at a time, for instance painting up all of Santis’s blue armor at once, then all of his red armor, etc. When all of the single-color areas are done, that’s when I’ll go back in and do the more complex stuff like faces.
At this point all the details and colors are in place, so I send it back to Denmark one more time for a final list of revisions. We try to get as many revisions out of the way as possible during the earlier phases, because it’s much faster to correct a detail on a line drawing or sketch than on a fully-colored painting. Unfortunately, there are a lot of details you just can’t see until the painting is fully colored, so this is often the phase with the biggest revisions list.
Phase 4: Final Effects
Once final colors are approved, I go through and add reflections and atmospherics. Besides helping to establish mood and making everything look shiny and more attractive, these help separate visual layers and knock back less-important details so that the viewer notices the most important parts of the scene right away. When final effects are done, I send the image back to Denmark one more time, and unless they see some last-minute revision they missed in final color, it’s ready to print.
All material on this site is Copyright ©2000-2005 Mike Rayhawk, unless otherwise specified.
All Knights’ Kingdom characters and material are Copyright ©2003-2005 The LEGO Company.
Although LEGO material appears here, this site is not endorsed by or associated with The LEGO Company.
29 Best Christmas Porch Decorations to Impress Your Neighbors This Holiday
Get ready to be inspired — whether your tastes are totally traditional or downright flashy.
By Alesandra Dubin and Jamie Kravitz Updated: Nov 9, 2021

Sugar and Cloth
It’s beginning to look a lot like Christmas… from the curb, that is! There’s nothing like a Christmas porch to add warmth and visual appeal during the holiday season: Decorating this special space welcomes guests, inspires you every time you come home, and shares your household’s cheer with the entire neighborhood. (In fact, your impeccably decorated Christmas porch might even inspire a little healthy competition among neighbors, too!)
To set up the perfect outdoor space, consider your aesthetic. Do you gravitate toward timeless style and traditional appeal? Do you go for a chic, monochromatic, or understated vibe? Or are you all about making a huge visual impact with as much oversized, sparkling, and wow-worthy decor as possible?
Next, consider al the elements you have to work with for your Christmas porch. There’s the front door, which stands ready for your DIY door wreath or holiday banner. Then there are the steps, planters, and seating. Don’t forget the doormat!
With your porch all decked out in its holiday finery, you’re ready to welcome loved ones into the home for cherished traditions like cozying up for Christmas movies, snacking on Christmas desserts with hot tea or cocoa, playing Christmas party games in stretchy pants… and of course opening up Christmas presents for those on the nice list!
Advertisement – Continue Reading Below
Cozy Cabin
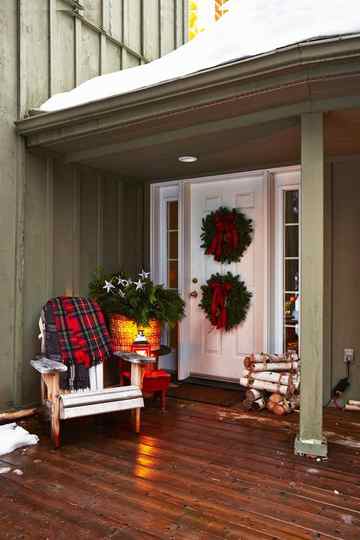
Stacey Brandford
You’ve heard of bringing the outdoors in, but why not try bringing the indoors out? Rustic cabin-inspired details lend a feeling of warmth to your porch — even in near freezing temperatures. Drape a few plaid blankets or scarves over an unfinished wood patio chair, drop a bundle of birch logs tied with rope by the doormat, fill a weatherproof basket with decorative fir branches and stick in some metallic star floral picks. Turn on a light-up lantern, and hang a woodsy wreath or two on the door.
Advertisement – Continue Reading Below
DIY Doormat
Mike Garten
Winterize a plain coir doormat with this easy but effective DIY: Choose a holiday stencil in a simple, solid shape — like a Christmas tree or round ornament. Use painter’s tape to keep your stencil in place while you spray paint in bright white. Repeat until the pattern fills the mat. For another easy porch upcycle idea, wrap a few lines of red painter’s tape around a metal pail and fill with real or artificial pine branches.


