Want to get out of training wheels and paint like a pro?
Bob Ross painting techniques for the beginning landscape artist.
Bob Ross painting, William (Bill) Alexander, & wet-in-wet techniques. They all are perfect for the beginner attempting to learn to paint landscapes.
Ok, to answer this question right off, YES! My first landscape paintings were using the Bill Alexander painting techniques. As a matter of fact, my sister-in-law presently proudly displays one of these paintings in her living room, and yes, I have tried on numerous occasions to buy it back.
She has refused for fear of what my plans are for the piece. Am I ashamed of the work?
Heck no, it’s a great painting! It’s also a 180 degrees different style of work that I do today. So yes, it would go into storage to be used as a teaching aid only.

Genesis 1:9
The link here will carry you to YouTube for a wonderful selection of
sponsored by his company. The button below will take you to his YouTube Channel. Bring a cup of coffee with you, sit back and enjoy his show!
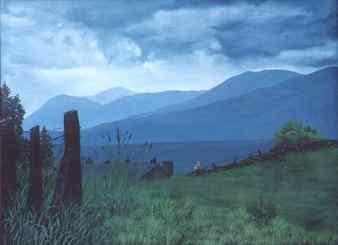
One of my early Bob Ross painting examples.
touch of clover British landscape
It opens in a new window so you won’t lose your place here.
So, are you new to oil painting? Check out these 31 tips designed just for beginners right from my studio’s. Tips that will help you paint better, paint faster, and preserve your health!
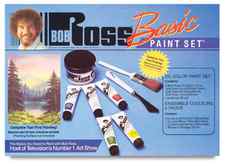
Bob Ross painting materials:
Let’s talk a little about the materials needed.
The oil painting technique is centered around one main ingredient. “Magic White”.
This is a thinned down white paint that is applied directly to the canvas as a thin coat. The magic white is usually applied with a 2-1/2″ broad, pure boar split bristle brush.
It is not allowed to dry during the paint session, paint is applied in this wet coating. When other colors are added, it helps with their blending and creates variations in color and intensity.
The magic white is also used like any other white paint when mixed with colors, it will lighten them.
Paints used in the technique are usually stiff, so if you are a beginner trying the technique, you may want to use their colors. They usually start (but not always) with 4 transparent colors:
- Phtalo green
- Sap Green
- Alizarin Crimson
- Prussian Blue
Brushes also include the 1″ pure boar split bristles.
Fan brushes, flats, and liners sizes varying to your taste.
Also used extensively in the technique is a special shaped palette knife.
Below is a very basic set with some, but not all the things you will need if you want to pursue this style of painting.
If you look closely, that palette knife is the same style I use today! (From a Bill Alexander kit)
Learn How To Paint Landscapes In This Bob Ross Style Tutorial!
Watch the video, and get a full supply list and step by step written directions here!

It’s time to bust out the paints and canvas for this paint-as-you-go tutorial! We join Sam in his studio and follow along as he creates a gorgeous landscape. The best part of this is that’s easy enough for anyone to do, and the end result is stunning. Just like in “The Joy Of Painting” with Bob Ross, the key here is to create your own little world. You can get inspired by what Sam has painted in the video below, but don’t get discouraged if yours doesn’t turn out the same – that’s the fun in painting! Everyone can use their imagination and fill in their own beautiful landscape.
See what we did in the video below, and scroll down to get the full supply list and step by step instructions with photos! Happy painting, friends!
[media height=”270″ width=”480″ provider=”youtube” type=”iframe” src=”https://www.youtube.com/embed/7m9yH9WZEdY?feature=oembed” ad=”true”]
Supplies:
– Brushes

- 1x Large – 1in
- 2-3x Medium – ½ in
- 2-3x Thin – ¼ in
- 1-2x Fine – 1/16 in
- Palette knives
- 1 & 3 in
– Paint
– Canvas
– Painting Palette
– Linseed Oil
– Odorless Mineral Spirits
Process:

1. First, mix a dark and light tone that is fairly abundant in your work. For this piece, we went with a dark and a light blue. Increase paint flow by adding and mixing in a little linseed oil. Mix a little linseed oil with white as well to make it easy to access on the fly.

2. Paint a rough outline of the work using your medium brush. This helps create focal points for you, in order to make painting easier. Focus on shadowy areas with your darkest color, and with your lighter color add daubs for mid tones, leave the lightest areas white for now.

3. With your lighter color, start at the top of the painting and begin filling in the sky. Outline the clouds as you work your way down the piece, filling in the sky. Allow the brush to lose paint as you work; this creates depth, as the sky is darkest directly above you and lightest as it touches the horizon.
4. Create more depth by adding some of the darkest color to the topmost points of the sky – again allowing your brush to loose paint as you work your way down… this will blend the two colors together nicely.
Click the “Next” button to see the rest of the steps!
© 2023 Great Life Publishing and GreaterGood. All rights reserved. Owned and operated by Great Life Publishing, a GreaterGood company. All charitable donations are paid by Greater Good Charities to benefiting organizations as a grant. Read our privacy policy.