Draw a rounded rectangle the size you want the stem of your four leaf clover vector to be with the Rounded Rectangle Tool. Next, go Effect > Warp > Arch. In the Warp Options dialog, make the Bend 20% and the Horizontal Distortion 40%, while keeping the other options the same. After, go Object > Expand Appearance. Give the stem a Linear Gradient from the Gradient Panel with the swatches being darker greens than the clover leaves. Rotate the leaves and stem into the desired position and your done!
Create A Four Leaf Clover Vector for St. Patrick’s Day – Adobe Illustrator Tutorial
In celebration of St. Patricks Day, I wanted to do a four leaf clover vector tutorial. Some of you might not celebrate St. Patricks Day or have no use for a four-leaf clover, but still take a look at this tutorial. This tutorial combines some good techniques. You will Divide, Transform, and add Warping Effects. These techniques will help you quickly and easily create with Illustrator!
Notes: St. Patricks Day Four Leaf Clover Vector
This four leaf clover vector tutorial was created with Illustrator CS3. But these features should be available in all CS versions.
Keyboard shortcuts are displayed in orange. ⌘ is displayed for the Command key (mac), with the Ctrl key being the Windows equivalent (not displayed).
Step 1: Creating the Leaf Shape
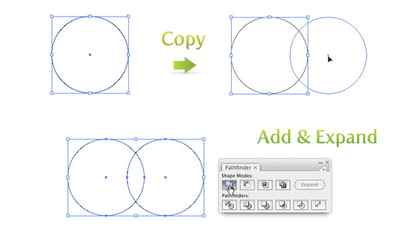
First, draw a circle with the Ellipse Tool (l) . Select the circle with the Selection Tool (v) and hold down the Alt Key (copies the selected object) and the Shift Key (snapping object into place). With these keys pressed, drag out another copy of the circle. Select both circles and Add and Expand them from the Pathfinder Panel.
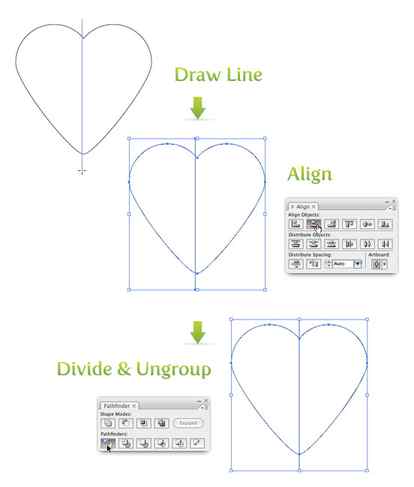
With the Direct Selection Tool (a) , select the bottom anchor point where the circles intersect. With the anchor point selected, drag it downward, roughly double the length of the combined circles. With the anchor still selected, Convert it to a Smooth anchor point from the Control Panel. Next, use the Delete Anchor Point Tool (-) and delete the anchor points on the left and right side of the anchor point you just dragged out.

Now it is staring to look like a leaf, but it needs some color to really resemble our four leaf clover vector. Before adding color, we will divide the shape into two objects. With the Line Segment Tool () draw a line roughly in the middle of the leaf shape. Select both shapes and press the Horizontal Align Center in the Align Panel. With both objects still selected, press the Divide button in the Pathfinder Panel and Ungroup (shift ⌘ g) both of these shapes by going Object > Ungroup.
Select one of the shape and create a Radial Gradient from the Gradient Panel. Use a light green and a darker green for the swatches in the gradient. Use the Gradient Tool (g) and click and drag from the top right of the shape to the bottom left. Use the same Radial Gradient and gradient adjustments for the other leaf.

Step 2: Transforming
One leaf is done, but we need three more to complete our four leaf clover vector. We can just repeat the first step three times, but that would take to long. This is where the Transform Effect comes in handy. Select both sides of the leaf and Group (⌘ g) them. Next, go to Effect > Distort & Transform > Transform to bring up the Transform dialog. In the Transform dialog change the Copies to 3, Rotate 90 degrees, and click the bottom center point in the 9-Point Proxy (the box with nine points above the Random check box). Now the clover has four leaves. It is a good idea to go Object > Expand Appearance. If you don’t expand the clover, the next time you try to rotate it, you will get some undesired results. Next, comes the stem!

Step 2.
Finish the clover by making the stem and dimpling in the center.
You will now draw in the remaining clovers. Here is where you can draw as many as you like. They can get smaller or bigger depending on what you want.
Step 4.
Lastly, add the detailing to the two clovers in the back, then erase the mistakes if you made any.
This is what the line art looks like when you are finished. Now you can color your clovers in.
Comments (0)
More From Dawn


Related
Details
Description: Well look at what we have here. I totally forgot to upload this tutorial yesterday and I think it’s because I was distracted doing something else. Here is “how to draw clovers“, step by step. I think you will find this lesson helpful especially if you are going to be celebrating St. Patrick’s Day in March. This concept would also make a great tattoo design, so if you have been in the market lately to get a clover tattoo, you should seriously consider this one. Of course you can alter the clovers any way you want. That’s pretty much all I have to say for this tutorial description so have fun tackling it. Peace out people.
Login
Not a member?
Leaving Dragoart for External Site
We temporarily stopped you from leaving Dragoart so you could confirm
The site above is not affiliated with Dragoart in any way. Please continue at your own risk. Don’t enter any passwords or personal information from a site claiming to be Dragoart or its affiliates.