Bonus – You can keep the scarecrow for some front porch Halloween decor after it protects your garden beds in late summer/early fall!
A Beginner’s Guide on How-To Make a Scarecrow Step-by-Step

Harvest season is here! We have a bed of corn that will be ready to pick in the next few weeks and that means it needs protection from wildlife!
This post contains affiliate links. If you use these links to buy something we may earn a commission. Thanks.
This time last year we grew a big, beautiful corn bed with lots of corn ears to harvest. But alas, a week before it was ready to pick, a raccoon came in the night and ripped out all of our corn plants and ate every single piece we had grown.
To say that was a tough pill to swallow was an understatement.

Table of Contents
How To Protect Corn from Raccoon’s?
Following the devastating attack, we researched all the possible ways to prevent this raccoon feast from happening the following growing season. And wow, there are a lot of options. Most of them we personally didn’t find very feasible for our space. Here’s a quick overview of what we found:
- Put in a motion sensor light to scare them away
- Put a radio in the garden all night
- Duct tape the corn ears so raccoon fingers can’t rip them off
- Grow squash plants around and between the corn to work as a natural deterrent (squash plants are prickly)
- Raccoon traps
- Set-up a scarecrow
We took these ideas and picked some that we felt would work best for us in our current situation. That was a getting a scarecrow, growing squash and something else…
How We Are Protecting Our Corn
So far the squash tip has worked. Overall the bed that we grew the corn in wasn’t in the best location so the squash didn’t grow as well as it should have. Next season we’ll try this again in a better, sunnier location!
Something else we’re trying that wasn’t on the list and should work in the same capacity as the squash, is chicken wire. We placed chicken wire around the garden bed with it sprawled out at the bottom so that it’s hard to climb-up or step on. We are hoping this works as well as the squash tip.

The last tip is the scarecrow. This idea worked out great for us as we had lots of wheat straw left over from our wheat harvest a few weeks before and it’s the perfect material for scarecrow stuffing. Although I’m sure other stuff like leaves would work too if you don’t have straw.
We are hoping to use some of the extra straw we saved to make some more scarecrows to protect our wheat beds next summer. I’ll be sure to share the success of that on here as well.

Step-by-step guide to making a fall scarecrow
We’ll Bring an Artistic Experience to YOU!
Explore Parties & Events
Main Menu
Menu
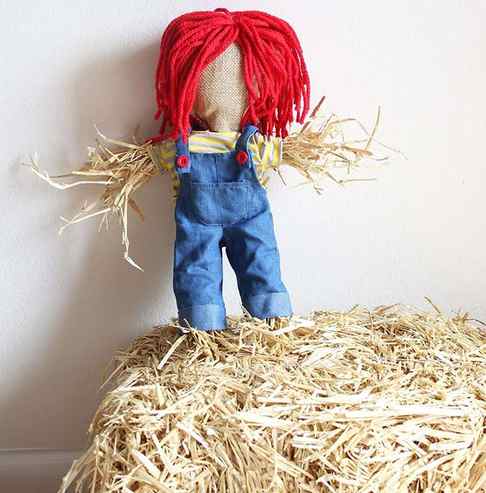
There are so many things that I love about harvest season! How nature is abundant with fruit and color, wearing just another layer of clothes for optimal coziness, going on hikes and walks, and being surrounded by the textures of fall all around. It’s such a wonderful time for outdoor adventures and home craft projects alike! Scarecrows are an iconic symbol of this season, and such a festive way to decorate during the autumn months. Whether rustic, cutesy or even a bit scary as Halloween creeps closer, scarecrows can’t help but bring a smile to the faces of passersby. Most full-size scarecrows require forms made from wood or pipes. However, a smaller one can hold its shape when made entirely of hay – we created this fun, easy DIY mini scarecrow to make with the kids. No special tools like a saw or drill are required, and a mini scarecrow is easier for small hands to put together. Dress yours up in recycled doll clothes; add hair, a hat, or button eyes of your liking, and you have a personalized friend to enjoy all fall long.
Materials for a Mini Scarecrow
- Hay (Can be purchased at an animal supply store or from Amazon)
- At least 6 rubber bands
- Spool of burlap
- Doll clothes (the ones we used were for an 18-inch doll)
- Yarn
- Scissors
- 26 gauge craft wire (optional)
- Drop cloth (optional) The hay makes a mess on the floor, so if you’re creating your scarecrow inside it helps to have a drop cloth or old sheet to make cleanup easier.
- Scarecrow decorations such as a hat, buttons for eyes, or a permanent marker to draw a face

Instructions for Making a Mini Scarecrow
Step 1: To start making your DIY mini scarecrow, first you need to create the legs and the body. For the legs gather a bunch of hay, fold over the top and secure it with a rubber band. Create a second leg that’s the same size as the first. Make the body for your scarecrow by gathering a bunch of hay that is about twice the length of one of the legs. Secure the top and bottom of the body with rubber bands.

Step 2: If you scarecrow is wearing pants (or overalls) stuff the legs through the bottom of the pants. The top of the leg should end about three inches above the pants and the bottom of the leg should stick out about three inches below the pants. Place the body between the two legs and secure the body to the legs with a rubber band.

Step 3: Create arms for the scarecrow by gathering two similar sized bunches of hay. Fold over the top of each bunch, and secure it with a rubber band. Attach the arms to the body of the scarecrow by stuffing the arms into the sleeves of the shirt and tucking the hay from the end of the arms into the body of the scarecrow.

Step 4: If your scarecrow is small this will likely be enough to secure the arms. If the arms seem loose, add another rubber band to the chest area of the scarecrow’s body. Use craft wire to attach the rubber bands from the end of the arms to the rubber band on the chest.

Step 5: Make a head for the scarecrow by overlaying two strips of burlap in a “t” pattern. Add hay to form the scarecrow’s head to the center of the burlap.
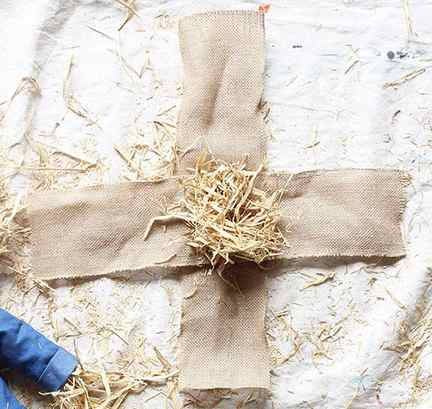
Step 6: Gather the ends of the burlap in a bunch and place the head on top of the scarecrow’s body. If the body is too tall for the head simply fold over the hay from the top of the body and remove some of the stuffing for the head. Secure the head to body by tying a rubber band around the ends of the burlap.

Step 7: Cut off any excess burlap and tuck it into the clothes.

Step 8: Create hair for the scarecrow with yarn. If you’re using thinner yarn you can weave it through the holes in the burlap. If it’s a bit thicker (like ours) you can gather several pieces of yarn and secure it to the head of the scarecrow using craft wire.

Step 9: Once the hair is filled in, add any final decorations like a hat, eyes made from buttons, or face drawn with permanent marker.

And your very own mini scarecrow is done!
Display your scarecrow outside to decorate for the autumn season and a friendly welcome to trick-or-treaters. You can even make an entire family of them! These DIY mini scarecrows are so simple and fun to make, your kids will get the hang of it in no time.
Ready for the next fall project? Create some beautiful handmade Fruit and Vegetable Prints on tea towels, or browse our collection of all-inclusive DIY Kits to continue the home crafting fun!