You now have your design ready for dyeing. This design will only work successfully with indigo. My experience tells me that guntai shibori does not work as well with fibre reactive dyes. The design is too faint.
How to Draw a Calla Lily – A Guide to a Realistic Calla Lily Drawing

The calla lily is a beautiful flower that is native to southern Africa. Even though it is not technically considered to be a “true lily”, the calla lily is an incredibly eye-catching flower and is known to symbolize both life and death! In today’s drawing tutorial, we are going to show you how to create your very own calla lily flower drawing with our step-by-step guide. Select the drawing tools that you will need and let’s get started!
Table of Contents
- 1 A Step-by-Step Realistic Calla Lily Drawing Tutorial
- 1.1 Step 1: Draw the Stem of the Calla Lily
- 1.2 Step 2: Outline the Flower Cups of the Calla Lily
- 1.3 Step 3: Add the Calla Lily Flowers to the Cups
- 1.4 Step 4: Draw the Spadix in Your Calla Lily Outline
- 1.5 Step 5: Color the Petals of the Calla Lilies
- 1.6 Step 6: Color the Flower Cups of the Calla Lilies
- 1.7 Step 7: Color the Stem of the Calla Lilies
- 1.8 Step 8: Color the Spadix of the Calla Lilies
- 1.9 Step 9: Highlight Your Calla Lily Sketch
- 1.10 Step 10: Add Texture Along Your Calla Lily Outline
- 1.11 Step 11: Soften the Flowers in Your Calla Lily Drawing
- 1.12 Step 12: Apply Tone to Your Calla Lily Flower Drawing
- 1.13 Step 13: Contour the Flower Cup of Your Calla Lilies
- 1.14 Step 14: Add Some Shading to the Flower Cups
- 1.15 Step 15: Highlight Your Calla Lily Flower Cups
- 1.16 Step 16: Apply Some Shading to the Stem
- 1.17 Step 17: Highlight the Stem of Your Calla Lily Drawing
- 1.18 Step 18: Add Some Shading to the Spadices
- 1.19 Step 19: Apply Some Texture to the Spadix of the Calla Lily Sketch
- 1.20 Step 20: Enhance the Texture on the Spadix
- 1.21 Step 21: Finish Your Calla Lily Flower Drawing
- 3.1 Is It Difficult to Create a Realistic Calla Lily Drawing?
- 3.2 What Colors Can I Use to Make a Calla Lily Flower Drawing?
A Step-by-Step Realistic Calla Lily Drawing Tutorial
If you have always wanted to learn how to draw a calla lily, today is your lucky day! In our tutorial below, we guide you through 21 straightforward steps that detail the entire drawing and coloring process. Follow along and learn how to turn a simple calla lily outline into a beautiful drawing.

The above collage shows each of the 21 steps taken to achieve the final result and demonstrates what your calla lily sketch should look like at every stage. At the end of our tutorial, you will be able to draw and paint your own calla lily flower drawing!
Whatever medium you choose to work with, our tutorial works well for both physical and digital drawings!
Step 1: Draw the Stem of the Calla Lily
We will begin our calla lily drawing tutorial by sketching the long stem of the flower. Locate the middle of your drawing area and draw two main stems that overlap slightly at the bottom. Make sure to draw the left stem a little bit longer than the right stem.

Step 2: Outline the Flower Cups of the Calla Lily
We are now going to outline the bottom of the flower cups on the two stems that you drew in the step above. Draw the base of these flower cups at the top of each stem.
These cups will represent the main part of the calla lily spathe, which will be drawn in the next step!

Step 3: Add the Calla Lily Flowers to the Cups
As the bottom of both flower cups has been drawn, we can complete the petals by adding the calla lily flowers. To do this, draw a curving arch on the opposite tips of each calla lily, making sure that they have an inward curve (as seen in the image above). This part of the calla lily is known as the spathe.

Step 4: Draw the Spadix in Your Calla Lily Outline
When you picture a lily, one of its most distinctive features is the slender yellow spike that sticks out from the middle of the petal. This is known as the spadix. Inside each of the petals drawn already, sketch a spadix that is in proportion with the petal size.
Try to draw these as symmetrically as possible with each stem line.

Step 5: Color the Petals of the Calla Lilies
We can now add our first coat of color to our calla lily drawing! Using a regular paintbrush and a shade of pistachio green paint, color the larger calla lily evenly. Repeat this process with a lighter shade of paint (we have chosen a light beige) to color the smaller calla lily.

Step 6: Color the Flower Cups of the Calla Lilies
As the petals have been colored in, we can move on to the flower cups of the calla lilies. With a small paintbrush, select a shade of mustard yellow and paint both of the flower cups.
Remember to paint both calla lily flower cups evenly.

Step 7: Color the Stem of the Calla Lilies
Moving down to the stems of your calla lily flower drawing, take a small paintbrush and some dark green paint and color in the stems of your flowers. If you see any visible construction lines or overlapping lines, they can be erased at this step.

Step 8: Color the Spadix of the Calla Lilies
The final base coat of paint that we will be applying will be to color in the spadices of your realistic calla lily drawing. Using a small paintbrush and some yellow paint, color in each spadix of your calla lilies.
As with the previous steps, remember to paint evenly!

Step 9: Highlight Your Calla Lily Sketch
Now that the coloring-in process has been completed, we can begin to add highlights to our calla lily sketch. With a soft paintbrush and some white paint, gently apply brush strokes onto the edges and curves of both flowers. However, while you are creating highlights, make sure that your first color coat is still visible.

Step 10: Add Texture Along Your Calla Lily Outline
Still working with the petals in our realistic calla lily drawing, we can begin to add some texture to our sketch. Working with the larger calla lily, use a fine paintbrush and dark gray paint to create texture along the structure lines of the flower. From the inward curve of the flower, add faint lines that extend from the center to the edges of the petal. To finish, softly blend the color along the edges and underside of the calla lily.
Moving onto the smaller calla lily, take a soft paintbrush and some dark olive paint and lightly create textured lines along the edges and curvatures of the flower.

Step 11: Soften the Flowers in Your Calla Lily Drawing
After adding some texture to the calla lilies in the previous step, you will need to blend it in now. Take a soft paintbrush (known as a blending brush) and begin to tone down the texture and structure for a softer appearance.

Step 12: Apply Tone to Your Calla Lily Flower Drawing
We can now enhance the overall texture in our calla lily sketch by applying some tone to our drawing. With a sharp paintbrush and gray paint, sweep the brush along the textured lines inside the flowers. Once this is done, use a softer paintbrush to tone down the edges of the flower with some gray paint.
Complete this step by adding final highlights to the edges of the smaller calla lily.

Step 13: Contour the Flower Cup of Your Calla Lilies
Using a small paintbrush and gray paint, apply some light contouring to both of the flower cups. When doing this, make sure that the first color coat is still visible.

Step 14: Add Some Shading to the Flower Cups
At this step, we will be enhancing the edges of the previously contoured areas with a soft paintbrush and black paint. Take care to make sure that your first color coat is still visible at this stage.
Using another soft paintbrush, smooth the stem color and apply some more blending to the flower cups.

Step 15: Highlight Your Calla Lily Flower Cups
Moving back to the calla lily flower cups, we can add some more highlights to our calla lily sketch. Making use of a soft paintbrush and white paint, gently add some fine highlights to the structure and bolder areas of each flower cup.

Step 16: Apply Some Shading to the Stem
At this stage of our drawing tutorial, we will be moving on to the stem in our calla lily sketch. With a soft paintbrush and black paint, apply some shading to both of the stems.
Make sure that your first color coat is still somewhat visible.

Step 17: Highlight the Stem of Your Calla Lily Drawing
Now that you have added shading to the stem, we can move on to add some highlights. With another soft paintbrush, select either a bright green or a mustard yellow color and apply light highlights onto both of the stems. While you add these highlights, make sure that your shading and first color coat applied in the previous steps can still be seen.

Step 18: Add Some Shading to the Spadices
The last element that we will be working on in our realistic calla lily drawing is the spadices in both flowers. With a soft paintbrush and some black paint, apply some light shading to each spadix.
When doing this, apply the paint to the edge of the spadix.

Step 19: Apply Some Texture to the Spadix of the Calla Lily Sketch
Now that we have added some highlights and shading to the spadices, the last thing that we need to add is some texture. With a soft paintbrush and dark yellow paint, apply spots to the edges of both spadices, making sure that your first coat of paint is still visible.

Step 20: Enhance the Texture on the Spadix
We can now complete the texture that we just added in the previous step! Select another small paintbrush and some mustard yellow paint for this step, and carefully blend the spots that you just added into the first color coat.
Make sure to do this on both calla lily flowers.

Step 21: Finish Your Calla Lily Flower Drawing
In the final step, we will be neatening up your realistic calla lily drawing. If there are any construction lines or overlapping lines still left, you can erase them now. The last thing that you will need to do is to trace over the entire outline of your calla lily sketch with the correct colors.
With a sharp paintbrush and the corresponding colors for each section, trace over the inner texture and lines of the entire calla lily outline to create a seamless final result without any visible lines.

And just like that, you have completed your very own calla lily drawing! Now that you have learned how to draw a calla lily from scratch, you can recreate this drawing any time you want, using any colors that you wish. We hope that you enjoyed our tutorial on calla lily drawing today, and that you will join us again for more easy and exciting drawing guides!
Our Flower Drawing Tutorials
Is It Difficult to Create a Realistic Calla Lily Drawing?
While we have detailed 21 steps in our drawing guide to help you draw your very own calla lily sketch, learning how to create a calla lily is not difficult at all! Simply follow our straightforward instructions at every stage of the drawing process and by the time you reach the end, you will be left with a beautiful calla lily drawing of your own!
What Colors Can I Use to Make a Calla Lily Flower Drawing?
When it comes to drawing, you are encouraged to let your creativity run wild! Calla lilies grow in a variety of colors, such as pink, orange, yellow, lavender, and dark maroon, with the most common color being white. In our tutorial, we have chosen to draw a white calla lily but you can select any color that you wish to make your calla lily flower drawing come to life.
Matthew Matthysen ( Drawing and Painting Artist )
Matthew Matthysen is an educated multidisciplinary artist and illustrator. He successfully completed his art degree at the University of Witwatersrand in South Africa, majoring in art history and contemporary drawing. The focus of his thesis was to explore the philosophical implications of the macro and micro-universe on the human experience. Matthew uses diverse media, such as written and hands-on components, to explore various approaches that are on the border between philosophy and science.
Matthew organized various exhibitions before and during his years as a student and is still passionate about doing so today. He currently works as a freelance artist and writer in various fields. He also has a permanent position at a renowned online gallery (ArtGazette) where he produces various works on commission. As a freelance artist, he creates several series and successfully sells them to galleries and collectors. He loves to use his work and skills in various fields of interest.
Matthew has been creating drawing and painting tutorials since the relaunch in 2020. Through his involvement with artincontext.org, he has been able to deepen his knowledge of various painting mediums. For example, watercolor techniques, calligraphy and lately digital drawing, which is becoming more and more popular.
Learn more about Matthew Matthysen and the Art in Context Team.
4 Steps to Making Your Own Thistle Design
You start by drawing the design on to ready for dyeing fabric (ie pre washed at 60 degrees C/ 140 degrees F) with tailors chalk or removable fabric marker. My example here is 11cm/ 4 ½” high plus 28cm/11” long stem. All instructions are for this size.
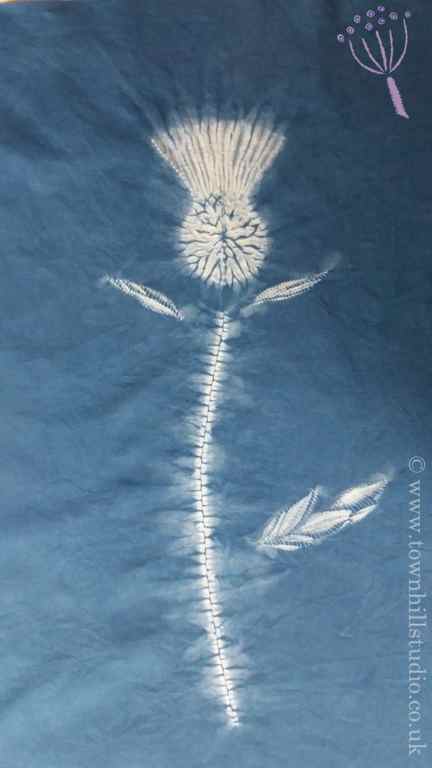
The shape of a thistle is made of a cup with the flower coming out of it. Draw a line downwards at the bottom of the cup to mark the stem. And two curved lines to suggest the bracts either side of the flower plus a small leaf shape half way down.
Stitching your Design
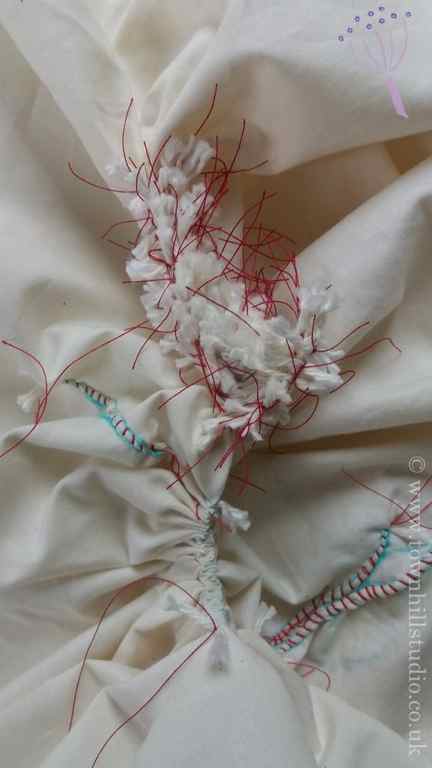
There are 4 different Shibori stitches used in this design: miru, mokume, ori nui and guntai shibori.
The thistle cup itself is created by folding the fabric in half along the centre line of the cup and then sew the 7 or 8 lines of simple running stitches (miru shibori) through both layers of fabric with double thread and a small cotton “tag” knotted into the end of each row of double thread.
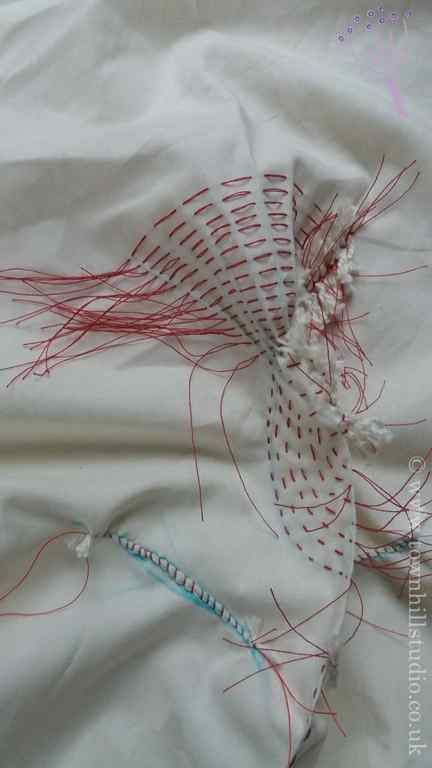
The flower head is made from 15 lines getting slightly longer away from the body of the thistle. Each row and each stitch is in line with the one below, each stitch getting wider as you go up. They are sewn with simple running stitches through one layer of fabric (mokume shibori) with double thread and a small cotton “tag” knotted into the end of each row of double thread.
Add two side bracts and the leaf with guntai shibori as described here in another blog.


Add a stem from the bottom of the thistle head, created by carefully making a fold (ori nui) along the line of the stem so you are pinching 2 thicknesses of fabric in your fingers. With a double thread and small cotton “tag” in the end sew through 2 layers of fabric.
Pulling up the Stitching
Now it is time to pull all the stitching up. Start with the thistle cup stitching. One by one pull them up and once pulled up separate the two threads and insert another “tag” between and tie a double knot around it securing the line of stitching.
The next job is to pull up the 15 lines of parallel stitching. One by one pull them up and once pulled up separate the two threads and insert another “tag” between and tie a double knot around it securing the line of stitching. Repeat this 15 times. The thread needs to be pulled up very tight but without breaking it!
The stem is gathered up securing the end as described above.