- Apply the first coat to the panel using a flat wide brush, or a specialist gesso brush. Use rapid, gentle strokes, spreading an even amount of gesso over the whole of the panel, right to the edges. Avoid ‘going over’ your strokes repeatedly.
- Apply the second coat when the first coat is 90% dry. Brush in the opposite direction to your first coat, using the same brisk, gentle brush strokes, so as not to disturb the layer beneath.
- Continue like this for at least 7 coats – (I often do 12 coats) allowing the panel to dry to a dull surface in between each coat, and always brushing in the opposite direction to the previous coat.
- Every now and then run the brush around the edges of the panel, to cover the sides evenly and avoid a build-up of drips.
Preparing Supports for Oil Painting
Now our canvas is ready to be Sized and Primed. If you apply an oil paint directly onto a raw canvas, the paint will soak into the fabric and pass through the fabric; and in the long run will cause the fabric to deteriorate.
On this schematic illustration, we can see exactly what we are going to do.

This is our support – in our case it is a canvas, but it could be a canvas board or a wooden panel. We will size the canvas with glue and then prime it with two or three coats of Primer.
Let’s see the process in detail: We have to size the canvas before priming. For this purpose, we need Rabbit Skin Glue.

Traditional canvas sizing show excellent adhesion and barrier properties. For centuries, artists have used it to protect raw canvases from the disintegrating effects of oil paints. To prepare the glue, we first need to to soak the glue in cold water in the proportion of 1 portion of Rabbit Skin Glue to 10 portions of water. It takes about 2-3 hours until the Rabbit Skin Glue gets swollen and to completely dissolve. It is helpful to stir the mix from time to time. I usually leave Rabbit Skin Glue in water to soak overnight. Now we have to slowly heat the soaked glue in an improvised double boiler. On the bottom of a pan, put a soft piece of fabric. Place your pot of dissolved Rabbit Skin Glue on top of the fabric.
Pour cold water into the pan, so that it covers 3/4 of your glue pot. Heat the mixture slowly, till the Rabbit Skin Glue becomes fluid. If the water in the pan boils, take the pan off the stove; the most important thing is to prevent the Rabbit Skin Glue from boiling. Put your finger into the liquid glue, now rub your fingers – they should stick to each other for a while, but not strongly; then this stickiness should end. If your fingers stick too strong and this stickiness remain for a long time – you have to add more water.
Important: Do not boil Rabbit Skin Glue.
If boiled, the Rabbit Skin Glue will lose its adhesive properties. Keep a pot with Rabbit Skin Glue in hot water while you size the canvas. Once the glue cools, it becomes jelly-like and you need to put it in hot water again. Brush this mixture quickly onto the canvas, allowing it to penetrate the weave of the fabric.
You have to wait several hours before your canvas becomes dry. Now you can use a fine sandpaper to remove any irregularities on the canvas surface. Apply a second thin layer of sizing. Do not sand the second sizing. Two thin coats are enough to properly block oil penetration into the fabric. Rabbit Skin Glue will tighten the canvas as well as make it stiff which is helpful for sandpapering and priming.
It’s time to prime with Gesso. Such readymade Acrylic Gesso will satisfy our needs entirely.
We have two options – to use thick Gesso as it is from the pot or add water to make it more fluid. Apply Gesso with a Wide Flat Brush in thin layers. The first layer should be thin (1 part Gesso and 2 parts water). Gesso should be applied with a brush in one direction of the weaves of the canvas.

After the first layer is completely dried, apply the next one, cross coating the first layer. The second and the third layers of Gesso should be more dense – three parts Gesso to one part water. If you apply undiluted Gesso straight from the pot, it would be enough to apply just two coats of Gesso. If you dilute Gesso with water, as I usually do, three or four coats are required.
Four thin coats of primer work much better than one or two thick undiluted coats.
Gesso provides excellent “tooth” and oil paint will perfectly stick to its surface making a unified layer. The rich white surface allows maximum color reflection which is crucial in our multi-layered painting technique. Before painting, we have to allow the primed canvas to dry completely for 24 hours. The Acrylic Gesso is water-based and we can paint over with other water-based media like Egg Tempera or straight with Oil Paints.
Important: Never use Oil Primer
In the middle of 19th century, when connection with Old Masters’ methods was completely lost, many misleading techniques of painting and priming methods occurred. Artists started to use Oil Based Primers, which caused significant damage to paintings and dramatically reduced the age of many works from that time. Most of the works painted over Oil Primer, adhere to the ground very weakly, and some paint is already falling off. The fact is, that the Oil Ground has a glossy surface that does not absorb oil from the paint, thus painting layers are very poorly attached to the oil ground, and after sufficient drying time, it can easily separate from it. The connection between the ground and a paint layer is unstable, especially in a multi-layered impasto painting.
Well, let’s see where we are, what our conclusions about painting supports: Paper for Oil painting, Unstretched canvas and canvas boards are suitable for: painting exercises, Color Theory tests, sketches, studies, preliminary brush drawings – in other words, for secondary purposes.

Pre-Stretched Canvas – ready to paint canvas, that we can acquire from any art shop, should only be used in cases when we need to paint, but there is no time and inappropriate conditions to prepare the canvas ourselves. Apply an extra coat of Gesso over it. Self Made Stretched and Primed Canvas – the best option for our primary artworks.
What you need for the task?
- Stretched and Primed Canvas
- Wooden Stretcher Bars and Cross Braces
- Canvas, preferably Linen. Cotton may also suit if you like it
- Scissors
- measuring tape
- Staple Gun and Staples or Rubber Hammer or usual Hammer and Carpet Tacks
- Rabbit-Skin Glue
- Gesso
- Wide Flat Brush for decoration works
- Sandpaper
Painting Materials & Techniques
The traditional gesso I refer to here is not the same as the modern tubs of acrylic ‘gesso’ (the stuff that most modern canvases come ready-primed with). In fact, traditional gesso is only suitable for use on hard surfaces like wood, mdf or metal. If you apply it to canvas or any bendy surfaces, it will crack!
Why Bother with Gesso?
The answer to that is best found by trying it out for yourself. If you enjoy working on a super-smooth, luminous surface, then gesso is for you. But if you like the relative ‘tooth’ of canvas, then it probably isn’t. One thing to be aware of is that there is a little hard work involved. Each panel needs many layers of gesso, before being sanded, so my advice is to work in bulk and gesso a whole stack of panels in a weekend if you can.

What you will Need:
- One or more solid panels (e.g. wood, mdf, masonite, copper)
- A bag of rabbit skin glue granules
- A bag of powdered whiting (aka chalk)
- A bain marie (or a pan of water with a bowl suspended in it)
- A wide, flat brush (or specialist gesso brush)
Step 1: Size the panel:
Wood surfaces require sizing with 3 coats of rabbit skin glue before applying the gesso. If the glue layers are omitted, the gesso will crack.
- Measure out 1 part rabbit skin glue granules (by volume)
- Measure out 15 parts cold water
- Cover the granules with just an inch of the cold water and leave for 30 mins to soften.
- Now add the rest of the water & warm the mixture gently in a bain marie, stirring until all of the glue is dissolved. Do not allow the mixture to boil.
- For the first coat, take a small amount of the mixture aside into a separate container and add equal parts warm water, to produce a weakened 30/1 strength glue.
- Paint the first coat onto the panel.
- When dry, paint the 2nd & 3rd coats using the stonger 15/1 glue mixture.
Note – the glue forms a jelly when cold, so it should be kept lukewarm if possible.
Step 2: Add a Muslin Layer (optional)
If wood or plywood is used for the panel there is a risk of cracking over time. To avoid this, a layer of muslin can be stuck to the surface of the panel over the 3rd layer of glue, and then another layer of glue added. This is not required when using MDF.
Step 3: Prepare the Gesso
- Measure 2 parts whiting (by volume)
- Measure 1 part of the ready-prepared warm glue mixture (at 15/1 strength)
- Before combining the two, add a small amount of warm water to the whiting, and stir to achieve a consistency similar to thick yogurt
- Slowly stir in the glue until fully incorporated, and the texture is smooth & creamy
- If the mixture starts to cools down and thicken during use, heat it gently in a bain-marie to maintain a warm temperature and a smooth consistency.
Step 4: Apply the Gesso
- Apply the first coat to the panel using a flat wide brush, or a specialist gesso brush. Use rapid, gentle strokes, spreading an even amount of gesso over the whole of the panel, right to the edges. Avoid ‘going over’ your strokes repeatedly.
- Apply the second coat when the first coat is 90% dry. Brush in the opposite direction to your first coat, using the same brisk, gentle brush strokes, so as not to disturb the layer beneath.
- Continue like this for at least 7 coats – (I often do 12 coats) allowing the panel to dry to a dull surface in between each coat, and always brushing in the opposite direction to the previous coat.
- Every now and then run the brush around the edges of the panel, to cover the sides evenly and avoid a build-up of drips.
Step 5: Sand the panel
When the gesso is fully dry (ideally having been left overnight), you can sand the panel, ideally using a super-smooth 320 or 400 grit sandpaper. When finished, the panel should feel like silk!
Step 6: Seal the Panel (for oil painting)
Traditional gesso is absorbent so, before using with oils, it needs sealing with a couple of final layers of rabbit skin glue at 30/1 strength. Paint on this layer after the sanding is completed. (Note: This step is not required when working with egg tempera).
Why and How to Gesso Canvases Before Pouring
Welcome to another segment of “What works for me.” Today I began to prime some of my substrates for the upcoming weekend of pouring to my heart’s content, when it occurred to me that some folks might not gesso their canvases, and might find out down the road (like I did) that they wished they had. So, buckle up, here we go. I’ll walk you through how to prep canvases for pouring.
Most, if not all, store-bought canvases state that they are gesso-primed. While this might be true, I still find the need to gesso them again at home before I pour.
Video: How to Gesso Canvases for Pouring
Supplies I Used

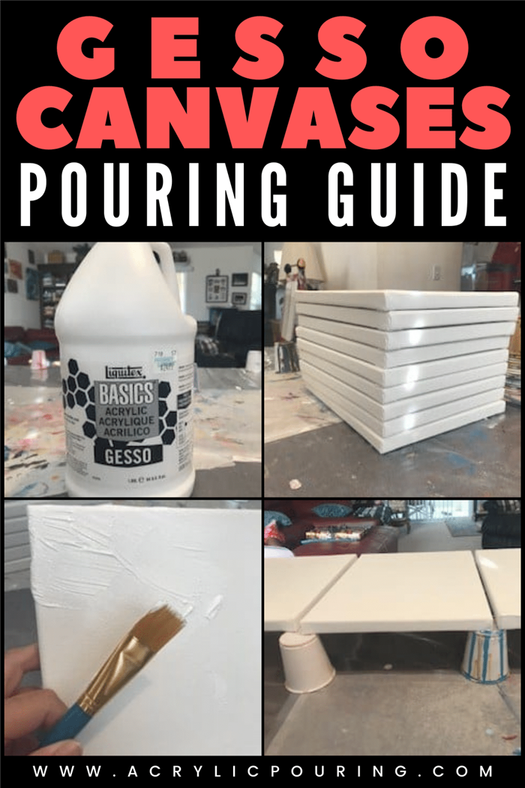
I’ve only purchased and used Liquitex Basics Acrylic Gesso. According to their bottle, “Gesso is a thick white primer that seals, stiffens, and provides surface ‘tooth’ for painting surfaces.”
Basically, that means that the acrylic paint needs assistance to grip the canvas and leave a stain. This is especially necessary for us pourers, because we’re typically adding pouring medium and a silicone product, whether it’s treadmill oil, WD-40, or, my personal favorite, K-Y True Feel.
Our mixtures need all the help they can get to do what we want them to do. When I’ve chosen to pour onto a canvas that I haven’t gessoed, I’m never happy with the outcome. The edges don’t get covered properly and the canvas shows through the paint. Ugh.
Planner that I am, I like to prime a lot of canvases at one time so that I only need to bring out my gesso occasionally. I get them done in batches and my canvases are primed and ready for me to use whenever I choose to pour.

To start, I set up my bathroom cups on my desk and ensure that I’ve got a sufficient quantity for the amount of canvases I plan to prime. My personal method of pouring is to do certain tasks all at once on one day.
For example, I may varnish 10 paintings at a time. Same applies to removing skins from my container lids, photographing, or moving paintings from my drying rack to my curing rack. This method may work for you, or it might not. I have a lot more space than others, so I know this might be difficult for some.
My advice to newbies and seasoned pourers alike is to do the following:
-
- Select a large variety of sizes of canvases to prime.
- Prepare your drying surface by setting up your cups to hold the canvas once ready.
- Pour your gesso into a dish of some sort.
- Get a nice size brush with firm bristles. My personal favorite is a Grumbacher wash brush that I found. It does a great job.
- Put on an apron and gloves. This stuff gets everywhere!

-
- Paint the gesso onto your canvas with lots of “X X X” strokes, similar to what you would do when painting a wall at home to ensure you cover every groove and crevice.
- Without putting more gesso on your brush, make clean straight strokes, both vertical and horizontal.
- Be sure to paint the sides and edges of your canvas. This is the primary area where your paint will otherwise spread out and allow canvas to show through.
- Make sure you are using a very thin amount of gesso to accomplish the aforementioned steps.

- Place your canvas on the cups to dry.
- Allow to sit for half a day minimum. I typically allow 24 hours.
- Stack canvases in a clean area, preferably covered with a cloth of some type to keep them clean and dust free until you need them.
I have occasionally purchased a painting from a thrift store for the purposes of painting over it. In this case, you definitely need to gesso it. These paintings may require more than one coat of gesso, because you don’t know if the painting was done in acrylic or oil, or maybe even watercolor.
I’ve even had some canvases that were suspect and I didn’t want any critters in my home, so I left them outside for a day or so, then washed them with Dawn dish soap, front and back. Then I let them dry for a couple of days before gessoing them.
Additionally, I’ve even resurrected some of my earlier work that I now loathe. I’ll just gesso right over my disaster and start again. Gesso is a GREAT PRODUCT!

I hope my little tutorial has helped you. Perhaps it answered a question you had or cleared up something that was confusing. At any rate, I always aspire to share at least one little nugget that you can walk away with to make pouring fun and worth your while.
Let me know if you have any questions or share with me your tricks for preparing your canvases or substrates for pouring.
Born in France, Patricia now calls Palm Coast, Florida, home, where she runs Oceans Apart Studios. She’s had the pleasure of raising two daughters and nineteen medical foster children. Now she specializes in watercolor, acrylic pouring, and custom jewelry taken from the run off of her paintings. Her pieces aim to capture the differences that make each woman uniquely beautiful. Check them out on Etsy.