Hello. I just found your article on Painting-texture and I find it fascinating! Love that you’re willing to share your knowledge, thank you for this. I so hope you’re still answering and commenting on people’s questions. I see that the last was in 2019. I need some advice. Here’s my dilemma: Years ago I purchased a piece of art that was done on wood and there was a house on it. The house was “stucco”. We moved and the movers chipped some of the stucco off so I’ve been looking for a way to repair it. (I am a painter so I don’t really know if that helps or not). From what I can tell in this article these stucco recipes are for a smooth stucco product, yes? The house on the piece of art I have has a grainy texture, like you find homes in the Southwest of the country. I saw, somewhere in all this info, that you said sand could be added as well as color (i.e. paint?). Would the ratios be the same? What kind of paint would I add to the stucco so it didn’t thin it out? I definitely do not want it to crack! What would I need to prime the wood with prior to the stucco? After? Currently it does not have acrylic on it but I’m wondering if a coat of matte acrylic would protect it without yellowing? What type of acrylic coating would be best? I’m sorry to flood you with, what, about 8 questions all at once. I merely am so very excited at the prospect of being able to repair my art piece that I wanted all my questions in one place in the hopes that you could provide me answers for all of them. Really don’t want to bother you with 100 comments. Please, please, please help. Thank you so much. Love the flower you shared with everyone. Now I’m heading to your website to check it all out. Thanks again for the article and your willingness to share your techniques. Not just everyone would do that.
5 Quick (and Surprising) Techniques for Textured Art
Texture is such a key component in mixed-media art; it’s often what gives a piece its wow factor. Creating textured art isn’t always a laborious process, as the 2017 Art Lessons: Texture Adventures prove. You can achieve visual and physical texture in a few quick steps, and incorporate the techniques in every type of project, including stitch, collage, and art journaling. Tons of ideas and projects for textured art are available now in one download: Art Lessons: 2017, The Texture Adventure Series Collector’s Edition. This 12-part series is perfect for artists of all levels, and it will be your stalwart companion as you explore paint, mediums, stitching, creating patterns, and more.
As proof that texture can be created in no time, here are five quick techniques for putting more oomph into your artwork. These aren’t your run-of-the-mill methods, mind you—you must try them yourself!
1. It’s 5:00 somewhere: When alcohol meets acrylic paint, amazing things happen to produce textured art. In Art Lesson Vol. 3: Venetian Plaster Party by Sandra Duran Wilson, an underpainting is created by spreading diluted acrylic paint on an Ampersand Encausticbord. While the paint is still wet, the surface of the board is sprayed with 70% rubbing alcohol, which, as Sandra explains, changes the viscosity of the paint and moves it away from the drops of alcohol, creating a gorgeous mottled surface and lots of visual texture.
Although she builds on that early layer, that dappled design doesn’t diminish.

This technique is also incorporated in Sandrine Pelissier’s Art Lesson Vol. 1: Custom Sketchbook with Spirograph Designs, to create visual texture on a painted sketchbook cover. Try this simple alcohol and paint trick for an incredibly easy way to create freeform patterns.

2. Tale of the tape: Time to excavate your junk drawer for that roll of duct tape—you’re going to need it for your next piece of textured art. Katie Blaine incorporates duct tape in Art Lesson Vol. 6: Texture Techniques on Black, and if you didn’t know that’s what created the cool, grungy surface, you’d likely never guess. To begin the piece on canvas, she recommends tearing the tape into pieces of varying lengths (no more than 6″ long), and letting the strips wrinkle and overlap as they’re placed on the edges. The resulting wrinkles and uneven edges are the starting points for lots of texture; light molding paste is layered on after that, then black gesso.

After adding collage, oil pastels, paint, and more, the resulting mixed-media artwork is a strong, eye-catching piece with lots of attitude. It’s no wonder that Katie was inspired by New York City at night.

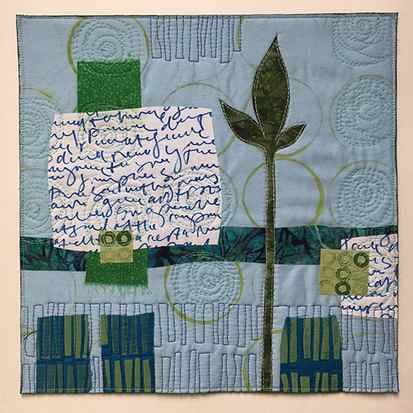
3. The write stuff: Handwriting is frequently a part of art journal pages and collage, but it’s usually not thought of as a textural element. Deborah Boschert shows us that handwriting can indeed be an element in textured art in Art Lessons Vol. 12: Expressive Surface Design. Her fabric collage includes several printing methods, one of which is writing on fabric. “Script is a beautifully graphic element to add to the fabric,” she says. “Because each artist’s handwriting is unique, the design is immediately one of a kind.” Deborah recommends using your own handwriting, but altering it so it’s illegible: “This encourages the viewer to take in the overall impact of the fabric collage, rather than trying to decipher the text.”

In the lesson, she offers tips for how to do this, and for how to incorporate it in a beautiful collage, like “Flouring Framework 2”:
4. Bubbling up: Tyvek is one of those familiar/unfamiliar mixed-media art materials. Often used for envelopes, the manufactured material is also an artist’s best friend, since it’s super strong and can be manipulated in so many ways. Sandra Duran Wilson shows us how in Art Lessons Vol. 4: Real and Implied Texture. To create an abstract floral still life, she uses painted Tyvek, but alters it using heat. For one method she creates holes, and for another, the material shrinks and creates a bubble-like texture.

In just a few seconds, elements for amazing textured art are created and ready to use; check out Sandra’s gorgeous piece!

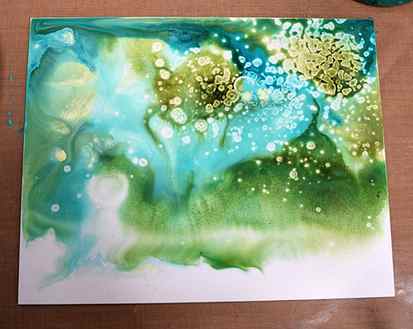
5. The big reveal: Most of us think of spray paint as a flat color medium, but Nathalie Kalbach takes it to another level in Art Lessons Vol. 10: Tactile Art Inspired by Street Art. She reveals several texture techniques using spray paint, one of which involves using deli paper or aluminum foil. After one color of paint is sprayed and left to dry, a contrasting color is sprayed on top. While that layer is still wet, Nathalie presses the paper into the paint, twisting it; this adds textures and pattern, lifting the wet paint to allow the first color to show through.

Her spray paint techniques are perfect for textured art, as you can see in this piece, “Watertower”:
Cost Effective
Not only can it give you more control over the consistency, but it can also be quite cost effective to make your own texture for use in your paintings or other artwork.
The reason for this is that you can use much cheaper building materials rather than materials that are specifically made for artists.
Often artist specific products have a somewhat inflated price as they are considered specialized materials. They can do a good job but in particular if you are working on a large scale then it might become a bit cost prohibitive.
Ingredients

I have been making my own texture for a number of years and in that time have used quite a few different ingredients. However there are a few key things that you need to include to make your own painting texture:
A thick product for the base that provides the substance to your texture mix. The type of material that you need for this is something like stucco, plaster powder or ready mixed plaster or something such as artex.
Depending on where you live you can get hold of different materials. This is one of the products that I can recommend in the US – it’s not stucco but something pretty close. There are only a few options it seems that are sometimes not available but see what you can find. Sometimes Stucco pops up on Amazon but not often.
Also, I did find some Stucco on Amazon in the UK at one time but it now seems to be out of stock again. Once again you can find this ready mixed plaster which is pretty similar here (Amazon UK).
Add to this one essential ingredient to make the texture paste flexible enough to add to a canvas and not crack off. I highly recommend you use PVA.
In different parts of the world PVA comes in different forms (in the US you can use Elmers Glue), in the UK PVA is widely available for example this one is a premium art PVA.
Hopefully you can get hold of some where you are. The essential part of the PVA is the V – vinyl, which gives the PVA flexibility. So you can buy some PVA Craft Glue or some industrial PVA which is often available from hardware or DIY stores.
If you want your texture to have some colour then you can also add paint to it, this can be useful if you want to use it for a base but the colour will be changed by the white of the texture.
Painting Texture Recipe
So, here are a few recipes for you to make your own texture:
Mix stucco with PVA in the mix of 3:1 (or try different mixtures to get different results from 2:1 to 5:1)
Ready-mixed plaster and PVA – similar to stucco in quantity
Mix gesso, plaster powder and PVA in relative quantities of 1:2:1
Basically you can try different options and once you have your mixture you can also add other things to it e.g. sand to get different effects. My tried and tested recipe is stucco and PVA so I know that works the best for me.
If you make up too much texture then you can keep it in an airtight container but try and use it within a few days (or weeks if it is really airtight).
Once you have applied the texture to the painting, make sure it is fully dry before you paint over it. This will usually be at least 24 hours but longer if it is put on thicker or in some atmospheric conditions. You can then paint over it with either acrylics or oils – if you are using oils I would recommend putting a coat of acrylic paint first.
Please note that I am an Amazon affiliate and may earn commission from any purchases made trough links on this website