You’ve done it and thanks to this DIY tutorial, you can now cross the item “build your own nutcracker” off your bucket list. And the result is something to be proud of, isn’t it? By the way, if you ask me, it’s also a great and creative last-minute Christmas gift idea for all nut lovers out there! PS: Although I am a creative crafting enthusiast, I have to admit that I did not come up with this Christmas DIY hack on my own. The idea, which I put into practice with the help of WEICON products, came from the DIY magazine “selber machen”.
How to build your own nutcracker | DIY instructions
‘Tis the season! It’s finally that time of year again, when we snuggle up on the sofa, drink a hot cup of tea, and eat a seemingly endless amount of mandarins and nuts. But that’s the thing about nuts: To crack them open and get to their delicious inside, you need a particularly strong helper – the famous nutcracker. However, if the nostalgic nutcracker soldiers aren’t really your thing and you also don’t want to buy the next best thing from the store, we’ve got some good news for you today: You can build your own nutcracker! It’s easy with the following DIY instructions.
Here’s what you need
• solid wood (e.g. beech or oak)
• fine sandpaper
• 20 mm and 35 mm Forstner bit
• 2.5 mm wood drill
• saw
• belt punch
• screw clamps
• screwdriver
• a piece of leather (e.g. an old belt)
• 2 x screws 4 x 25 mm
• gloves
• WEICON Epoxy Minute Adhesive
• WEICON GMK 2410 Contact Adhesive
• WEICON Bio-Fluid

Step by step to your homemade wooden nutcracker
Choose the right wood
If you want to build a nutcracker yourself, the first thing you need is wood. For the lever, the base plate and the handle, you should use solid wood, for example, oak or beech. Soft woods like pine or spruce are less suitable for cracking the hard nuts. Maybe you’re lucky – like me – and even find some wood scraps in your workshop at home that you can use for the craft project. For my DIY nutcracker, I was able to gather up a few pieces of solid beech wood.
Cut the wood to size


First, cut the wood to the right size using a saw. To give you a rough idea size-wise: My lever part has the dimensions 150 mm x 60 mm x 14 mm, while the base plate measures 280 mm x 80 mm x 14 mm. Once that’s done, don’t put the saw aside just yet – you can also use it to shape the rounded edges of the lever. Next, use the the 35 mm Forstner bit to drill an indentation into both the base plate and the lever. This ensures that the nut won’t just roll off later on, when it’s time to crack. Use the Forstner bit again to drill a hole for the wooden handle into the center of the front side of the lever. In my case, I used a 20 mm drill bit. The drill size you need depends, of course, on the thickness of the wooden stick you’ve chosen. Speaking of wooden sticks: I got mine as a gift from a colleague. You can find ready-made ones in any hardware store. Or you can saw a piece off an old broomstick or something similar. Once everything is cut to size, it’s time to give the wood a final polish – with some sandpaper.
Connect all parts


And then it’s time to glue! For your DIY wooden nutcracker, use our WEICON Epoxy Minute Adhesive first, by giving some of the adhesive into the whole for the wooden handle with the help of the mixing nozzle. Then insert the wooden handle and you can be sure that it won’t wobble, turn, or come loose. After all, if we take on building a nutcracker ourselves, we want it to last! The next step is the connection between the base plate and the lever. This is formed by a piece of leather – from an old belt for example – and, again, some adhesive. But one thing at a time: If you like, you can also attach screws to the belt to create a special look. To do so, drill holes into the lever and the base plate using a 2.5 mm wood drill bit. You should also make corresponding holes in the belt by using a belt punch.


Now, our WEICON GMK 2410 Contact Adhesive comes into play, as it is perfect for bonding leather and wood! Apply a thin layer of the adhesive to both the belt and the base plate. It’s best to use a paint brush to spread the adhesive and to mask the areas you don’t want glued with a little masking tape beforehand. Allow the adhesive to flash off for five to ten minutes before taking the leather piece and carefully attaching it to the base plate of your DIY nutcracker. Despite the high initial strength of the GMK 2410, it’s best to fixate your construction with a screw clamp for about an hour before you bond the lever part the same way. Finally, attach the screws and your DIY wooden nutcracker is ready. Almost at least!

Seal the surface
Last but not least, you should seal the surface to provide your DIY nutcracker with long-lasting care and a high-quality look. WEICON Bio-Fluid, for example, is a great choice for this, as it is a medically pure white oil that is also approved for use in the food sector.
Cracking idea! Prop maker who built two 6ft 5in Nutcrackers from food cartons and cardboard shares a step-by-step guide to help others create the festive figure
A DIY fan has shown that elaborate Christmas decorations don’t have to be expensive, sharing a step-by-step guide to create incredible giant Nutcrackers. US-based set designer and prop maker Julianna Miller created two giant festive figures to help introduce the holiday spirit into her home using cardboard, food cartons and a lick of paint. Julianna’s Nutcracker guide was originally posted on her own Facebook page, Quiet Crafting Corner With Julianna. Yesterday it was posted on the Christmas The Most Wonderful Time Of The Year page where it was then shared more than 24,000 times and commented on more than 20,000 times.
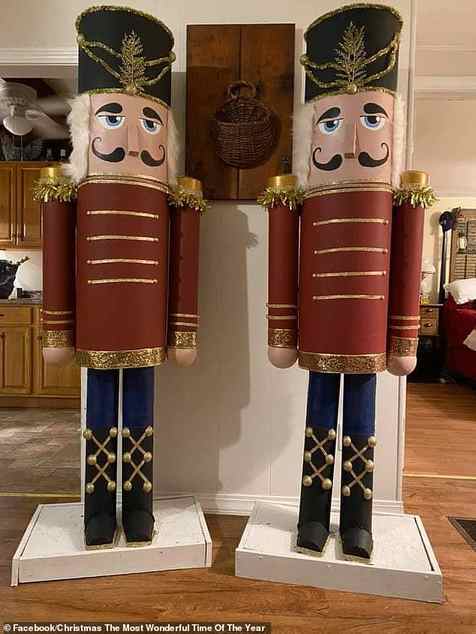
US-based set designer and prop maker Julianna Miller shared a step-by-step guide to help people create these incredible Nutcracker Christmas decorations
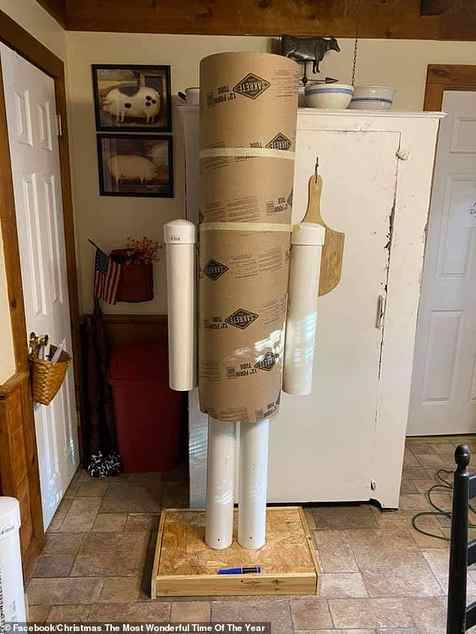
She started her models off with a large cardboard tube, before sticking pipes onto it to act as arms and legs
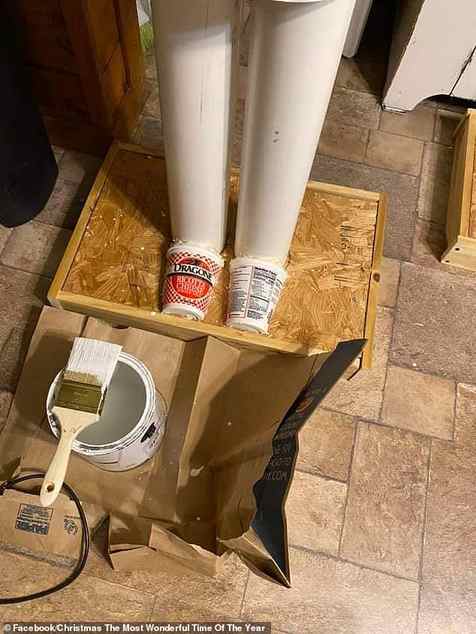
Old yoghurt and cottage cheese pots were used to give the decorations their feet
The incredible guide photo documents every stage of the creative process to help other people easily re-create the 6ft 5in decoration. To create the amazing Nutcrackers, Julianna started with a large cardboard tube onto which she attached white pipe to create arms and legs.
RELATED ARTICLES
Share
To construct the feet, Julianna attached yogurt pots before beginning the painting process.
Initially the entire sculpture was painted white to create a base before black paint was applied to create the boots and tall hat.
A touch of blue paint is also applied to give the Nutcrackers their trousers before pink paint is used to create hands and a face for the decoration.
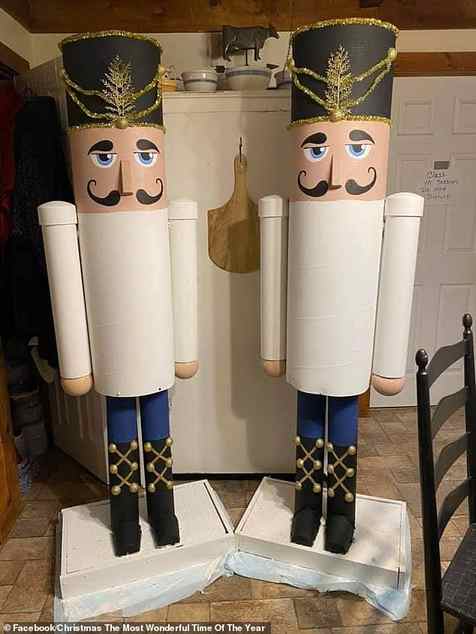
Julianna began the painting process by adding black boots, blue leggings and a cartoon face with comically large mustaches
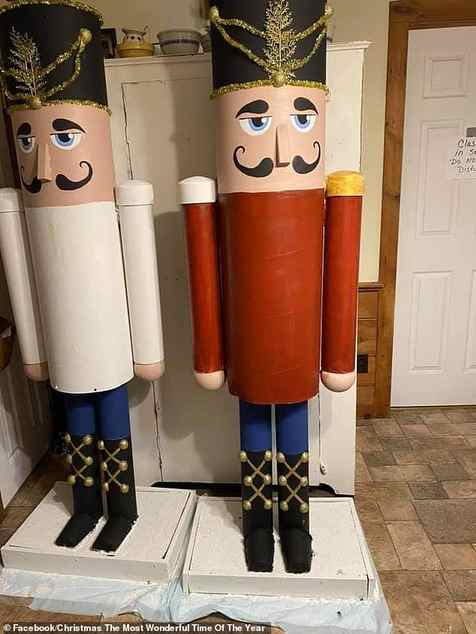
Red paint was then applied to give the Nutcrackers their distinctive crimson coats, and gold trimmings were also stuck on

The final touches were applied to the decorations, such as hair and golden hat trimmings
At this stage, additional decorations are stuck onto the models such as noses and gold laces for their boots as well as gold trimmings on their hats.
Cartoon faces were then painted on with comically large mustaches and white hair is glued onto the back of the heads.
Finally a healthy amount of red paint is applied to the torso to give the models their distinctive crimson cloaks, which are also finished off with golden trimmings.
People on social media were quick to applaud Julianna’s creative genius.

People on social media were quick to heap praise on Julianna’s for her creative Christmas decorations
One person said they were ‘very impressed’ by the end product.
While another said that the models would make perfect ornaments to stand either side of their own front door.
A third person said that Julianna has a lot of talent and praised the models as ‘absolutely amazing’.
STEP-BY-STEP GUIDE TO CREATING YOUR OWN NUTCRACKER
1. Construct the shape of your Nutcracker using a large cardboard cylinder and then stick two smaller tubes either side of it to create arms. These can be made from pieces of pipe.
2. Gather two small/medium sized pots to use them as feet. Julianna used old yoghurt and cottage cheese pots for her Nutcracker’s feet.
3. Now you can start painting your Nutcracker and you should begin by painting the entire model white as a base layer.
4. Next, use black paint to paint on a hat and boots, blue paint for the trousers and then pick a colour to paint on hands and a face.
5. When the skin colour has dried, then paint on a face for your Nutcracker and a cartoonish moustache.
6. Use gold trimmings such as tinsel to decorate your Nutcracker’s hat and boots.
7. Use red paint to give the Nutcracker a crimson jacket, applying multiple coats if necessary.
8. Finish off your giant decoration with additional golden trimmings to bring the jacket to live and use gold paint to give him shoulder pads.
- Update Your Browser | Facebook
- Update Your Browser | Facebook