Depict the branches on the right side. Use the jagged lines as in the previous steps and depict several branches of different shapes.
Winter Wonders Tree Walk
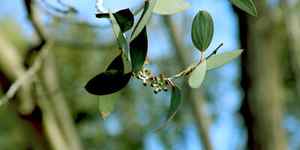
Many trees in winter have their own special charm that brings beauty to the season. Whether it is brilliant berries, mottled or textured bark, or interesting branch formations, trees in winter have charming traits to enjoy.
On this page
Ready to get started on your Winter Wonders Tree Walk? Follow these easy steps:
- Start with the How to Build a Tree Walk Guide; download, print, or craft your own.
- Learn about the traits of winter trees and select the ones you want to visit.
- Use the Tree Inventory Project webmap to discover where these trees live nearby that you can visit and record it on your guide.
- Try it out! Take your tree walk out for a test run – can you find the trees you’re looking for and identify them?
- Share your tree walk with neighbors and friends!
What is This Type of Tree Walk?

Bambooleaf oak, Quercus myrsinifolia
Silverleaf oak, Quercus hypoleucoides
Southern live oaks, Quercus virginiana
Canyon live oak, Quercus chrysolepis
Holly oak, Quercus ilex
Interior live oak, Quercus wislizeni
Blue oak, Quercus douglasii
California black oak, Quercus kelloggii
Waiting for those first blooms? Although it is not regulated by Title 11 as a tree, the popular ornamental evergreen Camellia will be one of the earliest pinks you will see. Mark your maps with the closest star magnolia, Magnolia stellata, to watch for one of Portland’s first (regulated) trees to bloom – with their showy flowers arriving before its leaves!
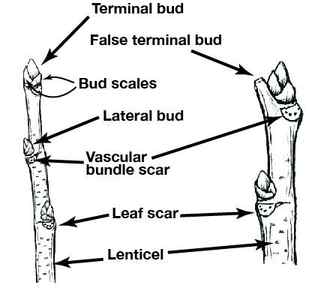
Tree Identification Review
Need to brush up on your tree vocabulary? Check out the Online Dictionary from the International Society of Arboriculture for everything from abiotic to zipline!

The introduction to tree identification for most amateur arborists is through their leaves – which works great for two-thirds of the year. Can only the most expert among us still identify trees through the winter? Certainly not!
Start with the easiest visual identifier this time of year – does the tree have any leaves, needles, or scales present in the winter? Evergreen trees hold on to their foliage for more than one year, while deciduous trees will be bare every winter.
The trees we call broadleaf are categorized as angiosperms because they produce a flowering body. Some trees have showy flowers, others have pronounced bracts, and a variety of unimpressive catkins take the name of a flower on other trees.
Gymnosperms are trees with “naked seeds” – most happen to be cone-bearing trees, also called conifers. This ancient line includes Ginkgo – see if you can find an uncommon female with fruit but do not touch! How does this seed compare to the cones of a Douglas-fir or a grey pine?
Broadleaf evergreen trees and deciduous conifers each make up 1% of the trees in our parks. Why do you think there are so few of these? What are the most common trees found in Portland’s parks?
How to Draw a Winter Tree


I suggest you complete a new fascinating lesson on the topic of natural objects, and now you will learn how to draw a winter tree step by step. Here the tree has a wide trunk and branches of different sizes. There are no leaves on the winter tree, and they will appear only in early spring.
Freehand lines are allowed in this tutorial, so the size and shape of the branches may differ from my example. The main thing is to remember the sequence of steps so that in the future you can easily draw any tree if necessary.
Please get your art supplies ready and get started with this fun tutorial.
- Pencil
- Paper
- Eraser
- Coloring supplies
Time needed: 30 minutes
How to Draw a Winter Tree

-
Draw the trunk. Depict two smooth vertical lines at some distance from each other.

Add the bottom of the tree. At the bottom, continue the lines and draw a wide lower part where the roots begin.

Depict the wide branches. At the top of the trunk, draw some wide branches.

Add the branches on the left side. Use jagged lines of various shapes to draw the thinner branches.

Sketch out the top branches. At the top of the tree, draw several branches of different shapes.

Depict the branches on the right side. Use the jagged lines as in the previous steps and depict several branches of different shapes.

Add the rest of the branches. Repeat the previous step and draw some more branches on the right side.

Add the smallest branches. At the ends of the branches, draw thin, uneven lines of various shapes.
Color the drawing. Use any shades of brown.
The winter tree is ready! You have now completed all the steps in this guide and acquired useful skills. If you liked this tutorial, then leave a little feedback in the comments. I will be glad to receive feedback from you. I recommend that you save the PDF file, which I have prepared especially for your convenience. This file contains a brief instruction and additional useful materials necessary for the effective implementation of the lesson.