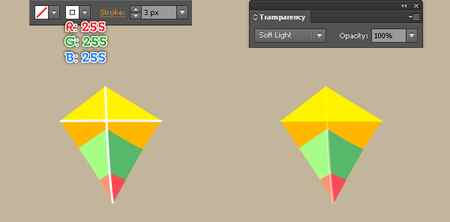
3. Pick the Pen Tool (P) and create a turquoise shape (R=158, G=255, B=255) as shown below. Make sure that the newly created shape is still selected and go to the Effect > Artistic > Sponge… Follow the data as shown in the second image and click OK, then go to the Effect > Blur > Gaussian Blur. Enter a 2px Radius and then click OK. Next change the Blending Mode of the resulting shape to Soft Light.
4. To give a realistic look, I’m going to add the shadow on the shape created in the step 3. First, make a copy (Ctrl +C, Ctrl +F) of this shape and then remove all existing appearances of the copy. Keep the resulting shape selected, then remove the fill color of it and add a 1px red stroke. Now select two anchor points highlighted with black of the red object and then click on the “Cut path at selected anchor points” button from the Properties bar. This make the red object becomes two paths. Select and remove the upper path. Reselect the remaining path and duplicate it once (Ctrl +C, Ctrl +F), then hide the copy (Ctrl +3). Next reselect the original path and replace the existing stroke color with R=0, G=0, B=0, then apply the Width Profile 1 for the resulting path. Keep this path selected and apply a 3px Gaussian Blur effect for it, then reduce its Opacity to 20%. Finally hide this path behind the shape created in the step 3.
5. Before you continue, press (Ctrl +Alt +3) to show the red path hidden in the step 4. Now open the Brushes palette (Window > Brushes). In the Brushes palette, click on the “Brushes Libraries Menu” button (at the left-bottom corner of the Brushes palette) and you will get brush sets in various categories. Open the Artistic category, and select the Chalk Charcoal Pencil subcategory. You will get a library of rough brushes. Select a suitable brush. I will use the one labeled as Charcoal Feather. Before you continue, close the Chalk Charcoal Pencil subcategory. Now reselect the red path, then move to the Brushes palette and click on the Charcoal Feather brush. Make sure that the newly created path is still selected, replace the existing stroke color of it with R=153, G=227, B=255 and change the stroke weight to 3px. Finally, set the Blending Mode of the resulting path to Screen and reduce the Opacity to 30%.
6. Next comes the another wave. Using the Pen Tool (P) create an object as shown below. Once your object is drawn, fill it with the linear gradient like you see in the second image. Keep the resulting shape selected, and go to the Effect > Artistic > Sponge… Follow the data as you can see in the third image and then click OK. Next, apply a 2px Gaussian Blur effect for the resulting shape then set it to Blending Mode Hard Light and reduce the Opacity to 80%.
7. Let’s create the shadow for the shape created in step 6. First, make a copy (Ctrl +C, Ctrl +F) of this shape and then remove all existing appearances of the copy. Keep the resulting shape selected, then remove the fill color of it and add a 1px red stroke. Now select two anchor points highlighted with black of the red object and then click on the “Cut path at selected anchor points” button from the Properties bar. This make the red object becomes two paths. Select and remove the upper path. Reselect the remaining path, replace the existing stroke color of it with R=0, G=0, B=0 and change the stroke weight to 2px, then apply the Width Profile 2 for the resulting path. Keep this path selected and apply a 3px Gaussian Blur effect for it, then reduce its Opacity to 40%. Finally hide this path behind the shape created in the step 6.
8. To give a realistic look, we’re going to add some details on the second wave. With the help of the Pen Tool (P), create a white shape (R=241, G=242, B=242) as shown below. Next, apply a 5px Gaussian Blur effect for the resulting shape then set it to Blending Mode Screen and reduce the Opacity to 50%. At this point the beach is ready and looks like the final image below.
Create a Summer Beach Background in Adobe Illustrator
In the following steps you will learn how to create a Summer Beach Background in Adobe Illustrator. For starters, you will learn how to create a beautiful beach using basic tools and effects and some gradients. Next, using a bunch of new shapes, the Stroke palette and some simple effects you will learn how to create the footprints and the kites. So let’s begin!
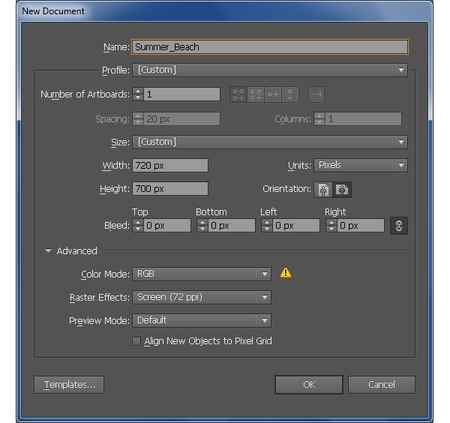
1. Launch Illustrator and then press (Ctrl + N) to create a New document. Select Pixels from the Units drop-down menu, enter 720 in the width box and 700 in the height box then click on the Advanced button. Select RGB, Screen (72ppi) and make sure that the Align New Objects to Pixel Grid box is unchecked before you click OK.
Create the Sand
2. Start with drawing a 720 by 700px rectangle using the Rectangle Tool (M). Next fill this rectangle with the linear gradient as shown below. Keep the resulting rectangle selected and go to the Effect > Artistic > Film Grain… Follow the data like you see in the second image and click OK. Make a copy (Ctrl +C, Ctrl +F) of the resulting rectangle, then open the Appearance palette (Window > Appearance) and remove the Film Grain section. Make sure that the resulting rectangle is still selected and replace the existing color of it with R=255, G=255, B=255, then go to the Effect > Artistic > Sponge… Follow the data like you see in the third image and click OK. Finally open the Transparency palette (Window > Transparency), then set the Blending Mode of the resulting rectangle to Multiply and reduce the Opacity to 30%. 


3. Pick the Pen Tool (P) and create a turquoise shape (R=158, G=255, B=255) as shown below. Make sure that the newly created shape is still selected and go to the Effect > Artistic > Sponge… Follow the data as shown in the second image and click OK, then go to the Effect > Blur > Gaussian Blur. Enter a 2px Radius and then click OK. Next change the Blending Mode of the resulting shape to Soft Light. 


4. To give a realistic look, I’m going to add the shadow on the shape created in the step 3. First, make a copy (Ctrl +C, Ctrl +F) of this shape and then remove all existing appearances of the copy. Keep the resulting shape selected, then remove the fill color of it and add a 1px red stroke. Now select two anchor points highlighted with black of the red object and then click on the “Cut path at selected anchor points” button from the Properties bar. This make the red object becomes two paths. Select and remove the upper path. Reselect the remaining path and duplicate it once (Ctrl +C, Ctrl +F), then hide the copy (Ctrl +3). Next reselect the original path and replace the existing stroke color with R=0, G=0, B=0, then apply the Width Profile 1 for the resulting path. Keep this path selected and apply a 3px Gaussian Blur effect for it, then reduce its Opacity to 20%. Finally hide this path behind the shape created in the step 3. 

5. Before you continue, press (Ctrl +Alt +3) to show the red path hidden in the step 4. Now open the Brushes palette (Window > Brushes). In the Brushes palette, click on the “Brushes Libraries Menu” button (at the left-bottom corner of the Brushes palette) and you will get brush sets in various categories. Open the Artistic category, and select the Chalk Charcoal Pencil subcategory. You will get a library of rough brushes. Select a suitable brush. I will use the one labeled as Charcoal Feather. Before you continue, close the Chalk Charcoal Pencil subcategory. Now reselect the red path, then move to the Brushes palette and click on the Charcoal Feather brush. Make sure that the newly created path is still selected, replace the existing stroke color of it with R=153, G=227, B=255 and change the stroke weight to 3px. Finally, set the Blending Mode of the resulting path to Screen and reduce the Opacity to 30%. 

6. Next comes the another wave. Using the Pen Tool (P) create an object as shown below. Once your object is drawn, fill it with the linear gradient like you see in the second image. Keep the resulting shape selected, and go to the Effect > Artistic > Sponge… Follow the data as you can see in the third image and then click OK. Next, apply a 2px Gaussian Blur effect for the resulting shape then set it to Blending Mode Hard Light and reduce the Opacity to 80%. 


7. Let’s create the shadow for the shape created in step 6. First, make a copy (Ctrl +C, Ctrl +F) of this shape and then remove all existing appearances of the copy. Keep the resulting shape selected, then remove the fill color of it and add a 1px red stroke. Now select two anchor points highlighted with black of the red object and then click on the “Cut path at selected anchor points” button from the Properties bar. This make the red object becomes two paths. Select and remove the upper path. Reselect the remaining path, replace the existing stroke color of it with R=0, G=0, B=0 and change the stroke weight to 2px, then apply the Width Profile 2 for the resulting path. Keep this path selected and apply a 3px Gaussian Blur effect for it, then reduce its Opacity to 40%. Finally hide this path behind the shape created in the step 6. 

8. To give a realistic look, we’re going to add some details on the second wave. With the help of the Pen Tool (P), create a white shape (R=241, G=242, B=242) as shown below. Next, apply a 5px Gaussian Blur effect for the resulting shape then set it to Blending Mode Screen and reduce the Opacity to 50%. At this point the beach is ready and looks like the final image below. 

Create the Footprints in the Sand
9. Next come the footprints. Using the Pen Tool (P) along with the Ellipse Tool (L) to create objects as shown in the first and the second image. Now reselect all red objects and replace the existing stroke color of them with R=239, G=216, B=177. Keep the resulting objects selected and open the Stroke palette (Window > Stroke), then check the Dashed Line box. Enter 1px in the dash box and 3px in the gap box. Keep the resulting objects selected, go to the Effect > Stylize > Drop Shadow… Follow the data like you see in the fifth image and click OK. Make sure that the resulting objects are still selected and make a copy (Ctrl +C, Ctrl +F) of them. Next open the Appearance palette (Window > Appearance) and remove the Drop Shadow section. Finally move the resulting objects 2px down and then move them 2px to the right. 


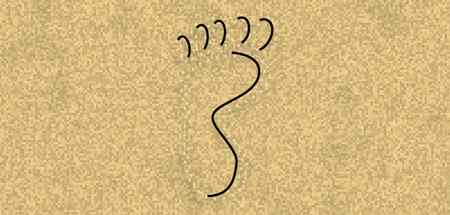
10. Select all remaining black paths and change the stroke weight of them to 2px, then apply the Width Profile 1 and a 1px Gaussian Blur effect for the resulting paths. Now select and group (Ctrl +G) all objects created from beginning step 9 to this time, then name this group “Left_Footprint”. We are done with the left footprint for the moment. 
11. Place the group “Left_Footprint” to the position as shown below. We will continue with the right footprint. Now reselect the group “Left_Footprint” and duplicate this group once (Ctrl +C, Ctrl +F), then reflect the copy vertically. Next name the newly created group “Right_Footprint” and place it to the position like you see in the second image. Finally make a copy (Ctrl +C, Ctrl +F) of the “Left_Footprint” and the “Right_Footprint” group, then place the copies to the positions as shown in the third image below. 


12. With the help of the Pen Tool (P) create four red curved paths as shown below. Once your paths are drawn, reselect the top red path and make two copies (Ctrl +C, Ctrl +F, Ctrl +F) of it. Select a copy and move it 11px up, then replace the existing stroke color of it with black. Continue select the remaining copy and move it 42px down, then replace the existing stroke color of it with blue. Next reselect the black and the blue paths, then hide them (Ctrl +3). Now focus on the third image, pick the Add Anchor Point Tool (+) and click on the four points highlighted with yellow. Then reselect these four newly created anchor points and click on the “Cut path at selected anchor points” button from the Properties bar. This make the two paths become six paths. Select the two smallest paths and remove them. 


13. Select all red paths created in the step 12 and change the stroke weight of them to 5px, then replace the existing stroke color with the linear gradient across stroke as shown below. Make sure that the resulting paths are still selected and apply a 3px Gaussian Blur effect for them, then change the Blending Mode to Hard Light. 

14. Select the two top paths created in the step 13 and go to the Effect > Stylize > Drop Shadow… Follow the data as shown below and click OK. Next, follow the sequence of images and apply the Drop Shadow effect for the remaining paths. 


15. At this point your beach should look like in the next image: 
Drawing a Beach Scene with Sun and Sand
In this tutorial we’ll draw a beach using basic drawing tools and custom shapes tool etc. To add finishing touches we’ll apply some soft gradient.

Draw a big rounded rectangle of almost canvas size.

Double click the layer to open layer style window. Apply settings as shown.


Create a shape using pen tool as shown.

Have a look at the flash clip below to see how we did this.
Create a circle using elliptical shape tool.

Now select direct selection tool, right click and select delete bottom anchor point as shown.

Now reduce the opacity of semi circle to 77% as shown.

Create a rectangle using rectangular shape tool.

Double click the layer to open layer style window. Apply settings as shown.


Select custom shape tool (U). From the preset flyout menu at the top select bird2 as shown below.


Draw a bird shape with white color and place it as shown.

Press Ctrl+J to duplicate the layer. Place it another postion in the sky

Select the pen tool. Draw a shape as shown below.


Double click the layer to open layer style window. Apply settings as shown.


Press Ctrl+J to duplicate the layer. Move it downwards.

Repeat the above step to create another duplicate and move it a few pixel down.

Double click the layer to open layer style window. Apply settings as shown.


Select pen tool and create some shapes thtat look like waves. Fill the shapes with diffrent shades of yellow and orange.

Create a pebble shape using pen tool as shown below.

Populate the sand area with small pebbles of diffrent shapes and sizes. Fill with diffrent shades to add variation.