Thanks! We’re glad this was helpful.
Thank you for your feedback.
As a small thank you, we’d like to offer you a $30 gift card (valid at GoNift.com). Use it to try out great new products and services nationwide without paying full price—wine, food delivery, clothing and more. Enjoy! Claim Your Gift If wikiHow has helped you, please consider a small contribution to support us in helping more readers like you. We’re committed to providing the world with free how-to resources, and even $1 helps us in our mission. Support wikiHow
How to paint a watercolor dog portrait
If you love painting and you have pets, you’ve probably felt inspired to create pet paintings of your furry companion.
But painting pet portraits comes with a LOT of pressure to capture a true likeness that does justice to the beauty and personality of your beloved pet.
In this mini-class, I show you how I created a larger-than-life French Bulldog painting in realistic watercolour.
Pets with black or white fur can give an added painting challenge, so I’ve chosen a black-and-white subject for this dog portrait to show you how to paint black fur AND how to paint white fur using watercolour.
I also share in detail my technique for painting the all-important eyes in this watercolour French Bulldog , which can make all the difference to capturing a likeness and bringing life to a portrait.
I hope this mini-class has given you the confidence and inspiration to create your own watercolour dog portrait using my techniques.
The Frenchie in my dog painting had short fur, so I used short brushstrokes. If the animal you want to paint has longer fur, the techniques I’ve shown you here can be easily adapted by using longer brushstrokes.
And of course, the method I’ve shown you here doesn’t only apply to dog artwork . You can apply it to painting cats, horses, rabbits and other furry mammals too.
For smaller mammals, check out my method for painting a hamster . And let’s not forget the goldfish !
If you decide to apply these techniques to your own watercolor dog or other pet portrait , I’d love to hear how you get on, so let me know how it goes in the comments below. And do also drop me a message if you enjoyed the video. I love reading them!

Browse more blog posts

So you want to be a painter? Schedule it!

Warm-Up Exercises
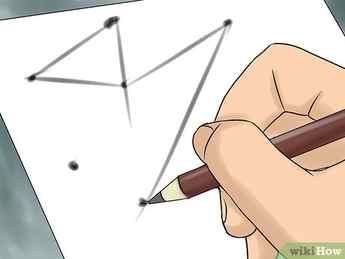
Practice drawing straight lines. Take a piece of paper and draw randomly spaced dots around the edges. Practice drawing straight lines between all the dots––this will come in handy when you are finding the proportions and placing the features of the dog’s head.
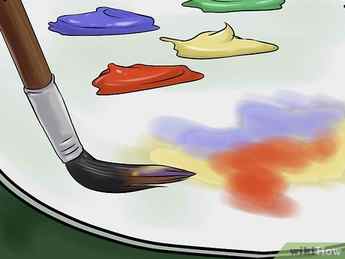
- Even if you work digitally, buy some cheap paints and practice mixing. Being able to identify the mixing components of a color is extremely helpful for matching the colors of your subject.
- If you are doing opaque painting, you need to try coloring on the actual material that you want to paint on. This will allow you to foresee how the material absorbs and paints diffuse which can help you to create different effects.
Advertisement
Part 2
Part 2 of 6:
Sketching
For precise help on drawing actual dog features, see further How to draw a dog. The following sections outlines the generalities involved in sketching before painting.
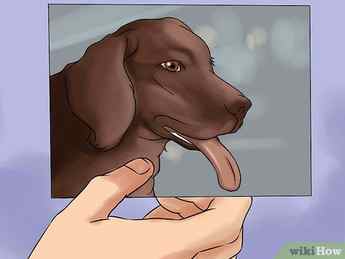
- Choose a reference image that features a single, strong, direct light source that creates a clear separation of light and shadow. You can identify a direct light source by looking for hard-edged cast shadows.
- A simple, uniform background makes it easier to see the outline of the subject.
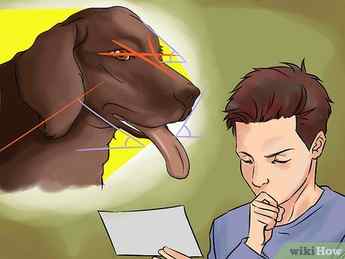
- Look for major lines of action (red lines) such as the center line of the head or the tilt of the eyes. When sketching in other features, compare their placement and orientation to these lines.
- Note the angles (blue lines) that parts of the head make with each other – these angles remain the same regardless of the size of your painting. Pick out spots that are easy to keep track of, such as the points of the ears, the nostrils, and hard corners where the jaw and collar overlap with the neck.
- Negative space (yellow area) is the shape created by the area around the subject. In many cases, negative space is far simpler and easier to judge than the shapes inside the subject.
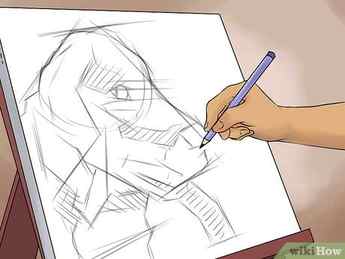
- Draw straight lines between the key features, making sure the angles are accurate.
- Using simple lines makes it easy to adjust proportions before drawing in more complicated forms.
- Resist drawing small details and focus instead on correctly placing the biggest forms.
- The sketch should show accurate proportions. Keep adjusting your guidelines until all the forms are the correct size.
Advertisement
Part 3
Part 3 of 6:
Underpainting
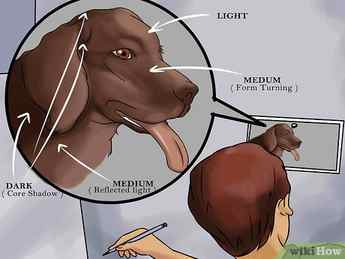
- Planes of the form that are turning away from the light and about to go into shadow.
- Light is bouncing off of objects behind the subject and hitting them from the opposite side, but much less strongly than the direct light. This is called “reflected light.”
- Dark value areas are where the least amount of light is shining on the subject because the planes of the form are tangent to the light sources, so they aren’t getting light from either the front or back. They occur between medium value areas and are called “core shadows.”
- Mix 4 neutral (gray) values: light, medium, dark and a background value. Don’t try to perfectly match any values because this under-painting will be completely covered by the final colors. The different value areas are only an organizational tool.
- Apply the values using the sketch as a guide. Working with only four values makes this step simple and fast.
- Use a large brush.
- If you have trouble placing the medium values, try painting only light and dark first before adding medium.
- Step back 10 feet/3 meters from the painting to get an overall impression. The painting should begin look like a three-dimensional form with light shining on it.
Advertisement
Part 4
Part 4 of 6:
How to paint a dog portrait
16181
STEPS
TOOLS

For almost 20 years my artwork has been published & licensed in a variety of products (cards, calendars, mugs, puzzles, etc) To see all of it check out http://www.RollieBrandt.com

My work place. nothing fancy. My nice husband built me the paint and brush holders which work great. I do not paint vertically on an easel but prefer a drawing table with a slightly angled surface.

I usually have my masonite cut into some of my most common size pieces, gesso them all at once and store ready to use. It’s important to seal the edges too.

On my website you can watch 3 painting videos which I created (using iMovie on a Mac) for more tips and ideas. I have a teaching page there too. I really LOVE painting and am happy to share.
Each artist has a preference of brush size & style, surface, paint, technique and you’ll likely find your niche. I’m showing you the only way I know, having taught myself with no formal training.

Meet one of my new “Grand-dogs” Hurley! I’m painting a small 8″ x 10″ portrait of him as a gift to his family. Once in a while I’ve been commissioned and that size runs about $500.

I start by drawing in pencil on masonite which has been primed using 2 coats of gesso, applied with a fine paint roller, giving it a slight stipple surface which is nice to paint on.

These are the colors I will use (plus Cobalt Blue which I added after this photo) I’ve always mixed colors by sight, usually using just these basic color “ingredients.”

I’m a “mom” so I chuckle at my use of basic simple kitchen items. Aluminum foil, plastic wrap, cut off plastic Miracle Whip jar, cardboard.

I wrap cardboard in foil for my palette.

I love to start with the Dog’s eyes. These are the colors the eye will require.

Starting the eyes.

I use some tiny round brushes. And you can see they’ve seen some use.

It’s fun to paint the eyes first and have the eyes looking back at me for the rest of the painting.

I use my own photos for reference.

Hurley is showing the whites of his eyes, but if you study the photo you’ll notice the “whites” are ever so slightly pink. 90% of being an artist is SEEING!

Time to start on the face and ears.


Base coat of color here and there.


Takes time with a tiny brush.

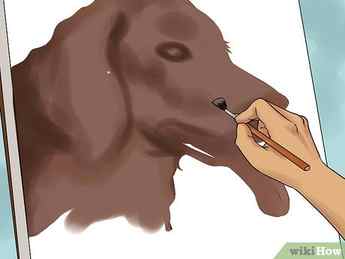
Time to start on the nose and muzzle.

There is a lot of blue hidden among the brown and black.

Time out to develop the background. Often with my dog portraits I use white with a little shadowing. These are the only paintings I don’t do background first on.

I sign bottom left or right and not too bold. I try to somewhat compliment the painting color. Sometimes I sign before I’m finished like with this one.

I chose a white background but want a shadow under Hurley so he doesn’t appear floating in space.

His toenails are actually bluish black.

His face is the focal point but I chose to show his stocky little body and cute short legs.

And the back paw. The finished painting will have painted edges and be given along with a decorative easel to sit on a shelf rather than be framed.

I always put up a finished painting for a day or so to look at it for things that need fixing. Then tweak here and there. Give it a final spray coating to protect it. I use Kamar Varnish Spray.


