Then place your sheet of graphite paper under the traceable and trace your penguins onto the canvas.
Painting Penguins Tutorial

I’m out of touch with what teenagers like now a days! Something to eat or spend if I remember correctly?
Step 1

Cut a piece of wallpaper – big enough to wrap the chocolate bar. Most of us like to squeeze or shake Christmas presents, chocolate bar squares are easy to guess what they are – optional suggestion wrap the bar in bubble wrap and cut the wallpaper bigger to accommodate the extra size.
Step 2

Sponge basecoat it with Baby Blue. Crop the digi-stamp using the 2nd penguin on the left hand side, and then enlarge it to 18cm H – 15cm W. Trace and transfer the penguin in the centre of the wall paper.
How to Draw a Penguin Step by Step with Artistro
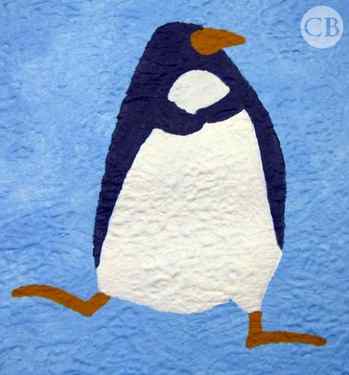
Continuing the topic of step by step guides, today we want to bring to your attention a detailed lesson on how to draw a penguin. Our article will help you learn how to draw a penguin in 8 easy steps. This guide is suitable even for the smallest children.
Prepare the supplies you need for the lesson:
- a lead pencil,
- an eraser,
- paper,
- Artistro acrylic paint markers.
Penguin drawing step by step
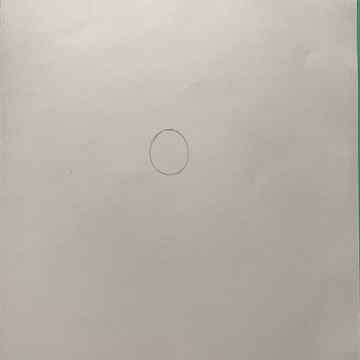
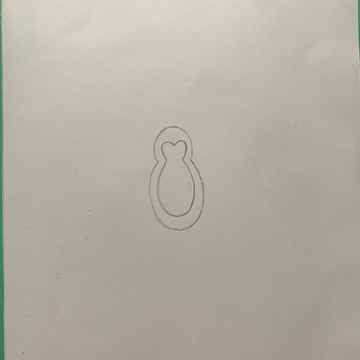
Step 1 – Draw the base of the head
First you need to sketch the base of the head – for this draw a circle of irregular shape.
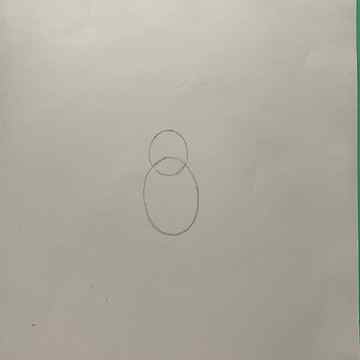
Step 2 – Draw the base of the body
Draw the base of the torso at the bottom in the form of an oval, intersecting with the circle drawn before.
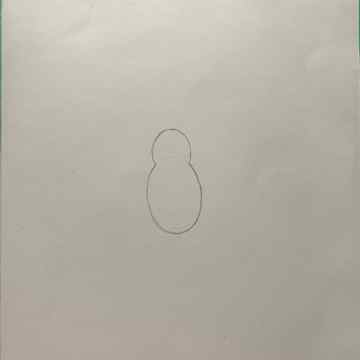
Step 3 – Erase the extra lines
After that, remove additional construction lines using the eraser. This will give you a combined penguin outline of his body and head.
Step 4 – Draw the belly and face
Draw a heart-shaped face of a penguin inside the formed figure, and then – his belly. See in the picture how to draw a penguin easy by tracing inside an open oval with a pencil, parallel to the large oval of the body.
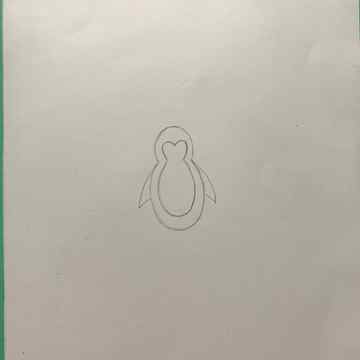
Step 5 – draw the penguin’s wings
Then draw two rounded acute triangles on the sides of the body – these will be the wings.

Step 6 – draw the penguin’s legs
Draw the penguin’s legs under the outer large oval of the body.
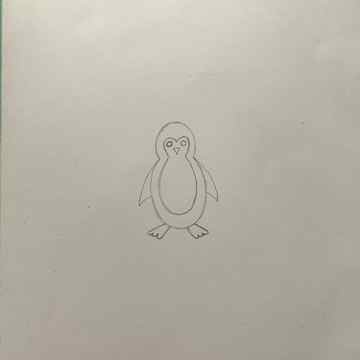
Step 7 – draw the eyes and beak
At the end, draw a small triangle in the middle of the face (this will be the beak) and two small circles (these will be the eyes) to complete the sketch. This is how to draw a penguin step by step. The only thing left to do is to color the drawing. You can use this sketch to create a few different colorful penguin drawings.
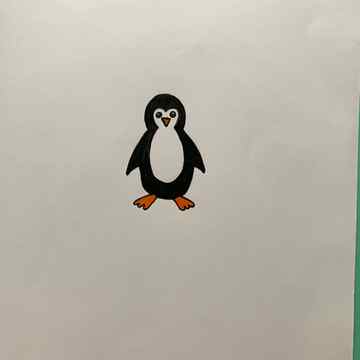
Step 8 – Paint the penguin drawing
Color the penguin’s body and wings with a black marker. Use an orange marker to tint the penguin’s beak and legs. Finally, trace the outline of the beak and legs with a black marker to highlight these elements, and tint the eyes, leaving two tiny empty spaces inside them to create the effect of eye glare.
10. Paint the ice skates

I chose phthalo blue for the mommy ice skates and brilliant purple for the kid penguin iceskates. I also used a #4 round brush. Start by painting the shoe of the skate.

Then mix black and white together on your palette to make gray. Paint the blade of the skate in.


Optional: To add more details to the skates, use titanium white to paint three curved lines for the laces. Also paint a white highlight line on the blade of the skate.
11. Use a #4 round brush to paint skate lines on the ice.

Mix primary blue and titanium white (about equal parts) to make a light blue. Use your #4 round brush to paint wavy skate lines. It may also help to water this down slightly to get it to flow better for these lines.

Connect the two canvases together to make the skate lines match!
12. Paint Trees

To paint the trees, I used a #4 round brush and the colors dark green permanent and titanium white. Start with dark green permanent and paint an outline of a tree.

Paint the tree in solid with the dark green permanent by painting downward strokes with your round brush.

Then dip your brush in titanium white without rinsing the brush. Start at the bottom of your tree and paint downward strokes. Work your way to the top of the tree.

That white will mix with the dark green permanent and make the tree lighter so you can see it better and so it looks like it has snow.


For the trunks of the trees, I used mars black.


