Another way to create depth and distance in a painting is to use different values. Values are the lightness or darkness of a color. For example, you might want to use a light value for the sky in the distance and a dark value for the sky in the foreground.
How To Paint Trees In The Distance
When painting trees in the distance, it is important to remember that they will look different than the trees in the foreground. In the distance, the trees will be smaller and their branches will be less distinct.
To paint trees in the distance, start by painting the sky. Once the sky is dry, use a thin brush to paint the outlines of the trees. Make sure to use a light blue or green color for the sky, and a dark brown or green color for the trees.
Once the outlines of the trees are done, start adding the details. Use a thin brush to add the branches and leaves, and make sure to use different colors for the sky and trees.
Finally, add a few Highlights to the trees to make them look realistic. Use a white or light blue color for the Highlights, and make sure to add them to the tops of the trees and the edges of the branches.
Understanding Perspective in Painting Trees in the Distance
In order to paint trees in the distance convincingly, it is important to understand perspective. In particular, you need to understand how to create the illusion of depth or distance.
One way to create the illusion of depth is to use perspective. Perspective is the way that objects appear to get smaller as they move away from the viewer. This is because the objects are actually getting smaller, but it also looks like they are getting smaller because of the way our eyes perceive them.
In order to use perspective to create the illusion of depth, you need to use vanishing points. A vanishing point is a point on the horizon that objects seem to converge to. In other words, it is the point at which all the lines in a scene appear to meet.
You can use vanishing points to create the illusion of depth by drawing lines from the objects in your scene to the vanishing point. The lines will appear to get smaller as they move away from the viewer, creating the illusion of depth.
It is important to note that not all objects in a scene will have the same perspective. For example, taller objects will usually have less perspective than shorter objects. This is because taller objects are further away from the viewer, and therefore appear smaller.
It is also important to use perspective correctly when painting trees in the distance. In order to create the illusion of depth, the trees should be smaller than the objects in the foreground. This is because the trees are further away from the viewer, and therefore appear smaller.
In order to create a realistic scene, it is important to use perspective correctly and to make sure that all of the objects in the scene have the correct perspective. If you want to paint trees in the distance, it is especially important to understand perspective and to use it correctly in your painting.
Selecting the Right Brushes and Materials
When you are painting trees in the distance, it is important to select the right brushes and materials. This will help you create a realistic and believable painting.
One of the most important things to consider is the type of brush you are using. A good brush for painting trees in the distance is a flat brush with a long bristles. This will help you create soft and natural looking trees.
You will also need to select the right paint. A good paint to use for painting trees in the distance is a light green or blue. This will help create a realistic and believable painting.
Once you have selected the right brushes and materials, it is important to practice. This will help you create a realistic and believable painting.
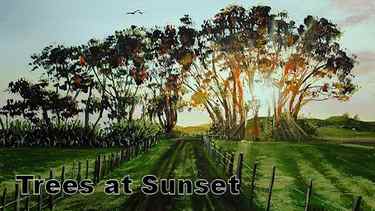
Class Description
In this acrylic painting lesson we will paint a beautiful scene with the sunset shining through the trees.
During the class you will learn:
1) How to paint sunset skies
2) How to paint distant hills bathed in sunlight
3) How to paint trees that look like the sun is streaming through them
4) How to paint foregrounds low light
5) and much more.
Latest Reviews
Amazing tutorial! Awesome reference pic and even better end result in the painting. I just loved doing this one and all my family and friends love the painting. Thanks a million to Nolan for this awesome amazing fantastic gift of art!
Cheers!
Dolly Mauji

Unlock the Follow Along Class HERE
Short Class Video
Painting the sky and clouds
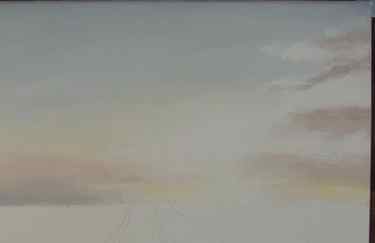
We will start at the back and work our way forward.
For the sky I use paynes grey and white gradually lightening the colour towards the horizon. As I near the horizon I start to add touches of cadmium yellow to the mix.
For the clouds I add more cadmium yellow and cadmium orange into the sky mixture.
I paint the clouds using small amounts of paint at a time to help create the transparent effect in the clouds.
I am also very careful to avoid the white area by the sun. If we contaminate this area it will be very difficult to lighten it again.
To show the sun is low on the horizon I paint the top of each cloud darker than the bottom.
Painting the distant hills
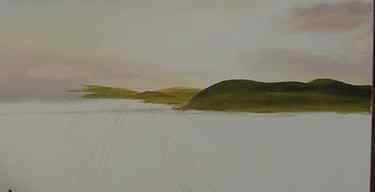
We can now start painting in the distant hills.
For that I gradually add yellow ochre to cadmium yellow to darken the hills as they come closer.
For the hills in the mid distance I add sap green and paynes grey to the mix.
As they are far away I don’t try to add any details to the hills.
Painting the trees
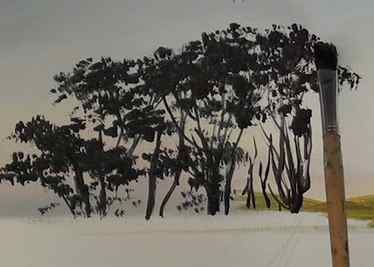
We can then move on to the trees.
I start with neat paynes grey and paint the clumps formed by the leaves.
To get this effect I use an old bristle brush which has it hairs all splayed out.
If you don’t have an old brush like this you can make one by smashing an existing brush hair first onto the table.
I paint from left to right as the colours need to lighten as we get closer to the sun.
I also add the branches of the trees using a rigger brush as I work.
As you can see I am merely using the photo as a reference and not trying to paint the trees exact.
As with the clouds I avoid the sun area.
Painting the sunset colors in the trees
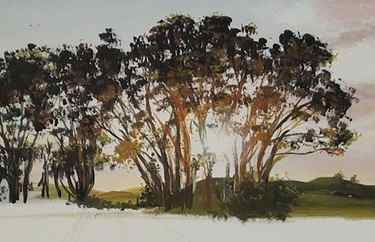
The light from the sun is infusing with that of the trees making them appear lighter and lighter towards the sun.
Directly against the sun, the sunlight is so bright that we cannot even see the branches.
To create this infused light effect I will gradually use lighter and lighter paint as I get closer to the sun.
To the paynes grey I first add cadmium orange and then cadmium yellow in order to lighten it.
The brown then lies on top of the black, the orange over the brown, the yellow over the orange and so on.
This turns our flat, silhouetted trees into ones that have lovely depth and dimension.
Don’t forget to fade out the amount of lighter colours you use as you move away from the sun.
Dry the trees using your hair dryer before moving on to the next step.
To add a glowing effect to the sun I glaze some white over the sun area and fade it outwards over the trees. We can then glaze in a few rays of light streaming outwards as well in order to complete the infused light effect.
Painting the road and the reeds
We can now add the road to the left using some of the brown colours on the palette and block in the silhouette of the reeds on the right hand side.
The reeds are painted using a rigger brush and gradually lighter tonal values. I have used dirty grey and yellow paint mixtures in this area.
Paint the leaves going upwards long and the ones coming towards you shorter in order to create a foreshortening effect.
Painting the field
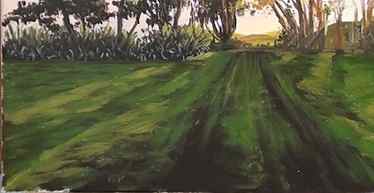
Now we can start to paint the road and the field.
Both are rough and muddy so I add some orange into paynes grey to mix a very dark muddy colour. I add a few muddy patches in the grass area and block in the tracks with this colour.
We want to gradually build up a rough and mottled effect in the grass areas.
We do this by gradually adding lighter and lighter greens over each other.
These are laid down using a rough scribbling motion with new strokes overlapping the previous ones.
Notice how I am also starting to create the shadows and highlights on the right-hand grass to indicate the sun streaming through the trees.
The colours I have used are paynes grey, sap green, cadmium yellow and white.
To create the muddy tracks in the path I use a grey and a soft filbert brush to paint tracks along the length of the road.
I then add random horizontal dabs over the tracks and mud to indicate the tread from the car tyres.
At this stage the painting was dried using a hair dryer.
I then added a cadmium yellow glaze over the grass in front of the sun in order to get an infused light effect in that area.
Adding detail to the painting
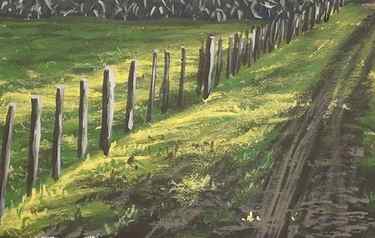
In order to create the illusion of distance in the painting we need to add small details to the foreground which then recede into the distance.
I use sap green and a cadmium yellow and white mixture to squiggle in the impression of blades of grass in the foreground, adding less and less as I move upwards.
The fence poles are added using raw umber.
To get their perspective correct paint them longer and further apart in the foreground and smaller and closer together as you move into the distance.
The poles are highlighted by adding white to the raw umber.
The wire is added using neat white and a rigger brush.
I complete the painting by adding a few birds in the sky.


