The next step is reserved for a Dead Color Layer, or a similar monochromatic, Grisaille stage of painting. Then follows Underpainting in Colors; however, we call it Underglazing if the painting is completed with glazes. This step is followed by more detailed work in colors; in the case of the Alla Prima method, this is the only step required to create an artwork. And the final step is Glazing, which can enrich the painting and make colors vivid and create irreplaceable optical effects. You need to keep in mind that before moving on to each step, the painting surface has to completely dry. As you can see, it’s possible to skip some of the steps. In each case, you can achieve a different visual result. For practice, we are going to take this drawing sketch and create paintings using different techniques. This is a great exercise to help you understand various options within the Flemish Method.
Oil Painting for Beginners – Online Workshop
Katie Jobling’s Oil Painting for Beginners Workshop is now open and it’s completely FREE to watch and paint along! Katie is a UK-based artist who believes art can have a tremendous effect on our emotional well-being. Katie has a fascination with colour, and she’s teaching us her top tips in this series of four video lessons.
Dive into the world of oil painting; a beautiful medium that was favoured amongst the masters. Together we will create some beautiful works, which will help you grow in confidence while deepening your understanding of oil painting. You will learn about mixing colours, building layers and the secret to oil painting success.
You can watch the video lessons here. The supply list is available on the workshop site so you can get all the materials needed to follow along.
SUPPLY LIST
Surfaces
As the foundation of your artwork, your surface is the natural place to start and plays a huge role in the success of your artwork. Always choose a quality paper or canvas that allows multiple layers and reworking. In this workshop series we will be working with the following surfaces:
- Strathmore 400 Series Oil Painting Paper – Instructor uses 9″ X 12″, any size is okay
- Strathmore Canvas Panels – Instructor uses 11″ x 14″, any size is okay
Paints/Thinner/Oil
- Daler Rowney Georgian Oil Colors
- Titanium White
- Rose Madder
- Vermilion
- Cadmium Yellow
- Hooker’s Green
- Cobalt Blue
- Payne’s Grey
- Daler Rowney Georgian Water Mixable Oil Colors
- Titanium White
- Primary Magenta
- Cadmium Orange Hue
- Primary Yellow
- Cobalt Blue Hue
- Daler Rowney Low Odor Thinner
- Daler Rowney Purified Linseed Oil (optional)
Brushes
- Princeton Aspen Brushes
- Bright Size 4
- Flat Size 10
- Filbert Size 8
- Round Size 4
CLASS LINEUP
► Lesson 1: Introduction to Traditional Oil Paint
Follow along as Katie teaches the basics of traditional oil painting. We’ll look at different painting techniques, how to use a colour wheel to mix colours, with some fun exercises to build your confidence using oils.
► Lesson 2: Beautiful Florals in Oil Paint
Together we’ll create a beautiful floral oil painting. We’ll cover lots of painting techniques, at an easy pace for beginners. By the end of the lesson, you will have a painting you can be proud of.
► Lesson 3: Introduction to Water-Mixable Oil Paint
We will look at the basics of water-mixable oils and how to use them. We’ll also consider the benefits of water-mixable oils and what differentiates them from acrylics and regular oils.
► Lesson 4: Stunning Seascape in Water-Mixable Oil Paint
Together we will create a stunning seascape in water-mixable oils. You will learn painting techniques, whilst gaining confidence with oils & have a beautiful painting to hang your home.
WATCH ALL THE LESSONS HERE
See more from Katie on Instagram
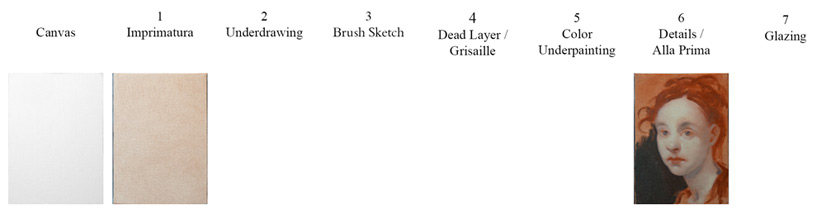
Alla-Prima
The very first technique we are going to look at is Alla-Prima. This is a very simple way of painting in just one layer. You can even continue to paint the following day, while the paint is still wet; this is why the Alla-Prima method is also called the “wet-on-wet” technique. After drying, the artwork surface forms just one unit layer of paint. Alla-Prima is not a multi-layered method. You see, there is no need to use any Underdrawing, Dead Color layers, or other kinds of Underpainting; we start and finish the painting while the paint is still wet.
Alla-Prima with Glazing
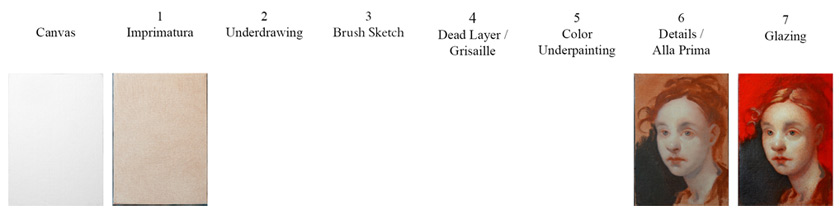
Alla-Prima can be used on its own, but it also works very well with glazing layers on top. Since there is more than one layer that do not intermix with one another, it is no longer Alla-Prima in a strict sense. Therefore, we call this method the “Alla Prima finished with Glazing” to keep the name simple.
Alla Prima over dry Brush Sketch
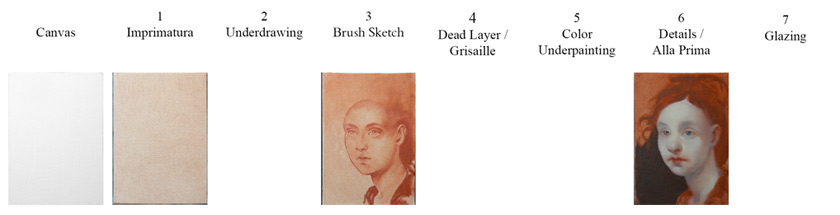
Here, you see another variation of Alla-Prima. It starts with a Brush Sketch over an Imprimatura, so the drawing is ready before you start painting in Alla-Prima. This way, you can concentrate on the colors and tonal values, working over the Brush Sketch.