A few years back, Doug Gray was interested in incorporating his digital photography into his clay work. He tried decals, but it wasn’t the look he was after – he wanted the photos to help him create the images, but he didn’t want the images to look exactly like photographs.
Copying Both Sides of an ID Card onto One Side of Paper
This section describes how to copy the front and back sides of an ID card, or other small document, onto one side of a sheet of paper.
When copying onto A4 size paper, you can copy documents that are smaller than A5 size. Likewise, when copying onto a Letter size paper, you can copy documents that are smaller than Half Letter size.
- This function is only available when the original is set on the exposure glass, not when it is set in the ADF.
- To use this function, the paper size used for printing copies must be set to A4 or Letter.
To use this function, first switch to ID card copy mode for the current job, and then perform ID card copy.
- Press the [Reduce/Enlarge] key.
- Press the [Reduce/Enlarge] key or [] [] keys to select [ID Card Copy] , and then press the [OK] key. The machine is now in ID card copy mode. Proceed to the following steps to perform the ID card copy.
- Place the original front side down and top to the machine rear on the exposure glass. Place the original in the center of the A5/Half Letter scan area.
- Press the [B&W Start] key or [Color Start] key. A message prompting you to place the original back side down on the exposure glass appears on the display.
- Within 30 seconds, place the original back side down and top to the machine rear on the exposure glass, and then press the [B&W Start] key or [Color Start] key again. Use the same mode (color or black-and-white) for both sides.
- Use the following keys to cancel settings:
- [] : Cancels the changes made to settings and returns the display to the previous screen.
- [Clear/Stop] : Cancels the changes made to settings and returns the display to the initial screen.
- When no input is received for the period of time specified in [Auto Clear] while the initial screen is displayed.
- When the [Clear/Stop] key is pressed while the initial screen is displayed.
- When the machine’s mode is changed.
- When the power is turned off.
- For details about [Reduce/Enlarge] , see Copy Settings.
- For details about [Auto Clear] , see Administrator Settings.
Image Transfer onto Clay the Easy Way
The process used here works best on soft clay and can be applied to any handbuilt or thrown clay surface provided the clay is reasonably soft. In the wet state, there’s enough water present in the clay for the transfer to readily occur. No water or solvents are needed. The same process can be used to apply imagery to leather hard and even bisqueware. However, with the diminished water content of drier clay, you’ll need to add additional water to make the transfer work successfully. We will only discuss transfers on soft clay here. You can create computer-generated imagery with a digital camera and software such as Adobe Photoshop. The key is to print your images with a water-based ink, such as that used in most inexpensive inkjet printers rather than screen printing on clay. When developing images for ink transfers on clay, the cheaper the better. You don’t need an expensive printer and you definitely don’t want archival ink and paper. I use regular ink cartridges, all-purpose or copier paper, and an inexpensive inkjet printer. If you prefer to work without a computer, see the image below for various water-based inks and their results. Or see this article from the archives on image transfer paper for ceramics.
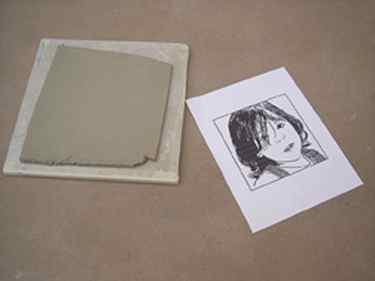
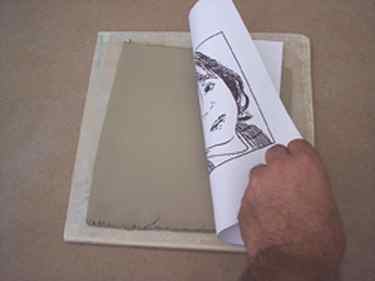
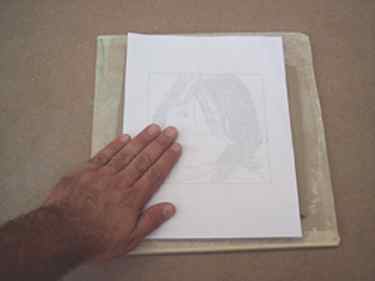
Begin with a freshly rolled slab and a print from an inkjet printer. The digital photograph used here has been altered in Photoshop, reducing the image to basic black and white line and shape. Use non-archival ink and multipurpose paper in your printer to assure that the ink will bleed when wet (figure 1). Lay the image face down so that the ink comes in contact with the moist slab (figure 2). Soft slabs have a very high moisture content so no additional water is needed, but too much water can be a problem. Experiment to find the optimum water to clay ratio.
Transferring Imagery to Pottery
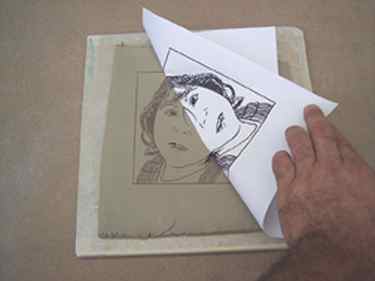
Rub the paper into the surface of the slab (figure 3) to eliminate any air pockets that might prevent the moist clay from coming in contact with the printed image. Allow the print to remain in contact with the slab for 30-60 seconds until the ink bleeds onto the clay surface. Peel back a corner to see if the ink has transferred (figure 4). If so, peel the paper up entirely from the slab of clay. If not, let it sit a few seconds more.
Note: If you can’t get the ink to transfer onto the wet clay, check the type of ink and paper. High-end, archival products that are designed not to fade or bleed and laser prints and Xeroxes don’t work for this process.
Setting Up
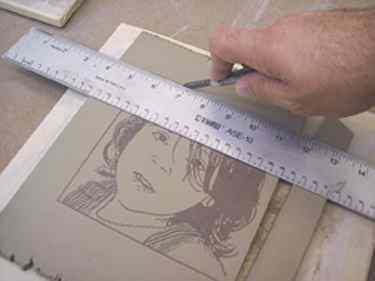
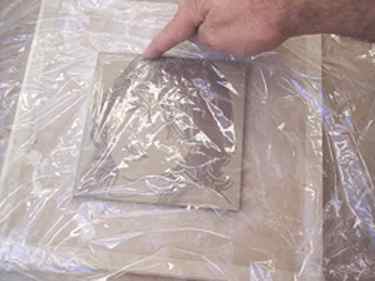
Manipulate the clay while it is still soft and pliable. If making tiles, trim it to size (figure 5). Tip: Place the straight edge over your image as you cut, so if your hand slips, you won’t cut into your image. Place a thin sheet of plastic over the slab and rub the edges gently with your finger to produce a consistent rolled edge without marring the image (figure 6). If you prefer to allow the slab to dry slightly, place it on a piece of drywall and cover with plastic (figure 7). Moisture will condense on the plastic and blur your image so prop the plastic on stilts to keep it from coming in contact with the surface.