Watch how can you achieve that by editing the image here:
How To Enlarge A Photo Without Compromising Its Quality
Have you tried to enlarge a photo but ended up with a blurry, pixelated mess and wondered if there is any hope for showcasing your favourite memories on the wall in full size? The truth is—once you resize the photo, it’s never going to be the same. Increasing the photo size comes with inevitable quality loss because you’re altering pixels images are made of.
You’re either stretching the existing pixels, or the editing software is guessing and adding new pixels based on surrounding ones to create a larger image that still looks natural.
But you can salvage all those great photos you took with your phone and would love to see printed in larger formats or even old photos you want to show off in all of their glory.
Which Photo Enlarging Software Should You Use?
Your options include:
- Photo editing software
- Photo resizing sites
- Plugins for Photoshop
Some of these digital photo enlargement options are easy and intuitive, while others require extra editing and advanced technical skills.
How to use photo editing tools to enlarge photos digitally without sacrificing quality? Should you use Photoshop or let AI do all the work for you?

Can I Enlarge My Photo Without Losing Quality?
Consider the Image Quality Of Your Starting File
Before you jump right into editing software or instant resizing websites, consider the photo file you have— its limits due to quality.
Resizing results will depend on the following:
- Original image resolution
- Details on the image
- Digital image or scanned physical photos
High-Quality Resolution for Photo Enlargements
High photo resolution is considered to be 300 dpi (dots per inch on printed image). When setting the width and height when enlarging a digital photo, this resolution might drop, making the image low quality. Starting image resolution limits to which extent you can enlarge the image. Enlarged pixels highlight the poor quality of your image and result in a blurry image. Enlarging the image without losing quality should always be the goal here.
Pro tip: you can get away with a lower dpi than 300 for prints that are larger if the viewing distance is more than arm’s length. It won’t be blurry if you downgrade to 150 dpi.
Details On Images
Images with many intricate details also emphasize the poor quality of the image after you alter the image size. You’ll have to edit the image in software, before printing to avoid blurry letters. Format (raw, jpeg) will also determine the extent to which you can stretch the image without losing details.
Photos taken with a mobile phone that result in low-quality images in jpeg format differ from professional camera photos shot in the highest quality raw image file that you can scale all you want.

Can You Enlarge Old Photos?
It’s possible to enlarge a picture of old photos and turn them into quality prints. You’ll have to scan them at the highest resolution available for a larger photo print (600 ppi-1200 ppi). However, to keep the quality following the scanning, don’t enlarge them to more than double their size—aim at 10%. Going overboard with the largest size will cause blurry prints.
The same applies to old photos that are stored digitally but were taken before you got your hands on better equipment or captured them by mobile phone camera.
How to photo-print (or print) a properly-sized reference scale
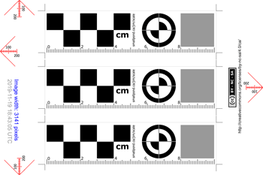
The goal is to make a photo-print (or print) with the scale being exactly 10 cm long.
Printing to a standard desktop printer (rather than sending the file to a photofinisher) is straight-forward: Print a ‘standard size’ image file obtained below. Printed ‘actual size’, it should appear with the scale 10 cm long. The standard size image has a DPI setting of 200 dots/cm = 508 dots/inch.
Photo-printing using a photofinisher yields a better grey square. This would be easy too if photofinishers printed our images sized perfectly to a 4×6 print, but they don’t; it’s too difficult to align images exactly with the print boundary. So instead they project the image upon an area slightly larger than the print. That means we cannot predict the result and need to check the length of the scale as it appears on the received photo print.
When the photo print is received, use a ruler to measure the 10cm scale on the print as accurately as possible (you should be able to estimate fractions of a millimeter and thus get centimeters to two decimal places, eg., 10.13 cm). If the printed scale is as close as you’d like to 10 cm, you’re done! Just use scissors to cut out the scales. Otherwise, you can adjust the image size and reprint it, using the custom image generator below.
Reference scale generator/downloader
Use the buttons below to generate and download a reference scale image file to save on your computer/device. Print the image file, or (better) send it to a photofinisher for printing as a 4×6 inch print. Matte finish reduces glare and fingerprints.
Choose this if you haven’t already tried printing a scale.
Download a standard-size image file
Custom size
Choose this if you printed a scale and it was not exactly 10 cm.
Measured length of scale (cm), eg., 9.75
Image width (pixels), as displayed on your print (blue)
Download a custom-size image file
Suggestion: Photo prints are inexpensive, so rather than sending just one file to the photofinisher, perhaps send several, each a slightly different size, to increase the chance that one of them will be printed with a scale exactly 10 cm. For example, to make three files with scales differing by one millimeter, use ‘custom size’ with these pairs of values:
9.9
3141
10
3141
10.1
3141
(The width of 3141 px is the ‘standard size’, thought to be most likely to result in a 10 cm print.)
Photofinisher printing machines are usually stable, so when you get one well-sized, it will probably reprint at that photofinisher without need for further adjustment (assuming all machines at that service are set up similarly).
The red ‘arrows’ are cropping indicators; they provide information, just for interest, about how much of the image was cropped by the photofinisher. Their scale is in pixels.
Use scissors to cut the reference scales from the print along the guide lines and at the base of the millimeter scale.
How to use the scale (main page)
This work is licensed under a Creative Commons Attribution-NonCommercial-ShareAlike 4.0 International License.
Solution 2. Enlarge a Picture using GIMP
Another image enlarger is GIMP. It’s free and open-source available for Windows, macOS and GNU/Linux. GIMP also is the best alternative to Photoshop. It offers you the ability to do image manipulation including picture enlarger.
Here gives a step-by-step guide on how to enlarge a picture for printing.
Step 1. Launch GIMP and navigate to File > Open… to import the target picture.
Step 2. Then open the Scale Image dialog box by choosing Image > Scale Image.

Step 3. In this dialog box, type the desired dimensions in the boxes and click the Scale button to upscale the picture.
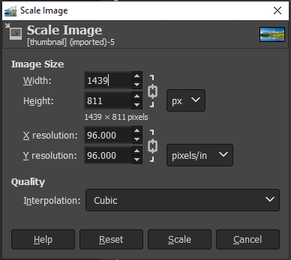
Step 4. Go to File > Export As… to save the enlarged picture.
How do I Create a URL for an Image in 2 Ways
How do I create a URL for an image? If you have the same question, you’ve come to the right place. This post presents how to get an image URL in 2 ways.
Read More
Solution 3. Enlarge a Picture using Paint
Microsoft Paint is a tool that allows you to resize, crop pictures, and add text on pictures. It also comes with some basic editing tools.
Below are the steps on how to enlarge a picture for printing.
Step 1. Find the image you want to enlarge and open it with Paint.
Step 2. Click on Resize to open the Resize and Skew window.
Step 3. Here you can enlarge the picture by percentage or pixels. Afterward, click OK to apply the change.
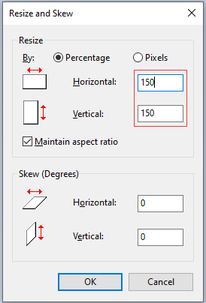
Step 4. Navigate to File > Save as to save the picture.
Solution 4. Enlarge a Picture using Image Enlarger
If you want to enlarge a picture to poster size without the need of software, try Image Enlarger. It’s a free online image resizer that can enlarge a picture to a specific size.
To make image larger, follow the steps below.
Step 1. Go to the Image Enlarger website.
Step 2. Tap Select Image to import the picture.
Step 3. Then move the slider to the right or enter the desired percentage (or dimensions) to enlarge the picture. Click Enlarge Image to continue.

Step 4. Finally, click on Download Image to save the enlarged picture.