Refunds (if applicable)
Once your return is received and inspected, we will send you an email to notify you that we have received your returned item. We will also notify you of the approval or rejection of your refund.
If you are approved, then your refund will be processed, and a credit will automatically be applied to your credit card or original method of payment, within a certain amount of days.
Unique and Authentic Day of the Dead Shadow Box 100% Made in Puebla, Mexico
– At Lolo – Mercadito we are committed to acknowledging the nature of each product. With each purchase, you are getting a unique and authentic piece that was handmade with love by artisans from Mexico. For their artisanal nature, there might be some flaws and variations in color, measurements, and design.
Care Instructions for all Products
If you do not see your product listed below, make sure to check the product’s page where we have specifications for each product’s care. If the answer is not there, please reach out to us!
HI! Thank you for visiting our Care Instructions Page. We know artisanal products may require some special attention to be able to preserve their beauty, and, because of their artisanal nature, they do not include a “care instruction label”. This is why we created this page that will hopefully answer all your questions, which include recommendations that artisans have shared with us concerning caring for your products. Do not hesitate to reach out to us if you have more questions, we would be glad to help however we can!
Embroidered clothing and textiles:
Our recommendation for all artisanal clothing is to hand wash with cold water, turned inside out and lay flat to dry without wringing. If necessary, iron on low with a protective cloth on top of the garment. If there is a need to machine wash, please do so on a garment bag on delicate settings and only air fluff on dryer machine.
Pro tip from artisans for Otomí embroidered products:
If, for some reason, there is some color run, boil some water on your stove top and, using tongs being careful not to burn yourself, submerge the piece entirely in it and move it around so that it looses the dye. We’ve tried it and it works!
Deshilado:
Hand wash with warm water, hang to dry or lay flat, do not wring. Optional: iron with starch to achieve a whiter, firmer look. Store in a dry, dark room, preferably in a protective layer such as bag or old cloth.
Clean with a dry white cloth. Store in a dry place, avoiding humid spaces, sunlight, or extreme heat. Not dishwasher safe. DO NOT MICROWAVE!
Art with Alyssa: Día de los Muertos Nichos
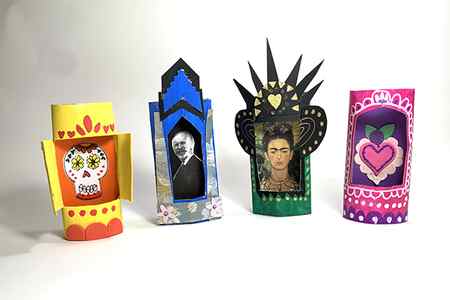
Celebrate Mexico’s Día de los Muertos (Day of the Dead) by creating a personal nicho. A nicho is a small shadow box that features a scene, images and items that are special to the person who creates it (photos of a loved one, a piece of jewelry, a mini toy, etc.). Many ofrendas (Day of the Dead altars) include nichos as a way of paying tribute to loved ones who have passed away. Below are two ways to make nichos using recycled materials: the first project uses empty cardboard toilet paper tubes and the second uses a recycled mint tin.
Discussion Points for Teachers/Parents
- Talk about things you love. What might you want to put in a special place of honor?
- Discuss recycled materials and using found objects to create art, collage and color.
Supplies
- Cardboard toilet paper tubes
- Small cup of water
- Tempera or acrylic paints (assorted colors)
- Paint brushes
- Scissors
- Colored paper or cardstock
- Markers or paint markers
- Things to decorate with: glitter glue, small plastic gems, sequins, stickers, paper or foam shapes
- An image to put inside your nicho—photo of a loved one, image of a famous artist, image of a sugar skull, a drawing or heart collage—it’s up to you! Image size: approx. 2” wide x 3½” long
Directions
- Cover workspace with a large paper bag or plastic cloth.
- Paint cardboard tubes with preferred bright colors and allow to dry. Pro tip: If you paint the tube white first, the colors will be a little brighter.
- Decide if you want “doors” to the opening, then proceed one of two ways:
If no doors: To cut the window, gently fold the tube in half and cut a rectangle shape that is approximately 1”x 2”. Optional: Alter the shape of the opening by rounding the top cut or making it pointy.
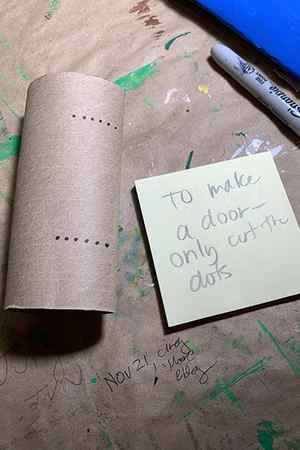
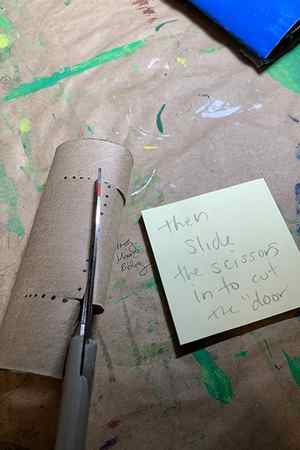
If you want “doors”: Cut a parallel top and bottom slit for the intended opening, then slip your scissors into the slot and cut down the center, leaving doors attached on each side. Fold back the doors to open. Be sure to paint the inside of the doors and allow to dry.
- Decorate the outside of the tube using whatever decorative items you chose: cut paper shapes, stickers, sequins, markers, etc.
- For the image, cut a piece of paper or cardstock that will fit inside the tube, about 2” wide and 3½” long. Glue the photo or drawing to the inside center of the tube. Adjust the image by sliding the paper so that the image can be seen through the opening.
Alyssa Navapanich is an award-winning art educator who teaches art to elementary school kids in East San Diego County.
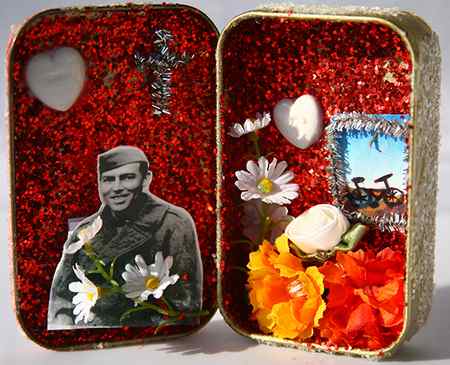
- Mint tin or jewelry-size cardboard box
- Scissors
- White glue
- Paintbrush
- Small paper cup
- Special items to put inside (small toy, photos of a loved one, a drawing, etc.)
- Decorative collage items such as buttons, beads, silk flowers, glitter, colorful paper scraps, lace or Washi tape
- Pour a small amount of white glue into a paper cup. Using a paintbrush, paint the glue on the outside of the box and sprinkle with glitter.
- Once dry, repeat step one for the interior of the box if desired (and allow to dry completely), or line with Washi tape.
- Use glue to adhere flat collage items (paper scraps, lace and photos) to the interior.
- Glue chosen small objects (flowers, toy, jewelry) inside the box to create your display. Overlap with flat items, if you wish.
- Glue desired decorative items (beads, lace) onto the outer edges or corners of the box.
- Once it dries completely, put it in a special place in your home.
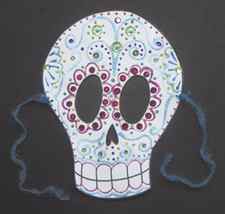
Learn how to make a “sugar skull” mask with white cardstock here.
Alyssa Navapanich is an award-winning art educator who teaches art to elementary school kids in East County.


