Thank you so much for following along with me. I LOVE to see what you create, if you share on Instagram please tag @thepigeonletters and @LavenderAndSea so I can see what you have created!
Techniques For Showing Heavy Snow
This is the same tree as in A but with a heavy snow. I proceeded as before with a 2B graphite pencil to sketch in the trunk and limbs, but this time I left more white space to indicate the heavier snow. Notice that I’ve included snow on the trunk of the tree. When you have a heavy snow, blowing wind produces this kind of buildup. The dark shading was done with a 6B graphite pencil.
Drawing D, containing the same elements as drawing B, shows the difference between a light snow and a heavy snow. The background, which was darker before, is now lighter to show that the woods have been sprinkled with white snow. The limbs have more snow on them, and their undersides are a little lighter in value to show reflected light from the snow. Notice the buildup of snow on the bark and at the base of the old pine. The trunk was made darker for design impact and to show that it is wet and is darker when you have heavy snow. A few lines in front of the tree, and the drawing is completed. I used Rives BFK paper with 2B and 4B charcoal pencils.

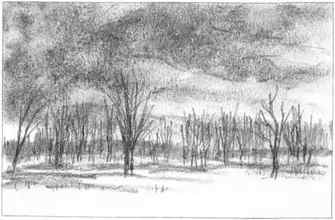

This is a rough indication to help guide me in the placement of elements in the drawing. There’s no sense putting in the foreground trees until the sky is finished, as they would only disappear as I model the clouds.
DRAWING A SNOWY LANDSCAPE
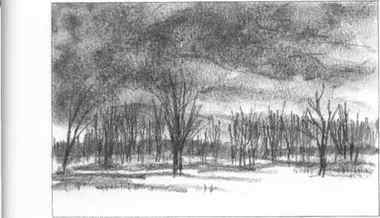
Preliminary sketch
This sketch was done on a piece of vellum layout paper. A 2B and a 4B charcoal pencil and a piece of soft vine charcoal were my drawing tools. These preliminary studies will get your thoughts down on paper, so you can develop a satisfactory composition before starting to work on your finished drawing. As I neared completion, I realized that I needed more snow on the left side. A piece of white pastel enabled me to create snow to my satisfaction.
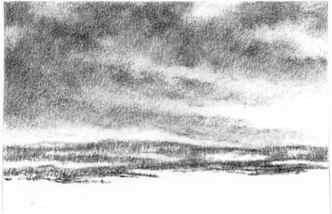
I sketched the clouds in with a piece of soft vine charcoal. Then I blended with the stomp until I had the suggestion I was looking for. This was sprayed very lightly with workable fixative. When dry, a B Wolffs pencil, which is a carbon-based pencil, was used to emphasize the cloud shapes. The fresh, black pencil applied on top of the stomped charcoal base made an interesting texture. At this stage, the patterns of the snow and land were indicated.
I begin to build up the land shapes. Every so often, with a fine point on my pencil, I make some small vertical lines where the land meets the snow. The lines should be irregular, of different sizes and go past the land shape into the snow. This gives the appearance of weeds or shrubs sticking up through the snow. Use a B pencil to work the background trees and parts of the landscape, alternating with a 2B or a 4B pencil to acquire the values you need. I work the background lighter before adding foreground trees and land shapes. This way, I layer elements. The darks in the foreground cover the lighter background values, which gives the picture perspective.
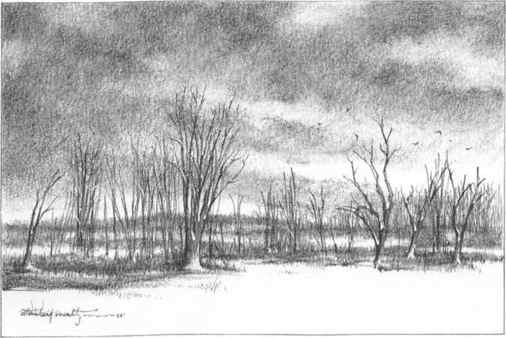
Notice the changes that occurred from the preliminary sketch to this finished drawing. The sky is basically the same except for the addition of some frolicking crows. The landscape was changed to include more snow between the land shapes, and some snow was added to the trees with white gouache. Basically, the positioning of the trees is fairly close to my original conception.
A word of caution: When placing flying birds in your landscape, do not overdo. Incorporate them with the overall design so they don’t look like an afterthought.
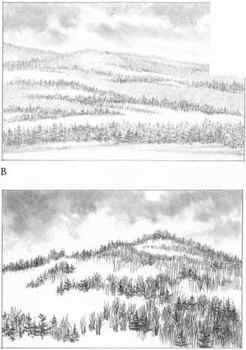
It is not necessary to include every limb of the trees; the vertical lines spotted around give the appearance of many trees on a snow-covered mountain.
Was this article helpful?
Recommended Programs

Pencil Drawing Made Easy

Realistic Portrait Drawing Course
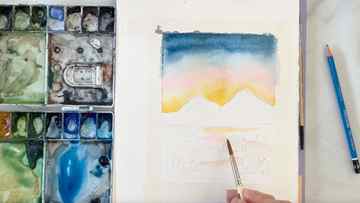
Step 2: Paint the Sunrise

Using your largest brush (6 or 8) fill the sky area with just water. Once the sky area of your paper is completely wet, bring in yellow bordering the mountains. You’ll notice that since your paper is already wet, the yellow paint will bleed into it nicely. Then add in the pink paint right above the yellow. At the very top dab in your blue paint and then with your brush, slowly drag down the remaining color until it touches the pink paint.
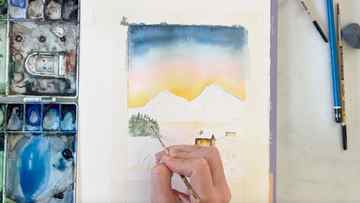
Step 3: Paint the Foreground & Houses
Grab your size 4 brush, it’s time to add in the artwork below the mountains. First add some light washes of pink and yellow into the white watercolor paper – leaving areas of white. This will show how the sunrise is reflecting on the white snow.
Next let’s paint the little houses. Grab a brown color and lightly outline the house with paint. Rinsing off your brush and grabbing just water, lightly touch the brown line around the house to bring the paint into the center of the home. Be sure to leave the roof white, as the roof has snow on it. Paint both houses like this. To add a little whimsy, grab your yellow paint and poke it in where the windows are. Because the paint is wet, this will cause the paint to bleed and the windows will appear “glowing”.
Step 4: Paint the Foliage
Now is time to add in the greenery. Grab your smallest brush (details size) and a green color, start to make little lines in the upper left corner right below the mountains. These should be light, since the trees are further away. Then, using a “scrubbing” motion, add texture to your trees.
Next paint the oak trees on the bottom right side. Grab a brownish green and dab your brush in circular motions to create the circular shape of the trees. Take brown paint and paint the tree trunks with a few strokes.
Lastly, add in the trees who have lost all their leaves. Using your smallest brush, pick up a medium brown on your brush and make the long thin lines of a trunk and thin branches.


