We’d all love a 15ft Christmas tree straight from a Scandinavian forest with lush, emerald pine needles and branches as thick as a giant’s arm. Festive perfection in theory, but in reality? Not practical. For one, shipping a real Christmas tree directly from a Norwegian forest is going to set you back a few quid and frankly that’s money that would be better spent on food or a new Christmas jumper. Secondly, pine needles get absolutely everywhere. And thirdly, who’s got a 15ft high ceiling? For most of us, too much stuff and not enough space means that a gargantuan storybook spruce is something that we have neither the need nor desire for. Even if you do have a cavernous hallway big enough to accommodate a small forest, there must be some compact corners of your house crying out for a bit of festive cheer. To that end, we’ve scoured the net to bring together the ten best DIY space-saving solutions for fitting alternative Christmas trees into small spaces. 1. The Logs and Fairy Lights Christmas Tree For a real rustic-themed Christmas, you can’t go far wrong with some natural lengths of wood and a string of Christmas tree lights. Tack the slim logs to the wall using small pins or picture hooks, then add a few springs of foliage and a string of Christmas lights to complete the look. Make sure you’re using LED fairy lights rather than traditional filament bulbs – this will eliminate any fire risks and will make sure your wall doesn’t end up with any scorch marks. 2. The Logs and Baubles Christmas Tree As above, but perfectly suited to areas where there’s no power socket. Whether you layer your logs parallel to one another as in the first image or angle them to create a tree outline as in image #2, this rustic space-saving DIY Christmas decor idea will suit almost any design scheme. If you did want to add some sparkle to a socketless corner of the room, you could always use a length of battery operated Christmas lights. 3. The Fairy Light Outline Tree No logs this time – just a simple string of warm white Christmas lights and a few picture hooks. You can really get creative with the shape of this alternative Christmas tree too – you could even use a few strings of lights and create a little family of trees side-by-side. For a more modern effect, just switch the warm white lights for some bright white LEDs, and consider a green or black cable if you plan to display your fairy light tree on a dark wall.
How to Draw a Christmas Tree with Lights
And this year, I am adding multiple Christmas drawing tutorials and today I am going to teach you how to draw a Christmas Tree with lights.
All of these Christmas drawing ideas are for beginners.
I’ve already done a few tutorials including Rudolph and a Christmas Pudding and I covered another tutorial on drawing a Christmas Tree with Presents here.
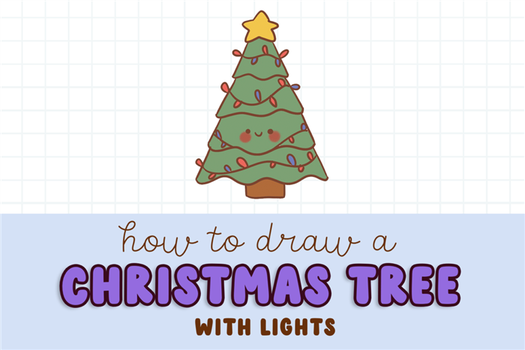
This is what you’ll learn to draw today:

This post includes affiliate links. If you do decide to purchase something, I will make a commission at no extra cost to you. For more information, please read my entire Privacy Policy here.
I am currently using an iPad Pro and an Apple Pencil to create my digital art.
But you can use any tool – a pen and paper or color pencils or Copic markers or Photoshop because the drawing method remains the same.
How to draw a Christmas Tree with Lights – Step by step for beginners and kids
We are going to be using very simple shapes for this drawing tutorial.
Let’s begin with a rough sketch of the tree – for this, we will first draw a very long pointy triangle – this is going to be our Christmas tree.

Next, we will draw a rough sketch of the star on the top – this is going to make drawing the Christmas tree really easy.

We are done with the rough sketch!
Let’s begin drawing the Christmas tree.
Next, draw the star outline using a marker or any drawing tool. We are going to erase the rough sketch later.

Next, draw 2 short lines at the side of the tree under the star.

Now, let’s complete the first row of the fig tree by drawing a wavy line connecting the two short lines like this:

Next, repeat the same process and draw a second row.

Repeat this two more times and you’ll have finished drawing your Christmas tree.

Lastly, draw the bark of the tree.

Now, this isn’t a Christmas tree without decorations.
So, let’s draw some lights on the tree. I’m going to draw a wavy line in the first segment of the tree – note the pink arrow.

Now, add little bulbs (these will be our Christmas lights) all around the wavy line.

Repeat this for the whole tree – I am going to make some space in the 3rd segment, because I want to draw a small face here.

Once you’re done drawing all the lights, draw a small face in the 3rd segment if you like – I like making all my objects kawaii so I do this. You can skip it if you want a plain tree.

Let’s color the Christmas tree and the lights now.
Erase all the rough lines before coloring your tree
First, we’ll start by coloring:
- The tree green
- The bark brown
- And the star yellow


Next, you can color the Christmas lights any color you want. I am going for red and blue because that’s what I used at home when I was little.

You’ve learned how to draw a Christmas tree with lights!
You can draw this on a Christmas card or a sweet Christmas banner.
Drawing Resources
I hope this tutorial was helpful to you and you enjoyed drawing this Christmas Tree with lights.
If you want to see more tutorials on drawing kawaii animals and kawaii things, please leave a comment below on what you’d like to see next!
I will be adding more kawaii drawing tutorials (animals, food, and lots of things) to this blog, so keep a lookout!
If you are interested in drawing in a kawaii style and then selling clipart or merchandise on Etsy, check out this course!
My old bud Ilaria (we’ve been friends on Instagram back when I had Instagram) created this course! I’ve watched her grow from 0 followers, and I’m so, so proud of her!
And believe it or not, there is not 1 single good online course about learning how to draw kawaii art and then making physical stickers on the internet. I’ve been looking for a course like this for a long, long time.
And it’s finally here.
You can create your own stickers and print them and sell them on Etsy or any space! She goes into detail about how to draw the characters.
This is by far one of the best courses I’ve taken that is so cute and so educational.
The course is in English, and it’s amazing!
What do you need?
A sketchbook, Photoshop, and a graphic tablet so that you can draw the kawaii characters. If you want to make stickers, you’ll need a printer and sticker sheets.
Even if you don’t want to make stickers and just draw kawaii characters, this course is perfect!
And if you are really keen on improving your drawings or you want to create cute kawaii animals and kawaii people, check out this second course by Sara.

Sara teaches you how to draw anything in a nice kawaii style. I really love these kinds of courses because they’re so easy to learn and it’s very easy to get clients because this is a really relatable drawing style.
It is in Italian but it comes with subtitles and it’s really easy to follow.
Use code STRAYCURLS-10 to get a 10% discount!
If you are just getting started with ProCreate, I highly recommend this course: Procreate for Beginners: Digital Illustration 101


