For the water droplets, take the Ellipse tool, draw 3 shapes, color them with (63,98,46) dark green; (179,202,109) light green and white, then place them on top of each other like in the image below. Go to Effects/Stylize/Drop Shadow and set the values like you see in the image and then group them all.
Adult Beverage
![]()
Eat, Drink & Be Scary Werewolf
Loading more…

Typography
Product Design

Web Design

Animation
Branding

Mobile

Illustration

Typography

Product Design

Web Design
Animation

Branding

Mobile

Drawing the Glass Shape
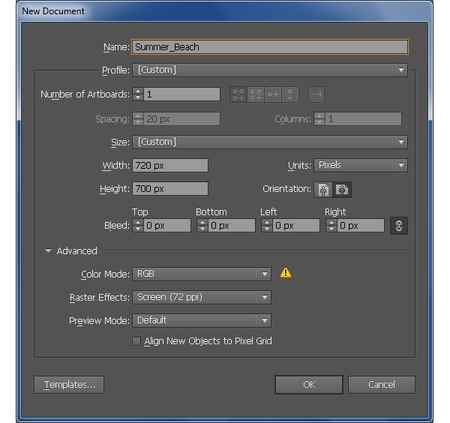
Open a new document, any size, RGB mode. Take the Pen tool and draw the shape that you see in the image below or just draw half of it and then reflect it to be symmetrical, like I did. Fill it with the linear gradient shown. Colors are: (230,230,230) or 10% black; white (255,255,255) and (204,204,204) 20% black.
Now copy and paste in front this shape. Take the Direct Selection tool and select the upper point of the shape and drag it a bit down like in the image. Make the same with the lower point of the shape. Then fill it with the linear gradient shown using the colors: (191,191,191) or 25% black; white (255,255,255) and (230,230,230) 10% black.
Next, copy and paste in front of the shape again and make it a little smaller. Fill it with the linear gradient using the colors: (77,77,77) 70% black; white and (51,51,51) 80% black, then set it to Color Burn. We will use this shape again later to make the liquid inside the glass. You should get something like in the image below:
Drawing the Glass Legs
Now let’s make the ‘leg’ of the glass. Draw the shape from the image below or just half of it and reflect it, then fill it with the gradient shown: (204,204,204) 20% black; (230,230,230) 10% black; white; (242,242,242) 5% black and (153,159,164).
For the ‘foot’ of the glass take the Ellipse tool and draw the shape that you see in the image and fill it with the linear gradient. Colors I’ve used are: (230,230,230) 10% black; white and (178,178,178) 30% black. To create more depth, copy and paste the shape that we just made, fill it with a darker gray and place it like in the image below. Now, the glass should look like this:
Coloring the Drink
It’s time to color the drink. Copy the shape that I said we will use it for this part and fill it the gradient using the colors: (63,98,46); (85,124,62); (168,194,88); (248,211,103) and (251,232,191) or any other colors that you prefer. The original shape, set to Color Burn that we made, has to be on top of this one not the other way.
Next, draw a simple shape like the one below and fill it with a linear gradient using the orange from above and a darker one. This way we will get the surface of the liquid inside and a more realistic look for the cocktail.
Cocktail Pattern Vector Images
Filters
of 44
Shutterstock logo
Click here to save 15% on all subscriptions and packs
> > Resources