Depict the elements inside the mushroom cap. Inside the previously drawn incomplete oval, you need to draw several straight lines of different lengths, as shown in the figure.
How to Draw Mushrooms
Hi! Welcome to another fun 10-step tutorial. Today, we are going to learn how to draw very fascinating creatures in nature: mushrooms!
Mushrooms are some of the most interesting things on the planet. They are a type of fungi and have a very unique life cycle. There are thousands of kinds of mushrooms and several kinds are edible! Some people even search for them in nature as a hobby.
Mushrooms break down organic matter for food supply, and they can provide humans with good sources of vitamins. One amazing thing about mushrooms is that some of them can glow in the dark! Apparently, some ancient people used to carry mushrooms at night as a source of light.
Pick out your favorite art materials and let’s get moving with this drawing. Let’s go!
How to Draw Mushrooms — Let’s get started!

- a piece of paper
- a pencil for the guiding lines and sketching
- an eraser
- a black sharpie or a pen for the outlines
- markers or colored pencils for coloring
- our printable drawing guide (Join my Email List below to get this Tutorial)
Get the FREE Printable Drawing Guide

Here are my RECOMMENDED Art Supplies!
- Crayola Coloring Set (140 Pieces – Mega Value!)
- 24 Colored Crayon Set
- A4 Printer Paper
- Crayola Coloring Pencils
- HP Home Printer with Instant Ink!
Time needed:
Step 1 – Draw the cap of the mushroom.
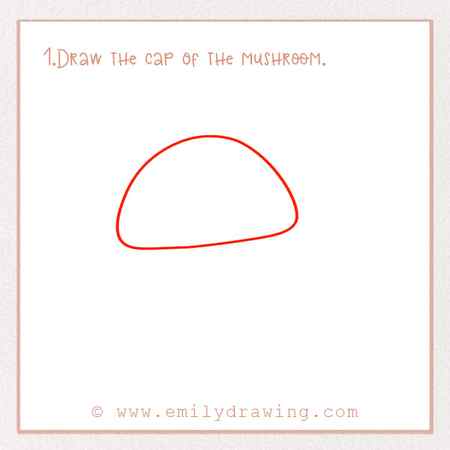
Let’s start this drawing by forming a mushroom cap, which acts sort of like an umbrella for the rest of the mushroom.
On the upper left of the page, draw a large rounded semicircle. Make it a bit tilted to the left! Check out the photo. It should take up about half of the page.
Step 2 – Draw the cap of the second mushroom.
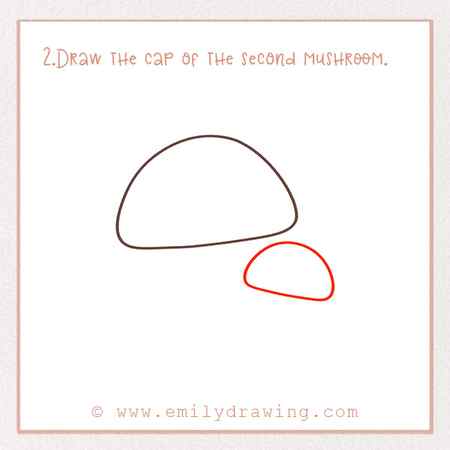
We are actually going to draw two mushrooms for this picture.
Below and to the right of the first mushroom, draw another smaller cap. It should be about one-third of the size of the first one.
Step 3 – Draw one mushroom stem.
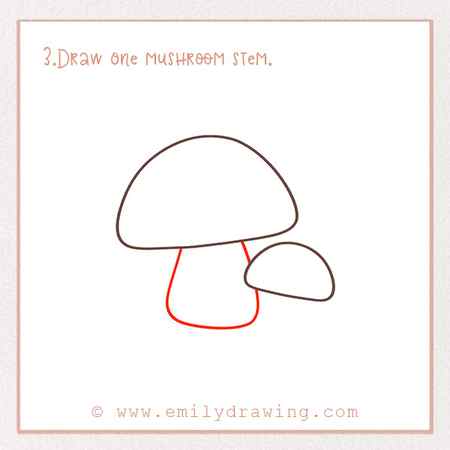
Let’s move back to the first mushroom. Mushrooms grow in a variety of places, but they always have a stem that the cap grows out of.
Below the first cap, draw a rounded rectangular stem. It should be fairly thick, since mushrooms have sturdy stems in real life. Check out the photo!
Step 4 – Draw the second mushroom stem.
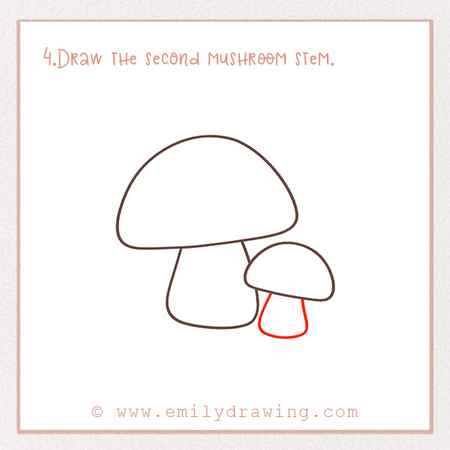
Let’s move back to the small mushroom. Make the same basic stem shape, just a little smaller.
Now we have the basic shape of both the mushrooms and can add more detail to them!
Step 5 – Draw spots on the big mushroom.
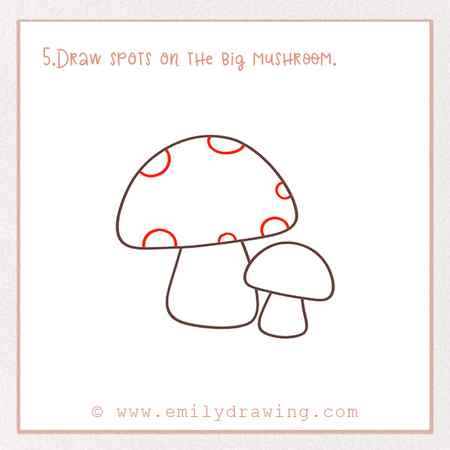
Next, let’s add some personality to the mushrooms. There are tons and tons of mushroom varieties on the planet, and many of them have spots on them.
So, on the big mushroom, let’s add some dots. Around the edges of the big mushroom caps, add some curved lines. These should look like cut off spots—we’ll add more in the next step!
Step 6 – Complete the spots.
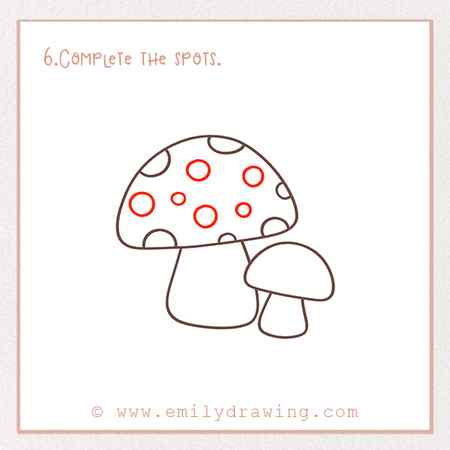
Let’s finish the pattern from step 5. Fill in the middle of the mushroom cap with smaller spots. Draw about six dots varying in size in the middle of the cap. Great job!
Step 7 – Add detail to the small cap.
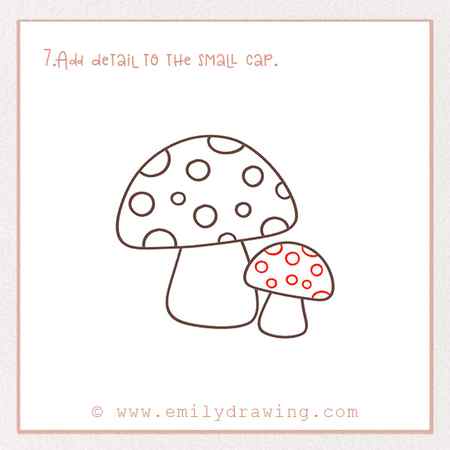
Now, let’s do the same thing to the smaller mushroom!
Just add some spots evenly throughout the small cap. It doesn’t have to be perfect. Check out the photo. Good job!
Step 8 – Add a cute face.
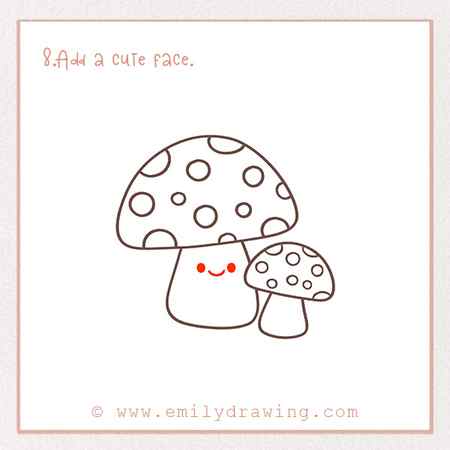
We always like our drawings to be super friendly looking. Let’s add smiley faces to our mushrooms!
Start with the bigger mushrooms. Draw two small dots about halfway up the stem for the eyes. Draw a small upward curve for a smile!
Step 9 – Add another smiley face.
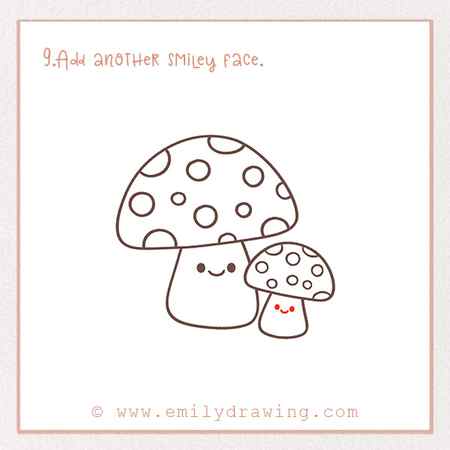
We need to add a face to the small mushroom next! On the stem, draw a small smiley face again. Now we have two happy mushrooms. We are almost done with this tutorial!
Step 10 – Color in your mushroom drawing!
Lastly, fill in your mushroom drawing with tons of color! Do your own thing with your favorite hues. Fill in the mushrooms and the background, too!
Pin it now, Draw later!

Thank you for finding and following along with this tutorial! We hope you enjoyed it as much as we did! Feel free to share this tutorial with others who you think might like it!
If you liked this drawing tutorial format, we’ve got tons more for you, including animals, plants, food, and more. Browse our site to find them! If you don’t see what you’re looking for, you can always suggest your idea to us!
How to Draw a Mushroom

We suggest you complete an interesting drawing lesson in which you will learn how to draw a mushroom step-by-step.
So, we are glad to offer you this fascinating and very useful drawing lesson, with which you will learn how to draw a mushroom step by step. This lesson consists of simple steps with a detailed description, which any aspiring artist and child can easily follow.
By learning how to draw a mushroom with the help of this instruction, you will be able to add this element to many of your paintings. For example, you can depict a mushroom against the background of a forest, a clearing, place it on a table while drawing a still life, and also draw it as the main object of the drawing.
This step-by-step guide will help you develop your artistic skills. Now you can prepare the materials you will need to complete this tutorial, and then follow my instructions carefully.
Time needed: 40 minutes
How to Draw a Mushroom

-
Draw the mushroom cap. To depict this element, you should draw one large arc, and then connect its lower ends with a curved line.
Add the inside of the cap and the stem of the mushroom. Depict an incomplete oval inside the previously drawn shape, and also add two curved lines, as shown in the figure.
Depict the elements inside the mushroom cap. Inside the previously drawn incomplete oval, you need to draw several straight lines of different lengths, as shown in the figure.
Sketch out the grass and earth to the bottom of the mushroom. Next to the previously drawn legs of the mushroom, depict several pointed blades of grass, as well as stones, using curved lines.
Erase extra lines. Use the eraser to remove any unnecessary guidelines from the drawing.
Color the drawing. To color this mushroom, I recommend that you use different shades of brown, shades of gray, and also green.
You did a great work, and now you know how to draw a mushroom step by step. Leave your comment, so we know if you enjoyed this tutorial. You can also offer your ideas for future drawing lessons.


