The left column represents the First method (dab and sprinkle) and the right column represents the Second method (mix then apply). As you can see, we’ve got some radically different snow effects.
How to Make Sparkle Snow Texture Balls
Learn How to Make Sparkle Snow Texture Balls in two steps with less than 5 supplies. These gorgeous snowballs are great for decorating your home for the holiday seasons.
Disclosure: I am a member of the FloraCraft® Make It Fun team. I received compensation and product for this post. All ideas and opinions are 100% my own.
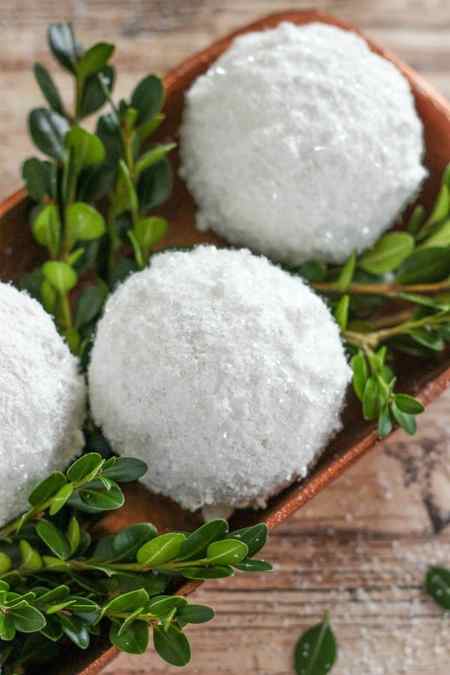
Hello there! Today, I am excited to share How to Make Sparkle Snow Texture Balls perfect for your holiday decor. These snowballs can be displayed on a mantel, inside a hurricane vase, used as an ornament for the tree, and so much more. This super easy craft can be done in 5 minutes with just 2 simple steps and less than 5 craft supplies. These snowballs were inspired by the Make It fun Crafts Holiday E-Book. I love how simple and elegant the snowballs are and the possibilities for decorating are endless.

Supplies (affiliate links):
Instructions:
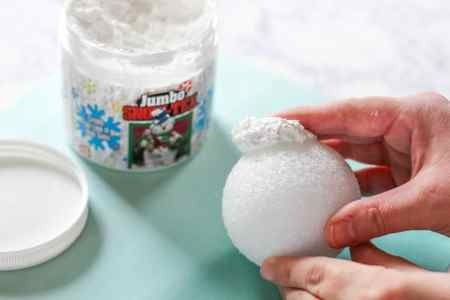
I started by applying a thick layer of Snow-Tex using my hands covering the entire foam ball surface. The Snow-Tex gives the look of a real snow effect.
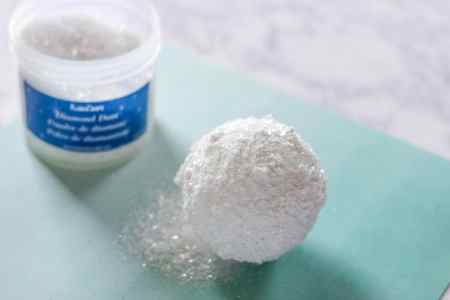
While the Snow-Tex is still wet sprinkle FloraCraft® Make It: Fun® Diamond Dust over the entire surface and shake off the excess. Diamond Dust adds a bright glitter to the snowballs.

I placed wood skewers into the wet snowballs, place in a jar, and let dry completely. You can remove the skewers once the Snow-Tex is dry.
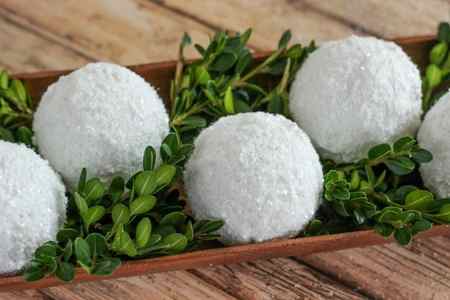
I used the snow texture balls in a centerpiece I made with boxwood cuttings. I have several boxwood bushes in my front yard and love to use them in my winter crafts like this wreath. They are beautiful holiday greenery. I recently bought this copper tray for my dining table and it looks fabulous with the greenery and snowballs.

I hope this tutorial on How to Make Sparkle Snow Texture Balls was helpful. For more craft ideas, check out Make It Fun Holiday E-Book HERE.
You can find a complete list of DIY crafts on the blog HERE.
YOU MIGHT ALSO LIKE:
Ways to produce a snow texture

This is a Guest Post by misterjustin
When I first decided to post about snow basing, there were a few scattered tutorials out there, but not a lot of step-by-step guides. Now there seems to be a glut of them. Rather than scrap my plan altogether, I decided to take a look at eight different ways to make snow. My goal is to show what a couple of material combinations can create without any additional tricks. To that end, I’ve used eight plastic bases that are unprimed and won’t have anything on them other than the snow mix.
The materials I’ve used:
PVA (white glue)
Water Effects
Sodium Bicarbonate (baking soda)
Soft Flake Snow (from Woodland Scenics)
“Water Effects” and “modeling snow” are available from a variety of manufacturers. I’ve used a number of brands of “snow” and out of all of them, the stuff made by Woodland Scenics is my personal favorite. It also happens to be what comes in the Secret Weapon winter scenery kit which means I have a ton of the stuff lying around that I can use.
There are two basic ways to add “snow” to your base.
First Method:
Dabbing the adhesive (PVA or Water Effects) onto the base and then sprinkling the snow material (bicarbonate or modeling snow) on top.

(PVA and bicarbonate)
Moving left to right starting on top, you can see I added the PVA, spread it out to cover the snowy part of the base, added liberal amount of bicarbonate and then shook the loose material off.
Second Method:
Mix the adhesive (PVA or Water Effects) and the snow material (bicarbonate or modeling snow) prior to applying it to the base.

(PVA and bicarbonate)
The mix ratio is really a matter of preference. If you want it to look a bit more wet, then use more PVA. Some people choose add a bit of off white paint to the mix for shading, but it’s not something I do with mine.
The end results:
These two methods will cover you 99.9999999% of the time. You’ll find a whole host of tutorials and opinions on how to apply it and which is best, so it’s worth looking around to see what you like the most.
Let’s look at our results.

The left column represents the First method (dab and sprinkle) and the right column represents the Second method (mix then apply). As you can see, we’ve got some radically different snow effects.
The First Method: Dab and Sprinkle

(A) PVA and bicarbonate
The easiest and least expensive application out there. A decent effect for large numbers of infantry.
(C) PVA and modeling snow
An excellent way to create ice and slush effects.
(E) Water Effects and bicarbonate
In my opinion. not the best result.
(G) Water Effects and modeling snow
An easy way to create slushy, recently fallen snow. This is also a nice touch if you’re doing a diorama and want to add snow to vehicle tracks and footprints.
The Second Method: Mix then apply

(B) PVA and bicarbonate
An overall easy and effective application. This is by far the most common way to apply snow to models.
(D) PVA and modeling snow
The end result is very similar to bicarbonate, but the effect is a lot cooler and has a more muted finish. Modeling snow also has a more realistic crystal effect due to the nature of the product.
(F) Water Effects and bicarbonate
The nice thing about working with Water Effects is that you can actually sculpt it to a degree and create drifts and impressions. With the bicarbonate, you lose some detail but you can fix that by sprinkling additional bicarbonate over the mix while it’s drying and blow off the excess.
(G) Water Effects and modeling snow
This is my personal favorite. This creates a cold, wet looking snow that is hard to beat. You can sculpt the Water Effects and if the result is too wet you can sprinkle some more modeling snow over the mix while it’s drying and blow off the excess.
And there you have it, eight different ways to create snow for entirely different effects. These techniques can easily be added to your base or scene and you can even combine more than one technique to create a variety of looks on the same base.

I’ll vouch for the First Method (A). Nothing more than simple white glue and the snow from Gale Force 9. I used it on my Skulltaker conversion a while ago with great results. – Ron
If you’ve got any questions about something in this post, shoot me a comment and I’ll be glad to answer. Make sure to share your hobby tips and thoughts in the comments below!